How to Build a CRM with Budibase
Building a CRM is one of the most common custom software projects you’re likely to encounter.
See, every customer-facing business needs a repeatable way to manage relationships with current, potential, and previous clients.
The trouble is that the market here is so thoroughly cornered by a handful of big players - like SalesForce, Dynamics365, HubSpot, and others.
This creates two potential problems. First, with such market dominance, these vendors can often present comparatively high recurring licenses.
Second, with an off-the-shelf solution, there’s no guarantee that the capabilities on offer will be a good fit for your specific requirements. In other words, you risk paying for features you don’t need or being forced to make do without features that you do need.
The relative benefits and costs to build a CRM system that matches your distinct business processes can make this a much more attractive option.
Today, we’re looking at an alternative approach, as we explore how to build a lightweight, custom CRM system from scratch using Budibase.
Let’s jump right in.
How to build a CRM in 6 steps
We’ll kick off by outlining what exactly we want to build. It’s worth pausing for a second and reflecting on what a CRM is. In practice, there is a huge range of different types of CRM systems - aimed at distinct use cases and market segments.
But when we zoom out a little bit, the core purpose is quite simple.
CRMs are tools that help us manage and leverage customer data. Ultimately, the goal is to give our marketing and sales team members a clear, accessible picture of our customer’s journey as they interact with different channels and assets.
Therefore, the more closely your CRM’s design matches your real-world sales processes, the better - so we may turn to the development of a custom CRM solution.
The tool we’re going to teach you to build is based around a purchasing journey with three distinct phases:
- New leads - potential customers who have reached out to our sales team.
- Opportunities - leads that have been contacted and verified by our sales team.
- Customers - Sales that have been completed.
Each of these will have its own dedicated UI - with full CRUD functionality and customizable analytics to display customer reports.
On top of this, we’re going to build an embeddable lead capture form that automatically categorizes leads and notifies our team. We’ll also add a customizable analytics dashboard for breaking down our data by lead status and channel.
By the end of this guide, you can have a fully functioning custom CRM that you can connect to just about any customer data source you’d ever want to.
Without further ado, let’s build a custom CRM.
1. Create a Budibase app and connect your data
The first thing we’re going to need to do is create a new Budibase application and give it a name.
We’ll call ours CRM:
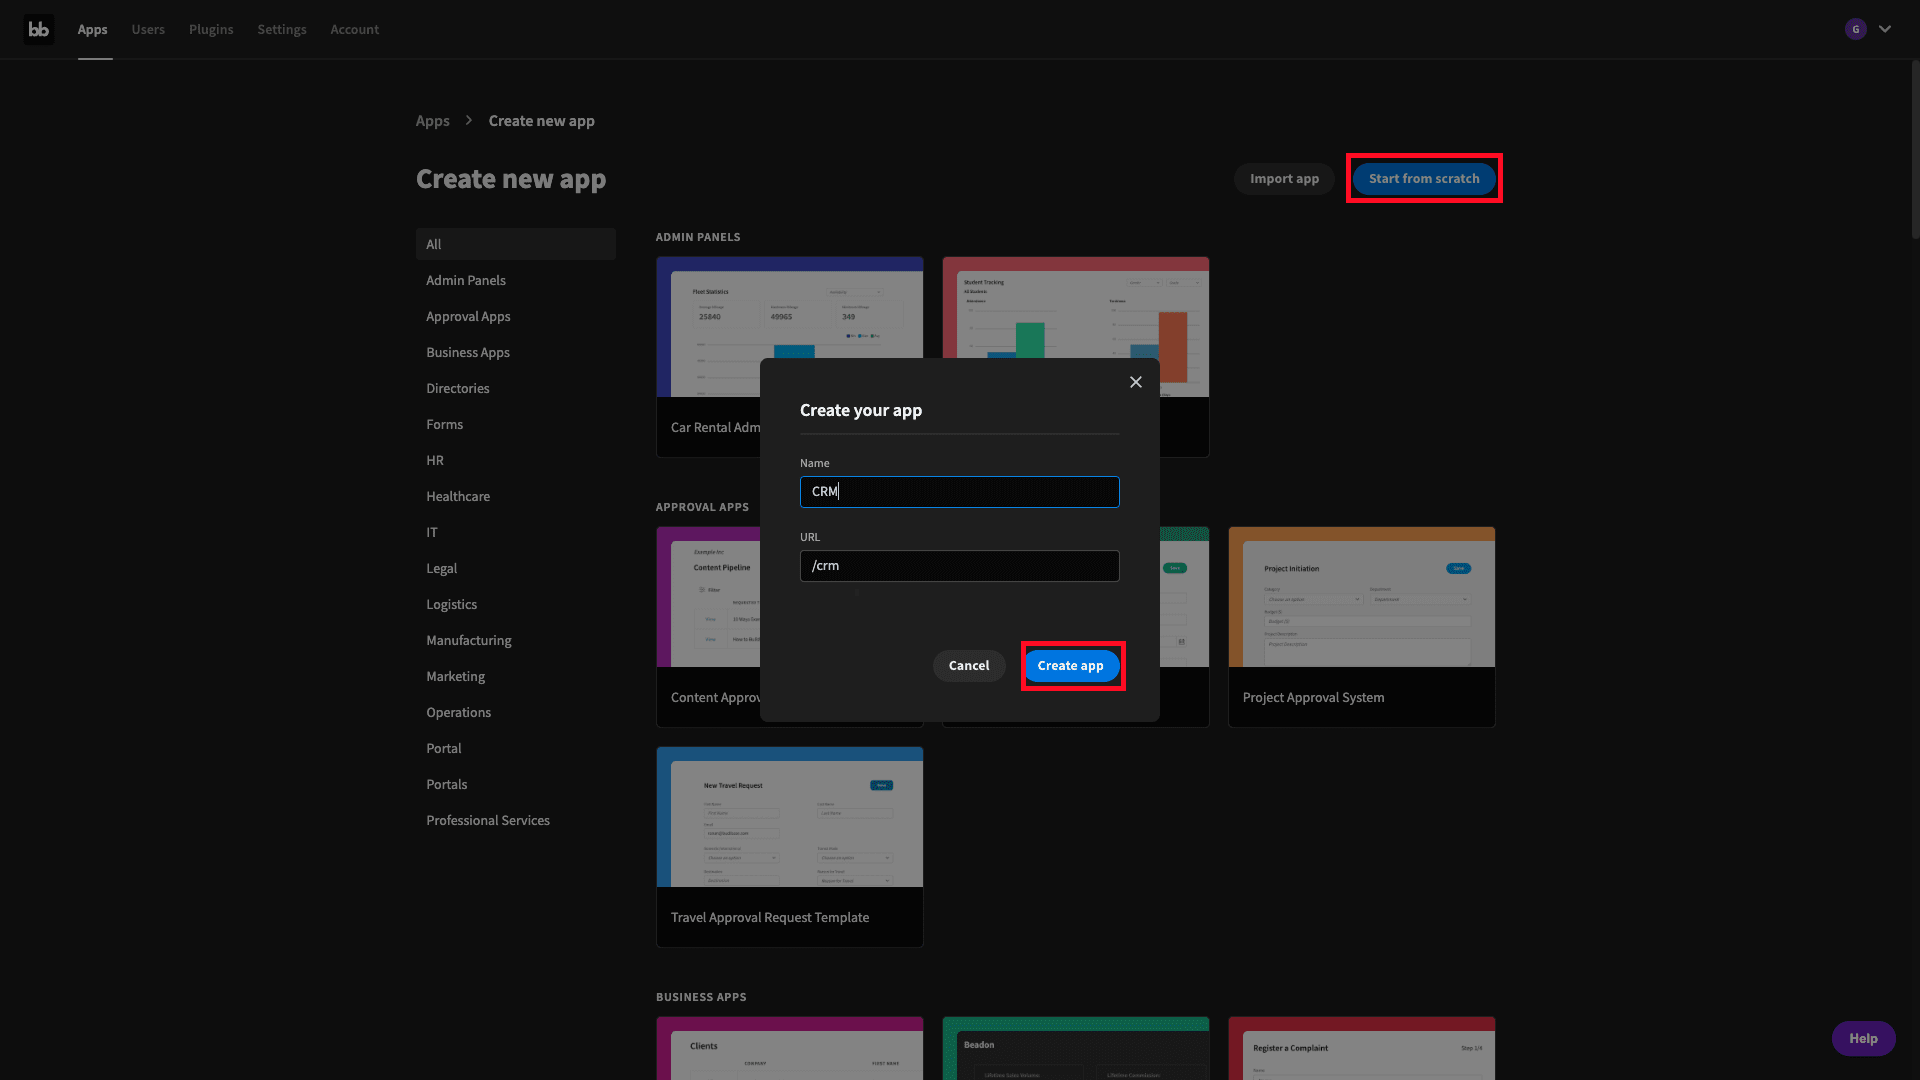
This will also populate the URL slug that can be used to access our application - although we could edit that if we wanted to.
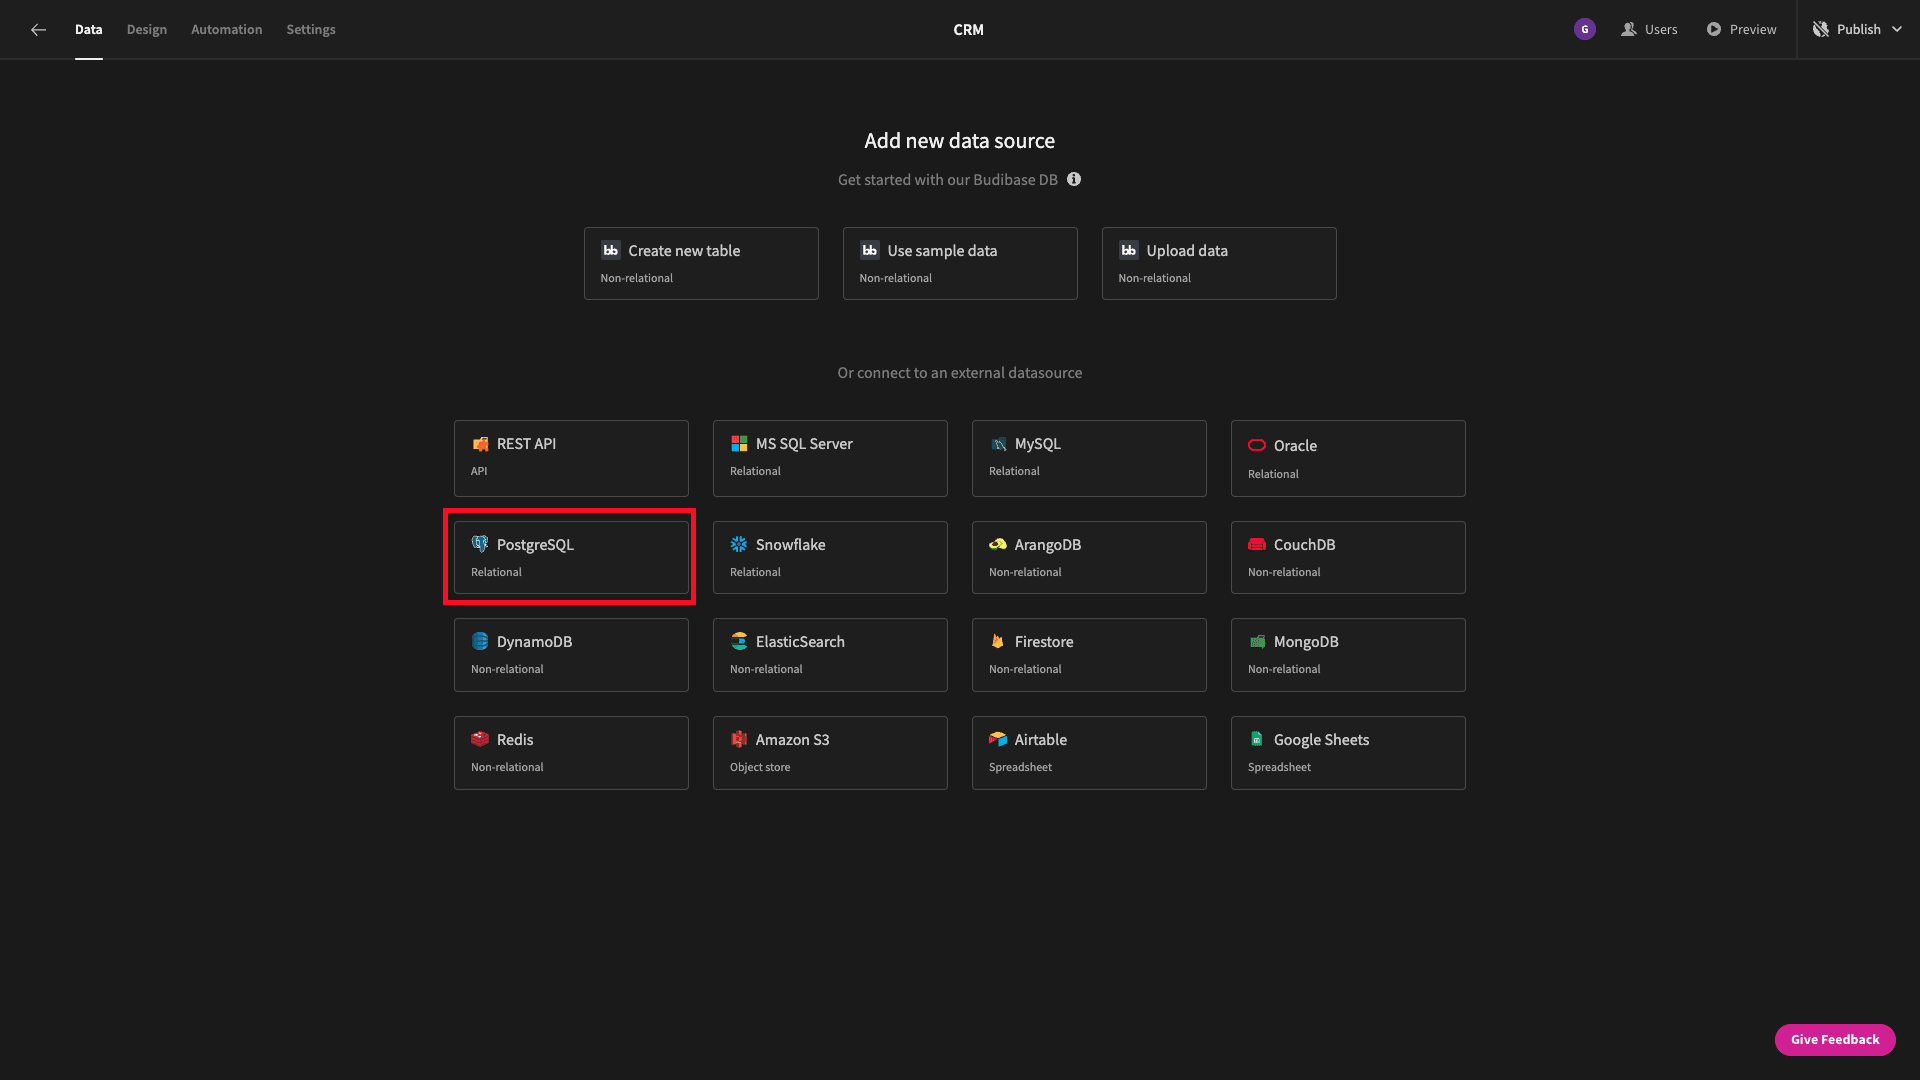
Next, we’ll be prompted to choose a data source. Budibase offers a huge range of options here, to suit wherever your customer data is currently stored.
We’re going to use Postgres for our demo app:
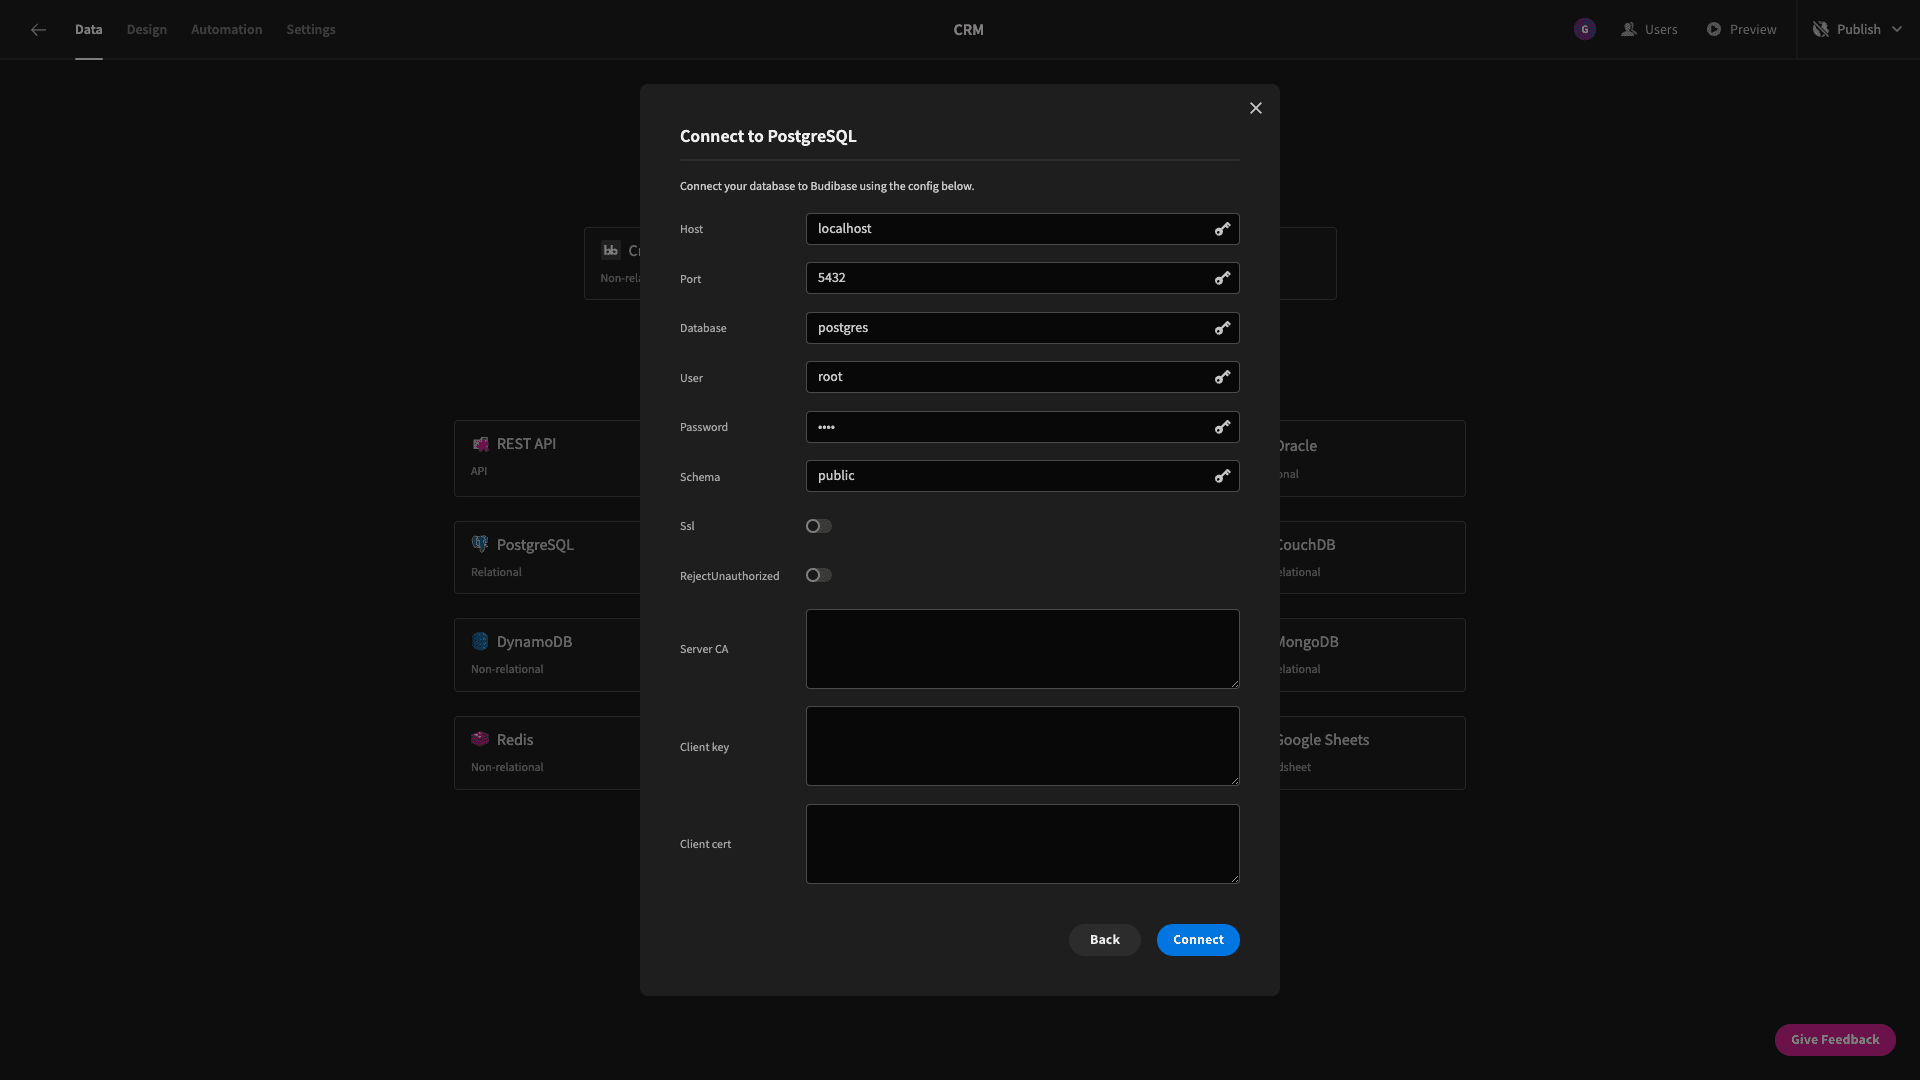
When we click through here, we’ll be prompted to add our database credentials:
Then, Budibase will ask us which specific tables within our Postgres schema we want to fetch so that we can manipulate them within our CRM app. Our existing customer database actually has quite a few tables that we don’t need - but we could leverage them if we needed more advanced CRM features.
We want to create a fully operational CRM around online sales - but we could just as easily add in some customer satisfaction metrics into our data model.
We’re only going to select and fetch two:
- contacts - which stores information about the users who have completed our contact sales form, along with their subsequent interactions with our team.
- companies - which stores information about companies that might be related to these users.
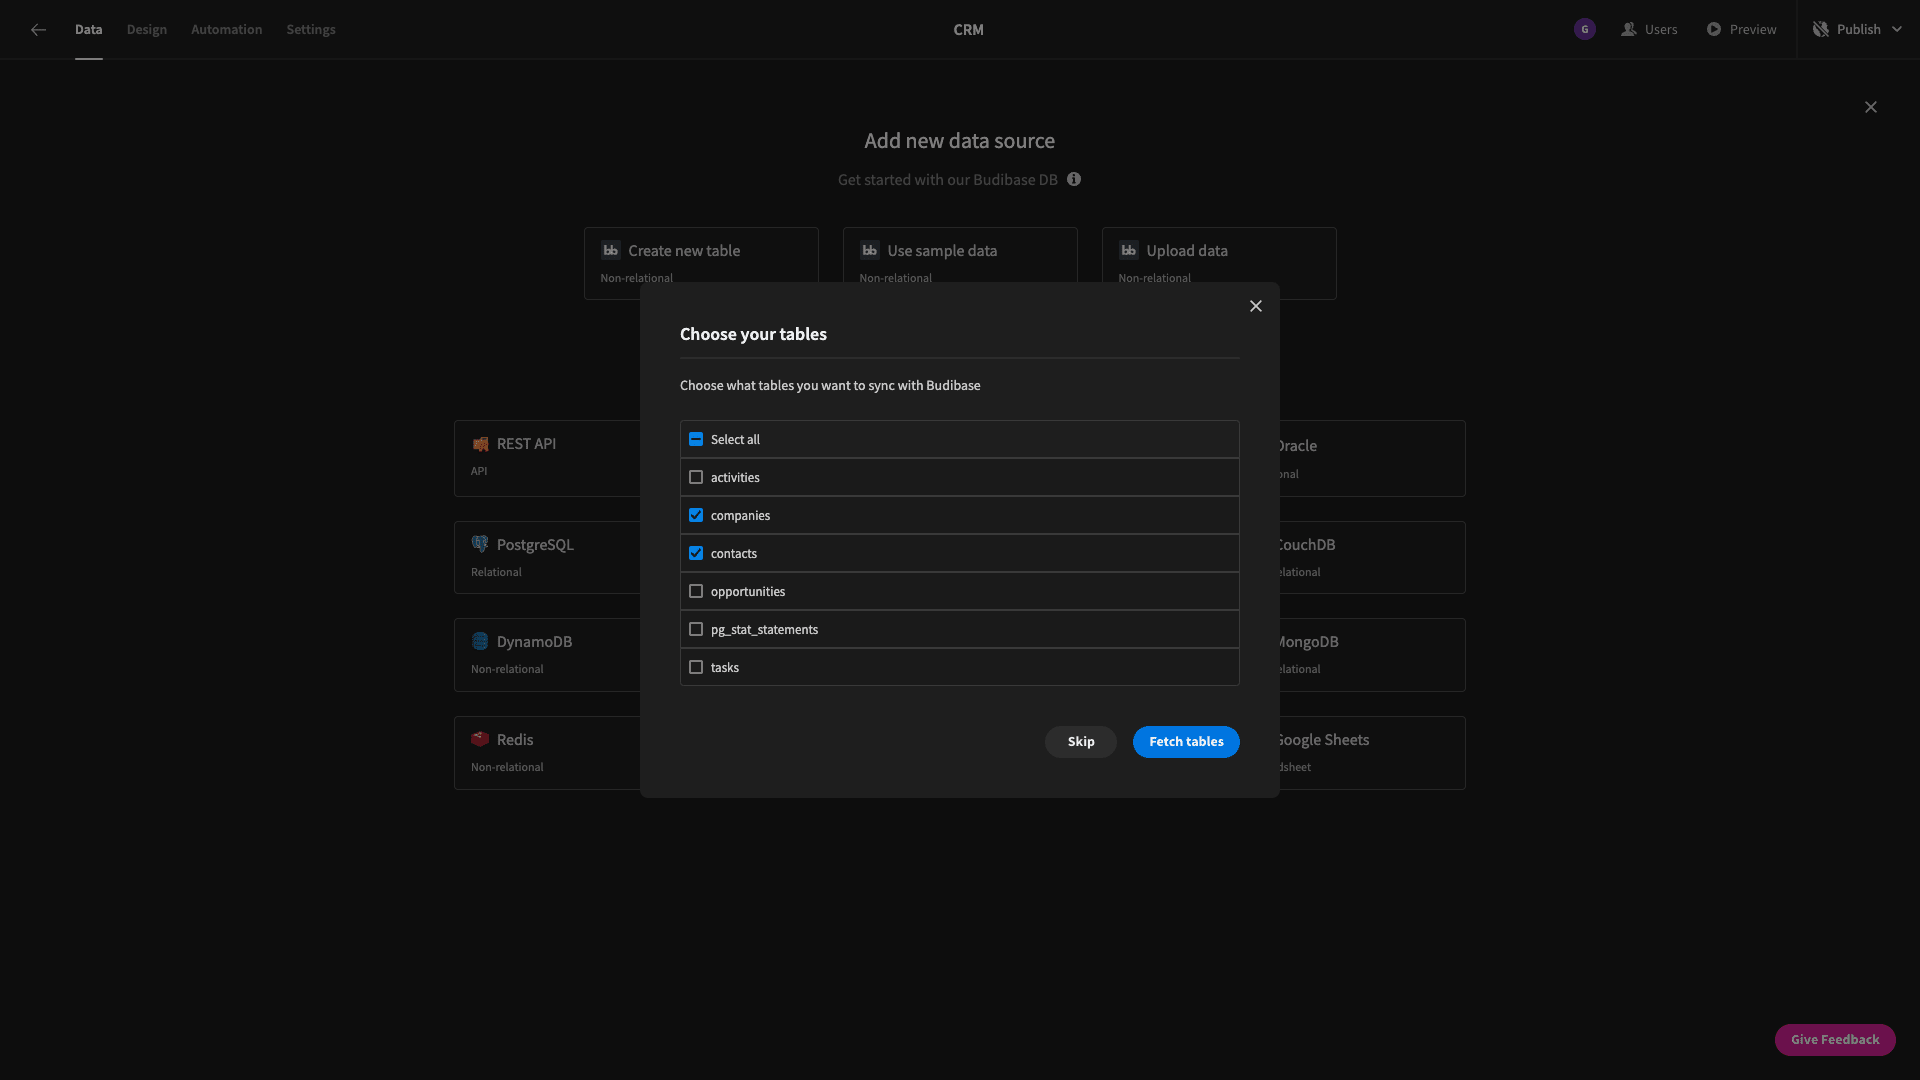
Having fetched these, we already have full CRUD functionality in Budibase’s backend data UI, using our editable tables:
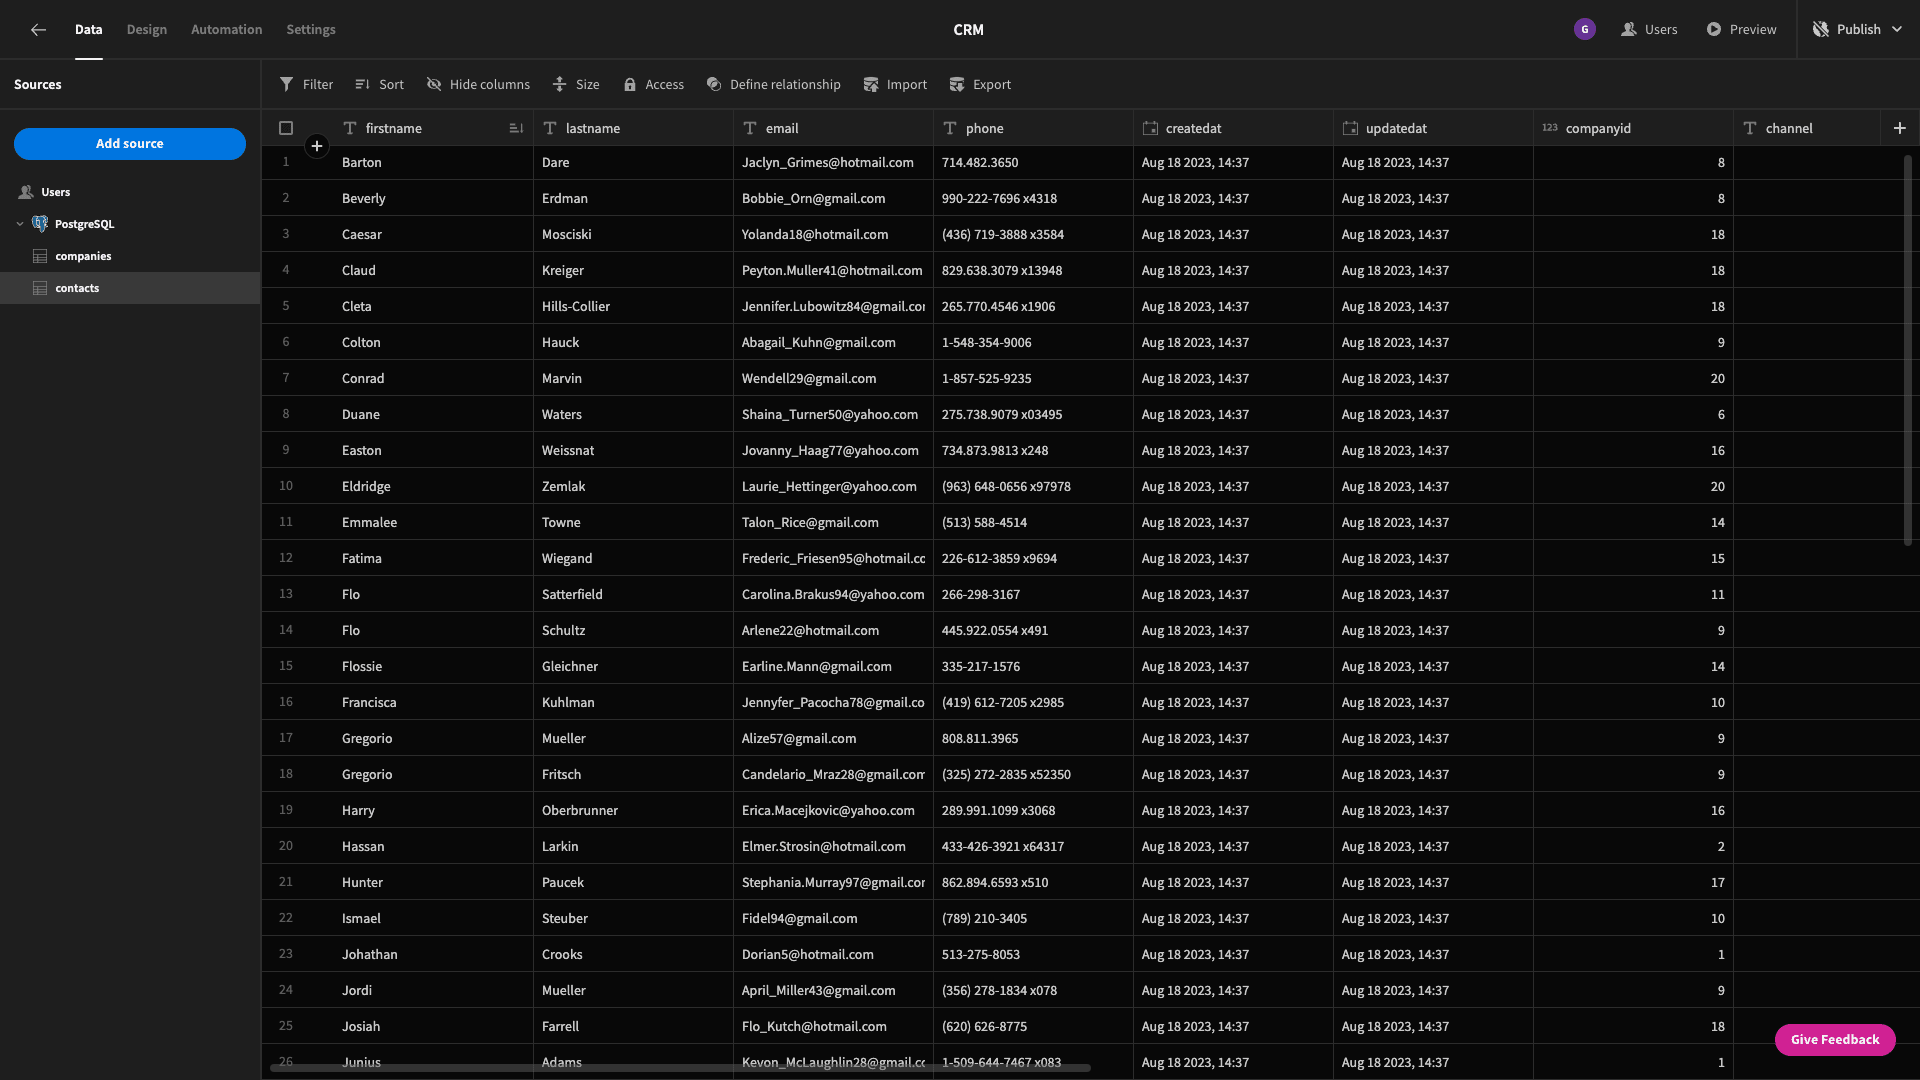
But, before we move on to building front-end interfaces for our users, we want to make a couple of adjustments to the data model that’s been imported.
First, the contacts table has a status attribute.
In Postgres, this is treated as a string, but when users interact with our CRM data, we only want them to have a fixed set of options - since the status of a contact is ultimately what denotes its current stage in the purchase process -in real-time.
To achieve this, we’ll hit the three dots icon beside the status attribute and choose edit column. Then, we can change its type to options and populate the choices we want to offer to users.
We can even color-code each one.
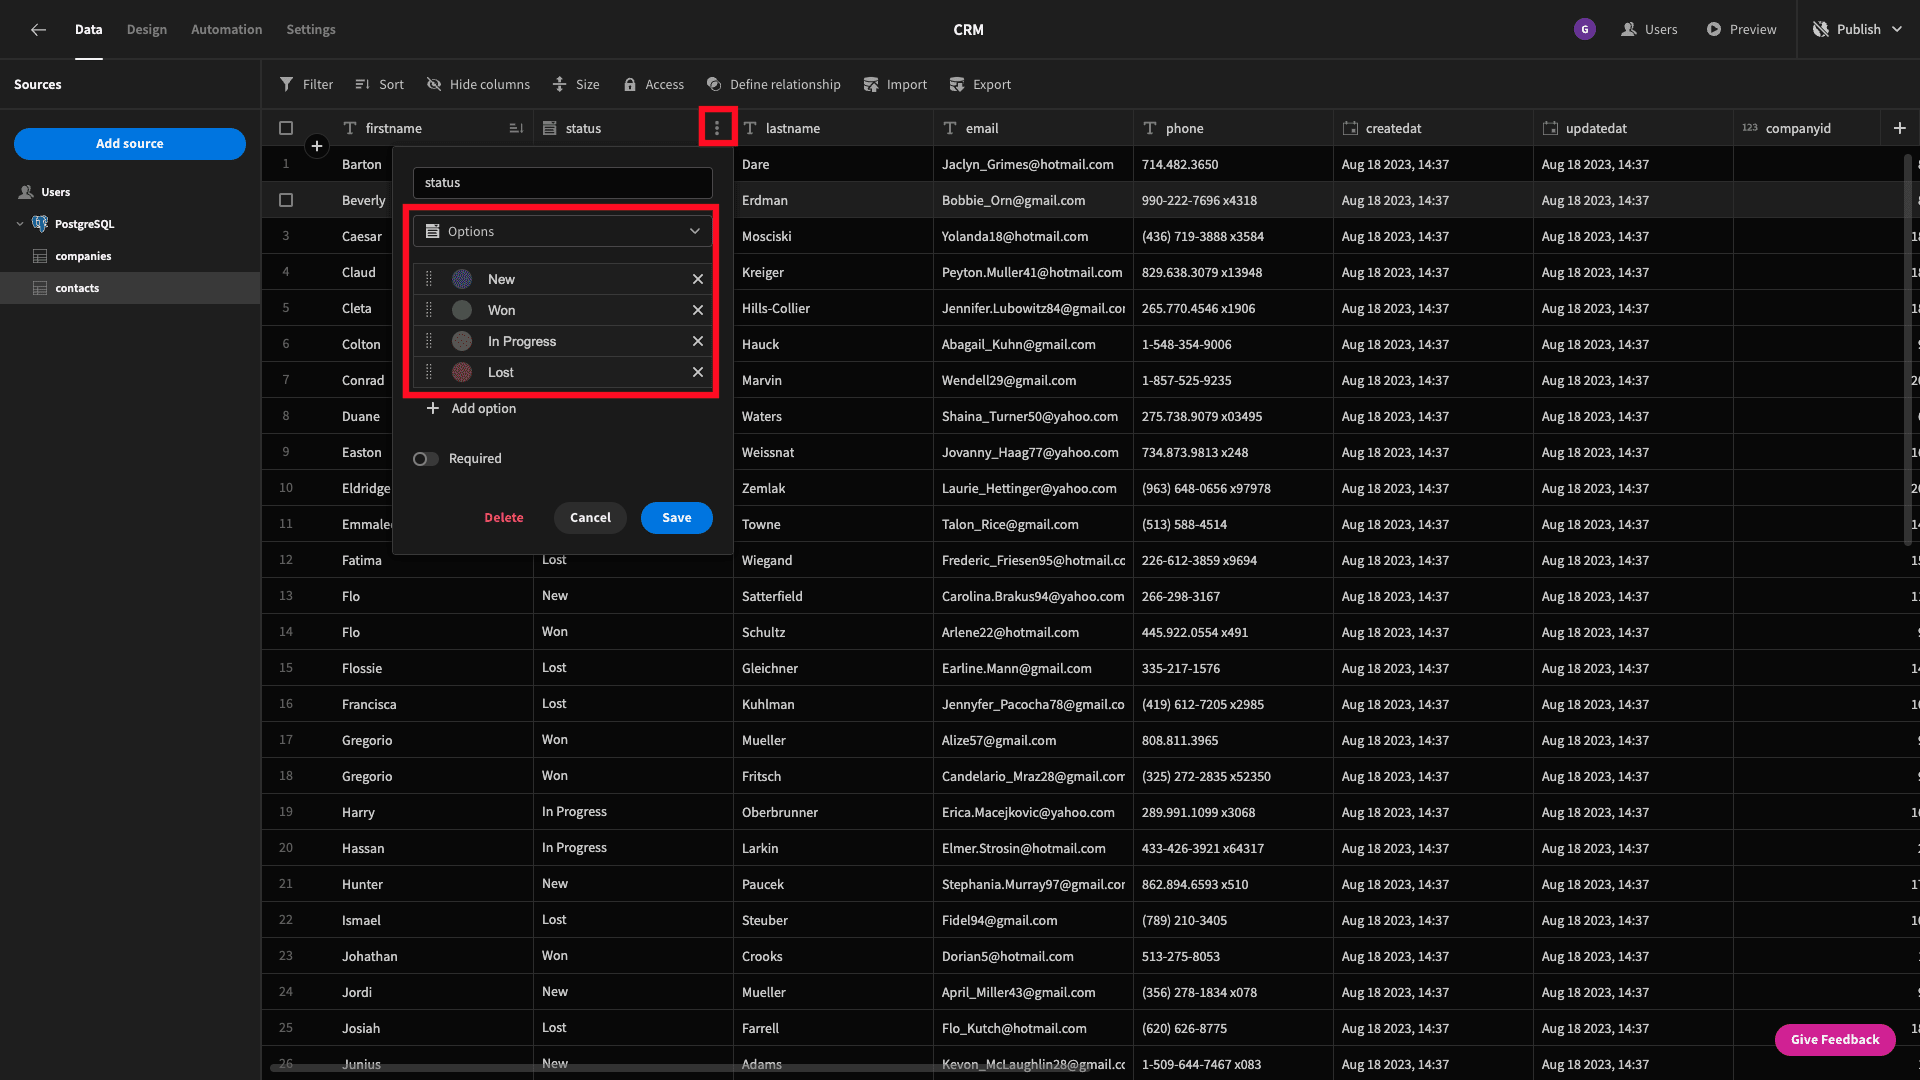
Now our table looks like this:
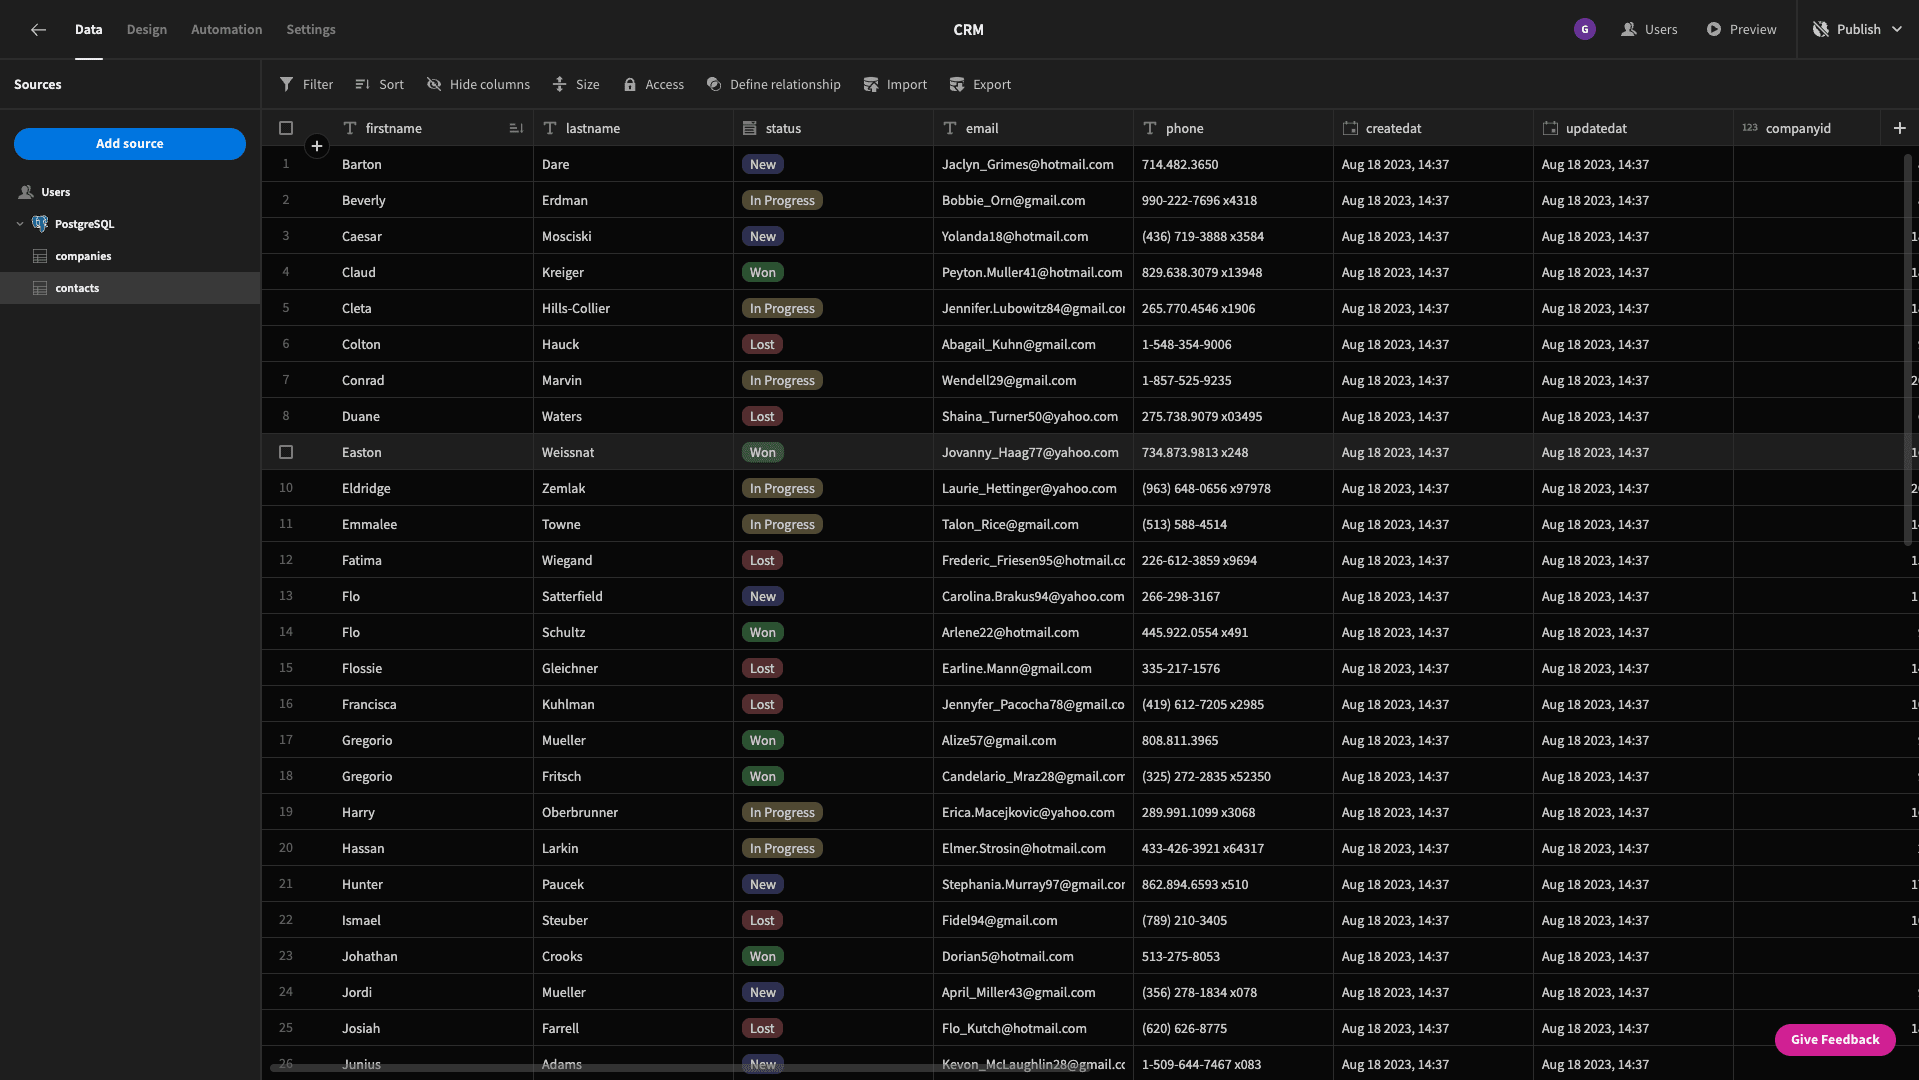
The second thing we need to do is define the relationship between our companies and contacts tables. Each one already has a unique ID column, which we can use as our primary and foreign keys.
We’re going to create a relationship where one companies row can be related to many contacts rows.
We’ll start by heading to the companies data tab and hitting define relationship. Then, we’ll use the following configuration to create a one to many relationship, linking the two tables on the companyId attribute:
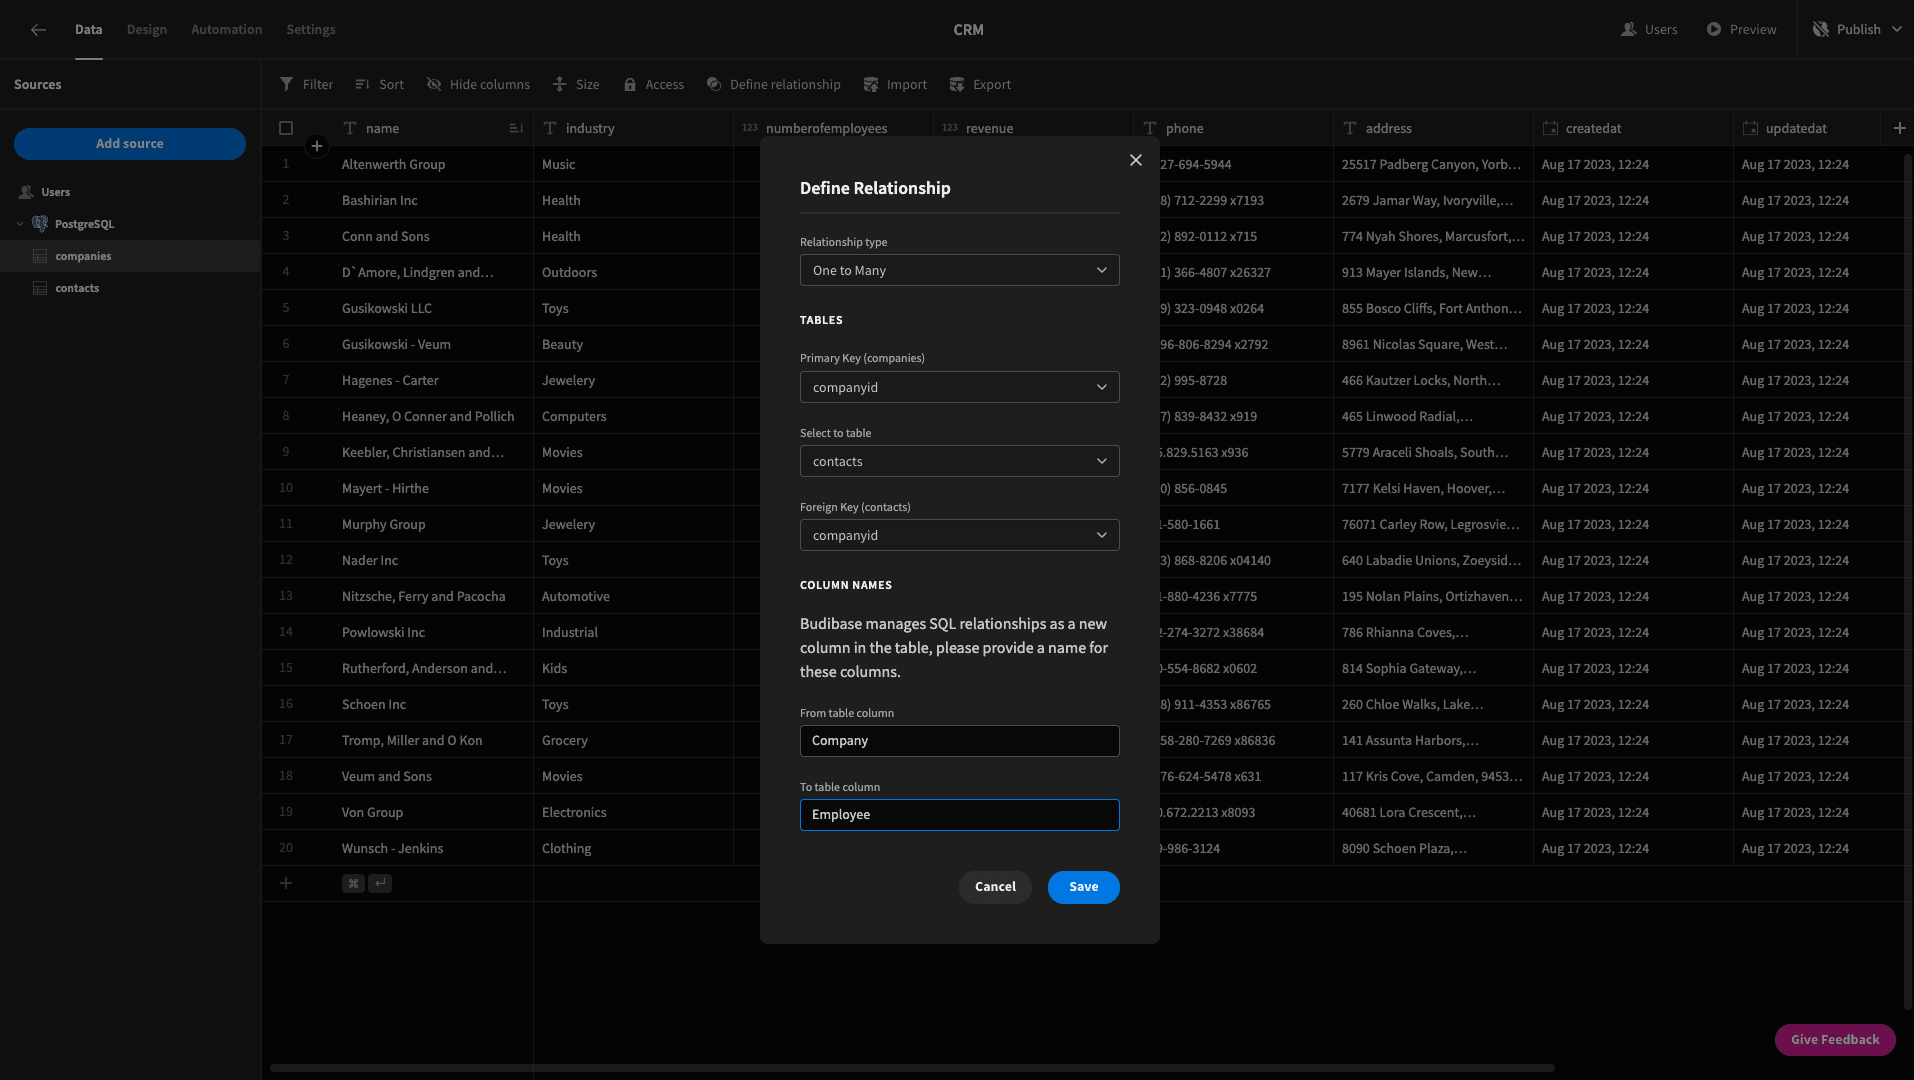
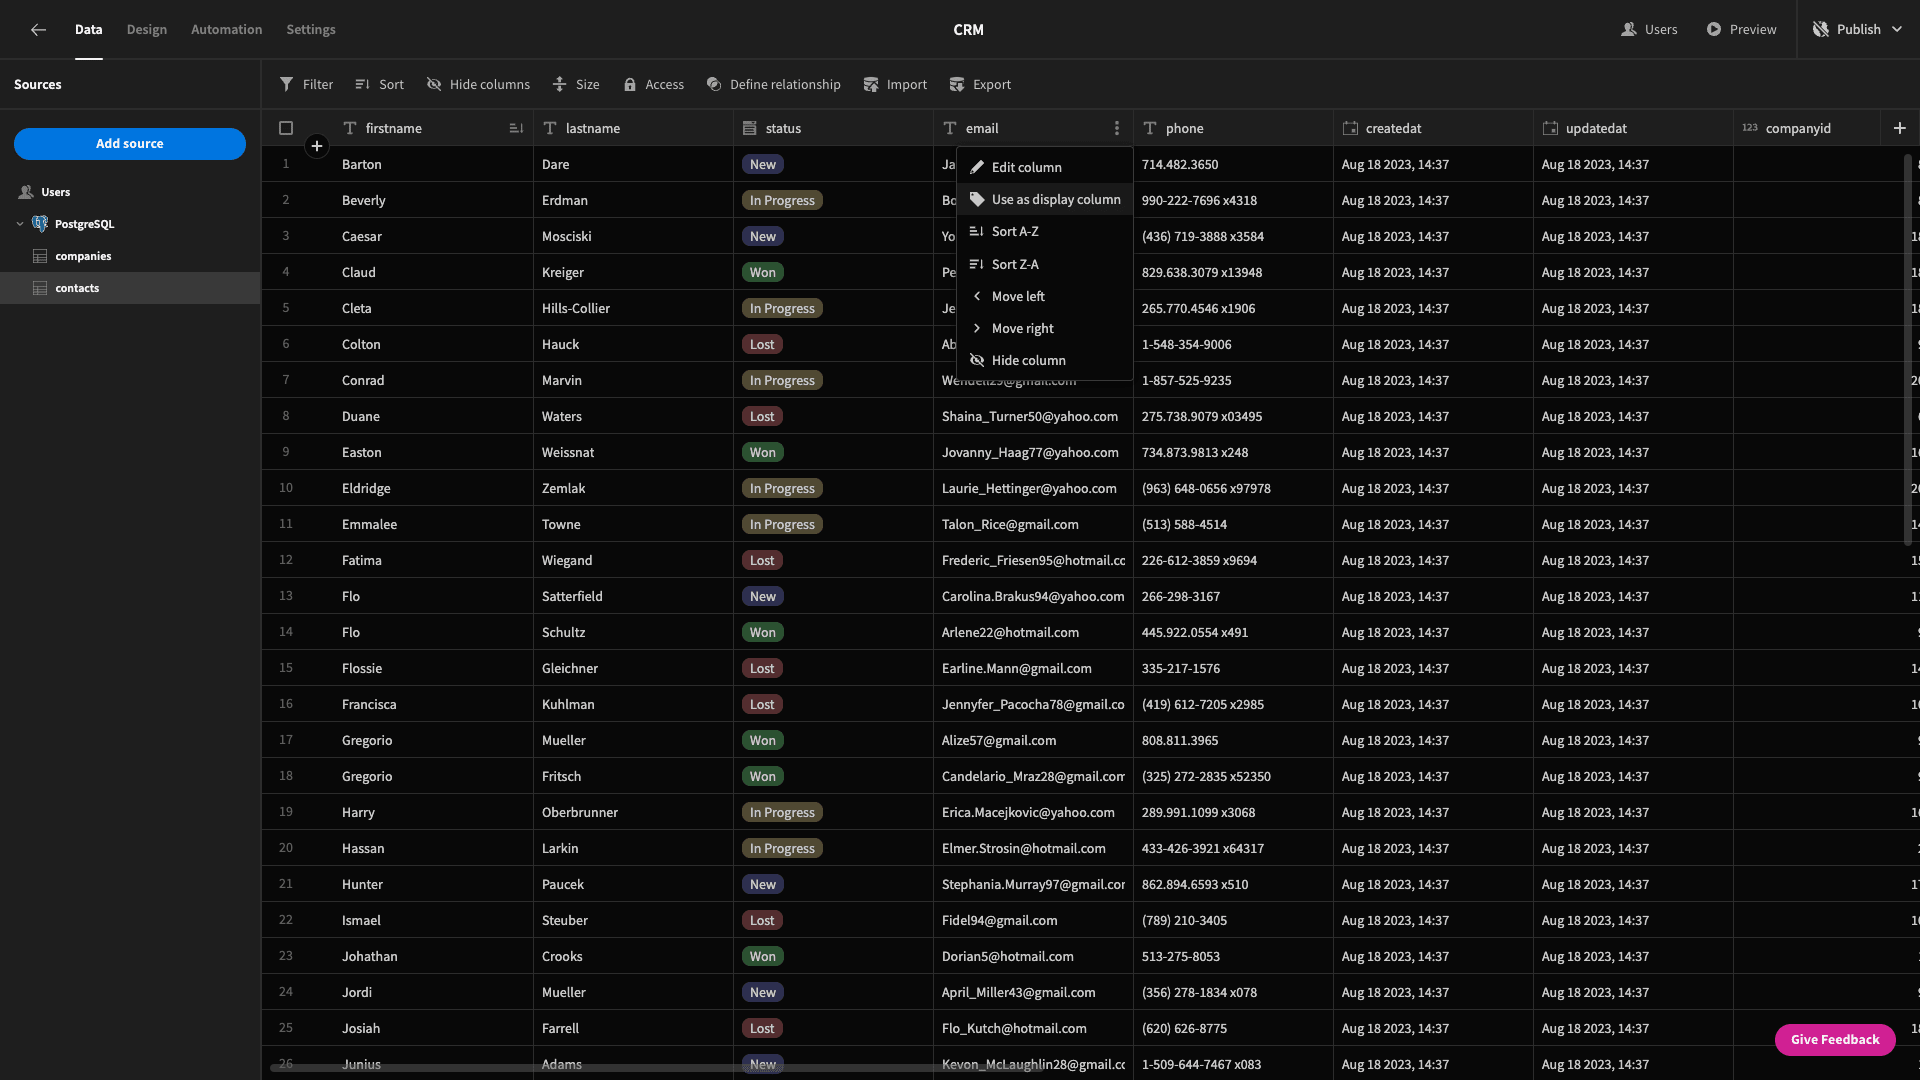
Finally, we can choose which attribute in each table we want to use to represent rows in the other table. This is what’s called the display column. For instance, Under each companies row, we’d like any linked contacts rows to show up as the customer’s email address.
Head back to the contacts table - and beside the email attribute, hit the three dots and select use as display column:
Now our two basic data tables are ready and we can start building interfaces.
2. Build an opportunities screen
The first screen we’re going to build is where we’ll handle our opportunities. Remember, these are the leads that are currently in progress.
Here’s what the completed UI will look like in-situ:
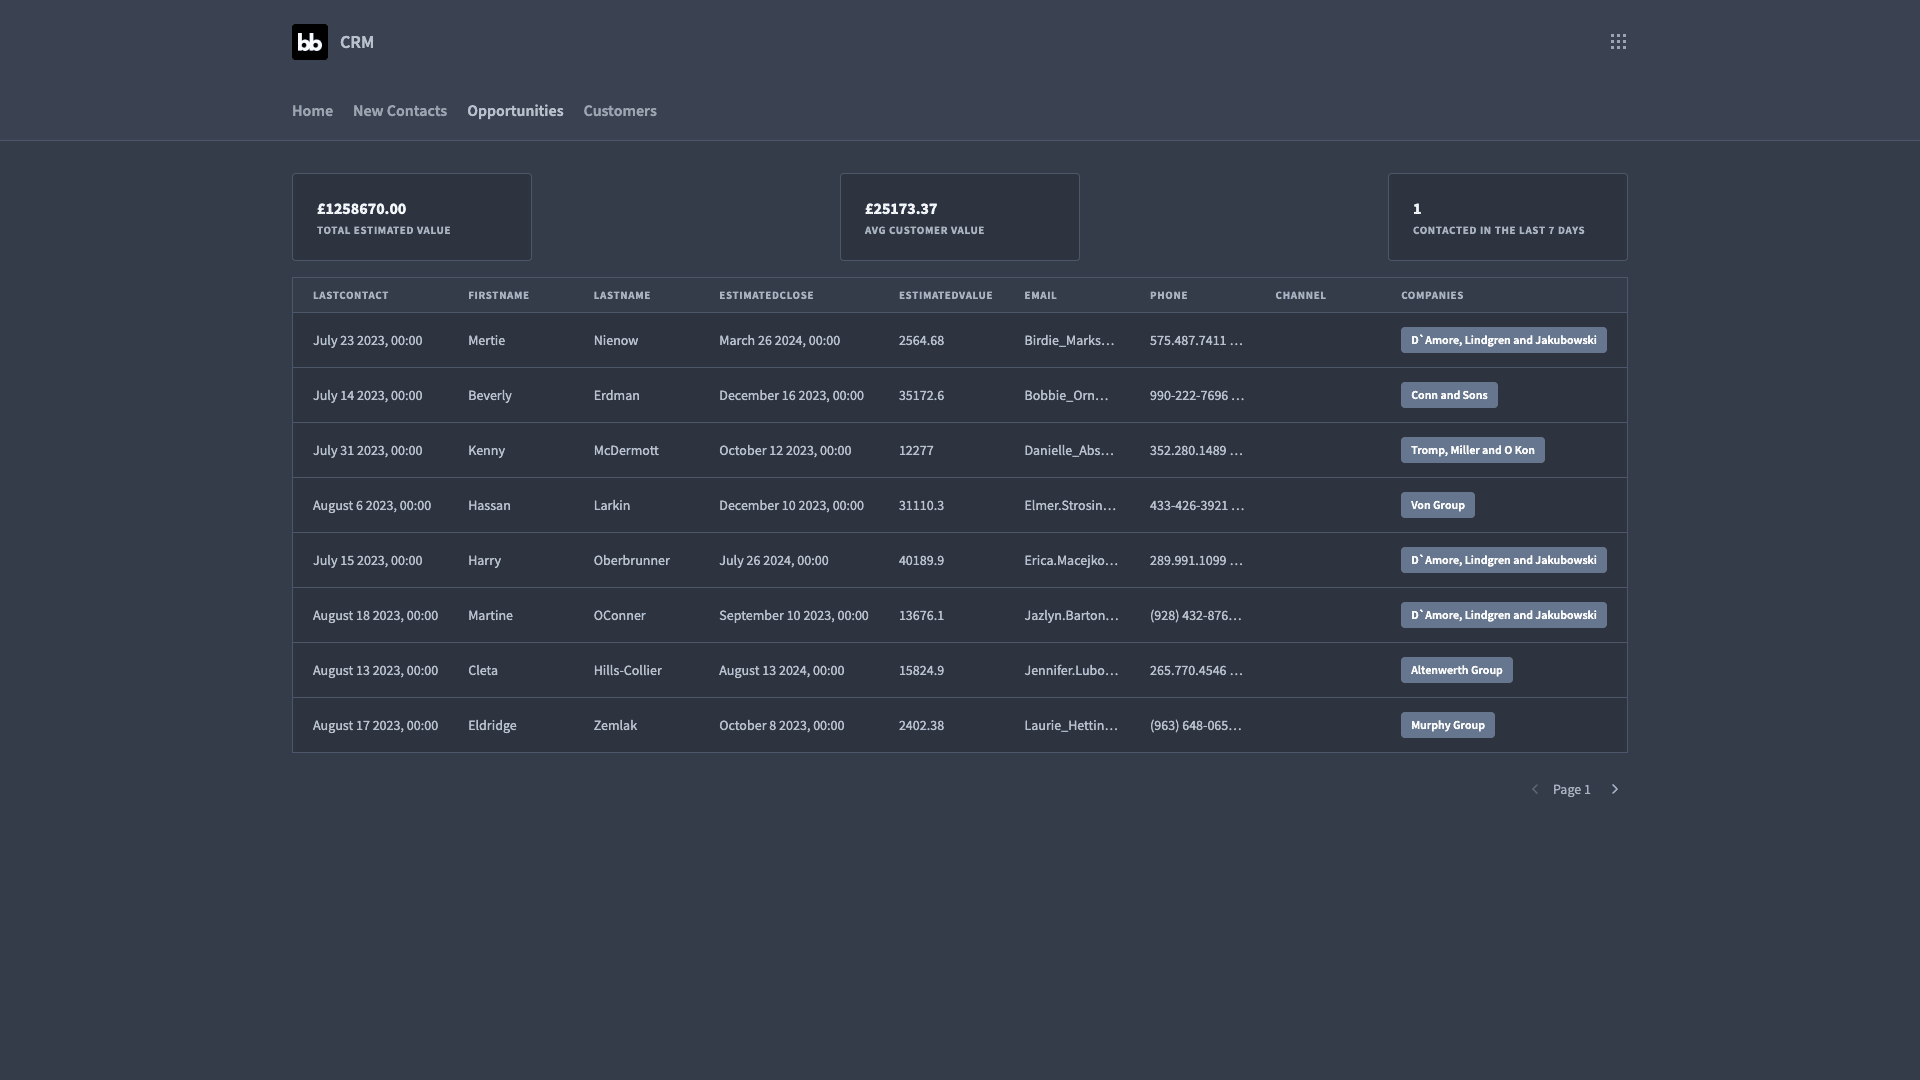
As you can see, the screen has two main sections:
- Three cards that give summary information about our opportunities pipeline.
- A table that lets us view and edit details of individual opportunities.
We’ll start by adding a blank screen in the design section and calling it Opportunities.

Building our data table
Next, we’ll click add component to add a table block component and set its data to contacts:
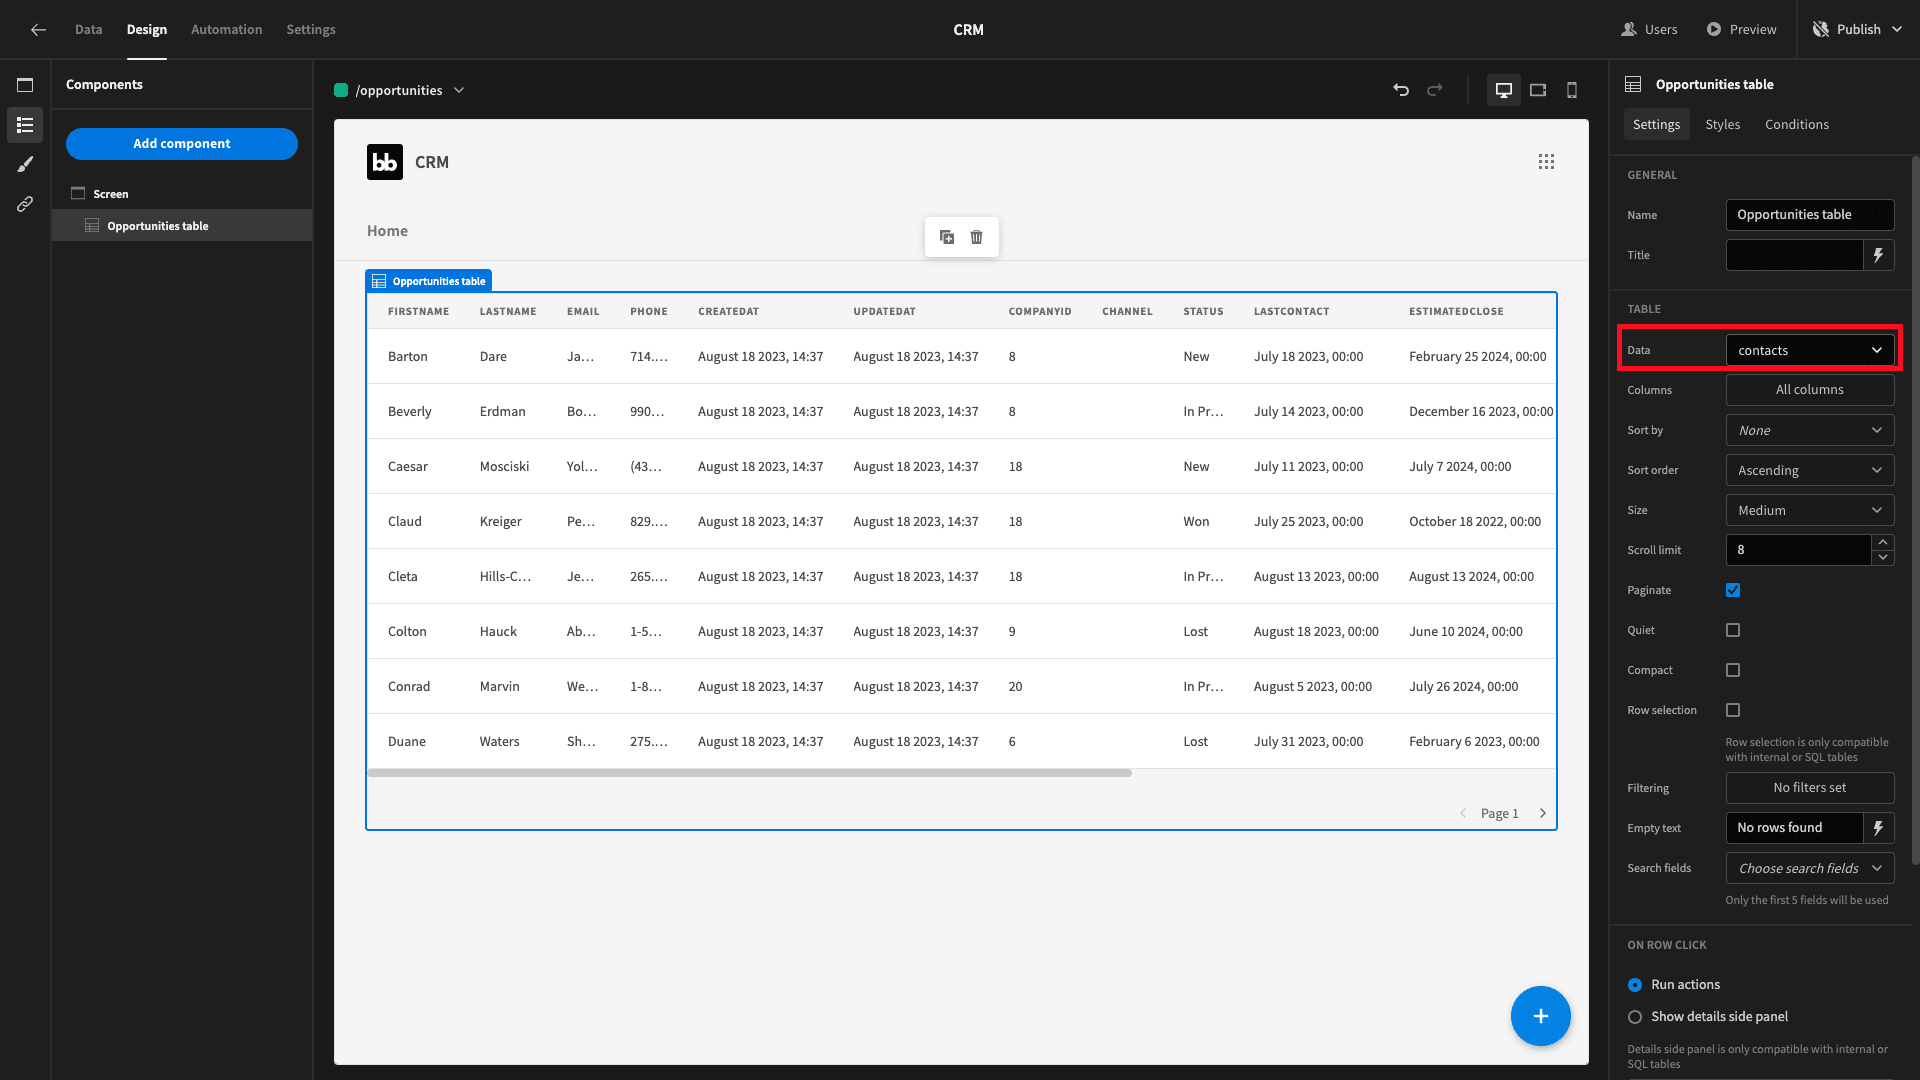
We also want to add a filter, so that this table only shows the rows with a status attribute that equals In Progress:

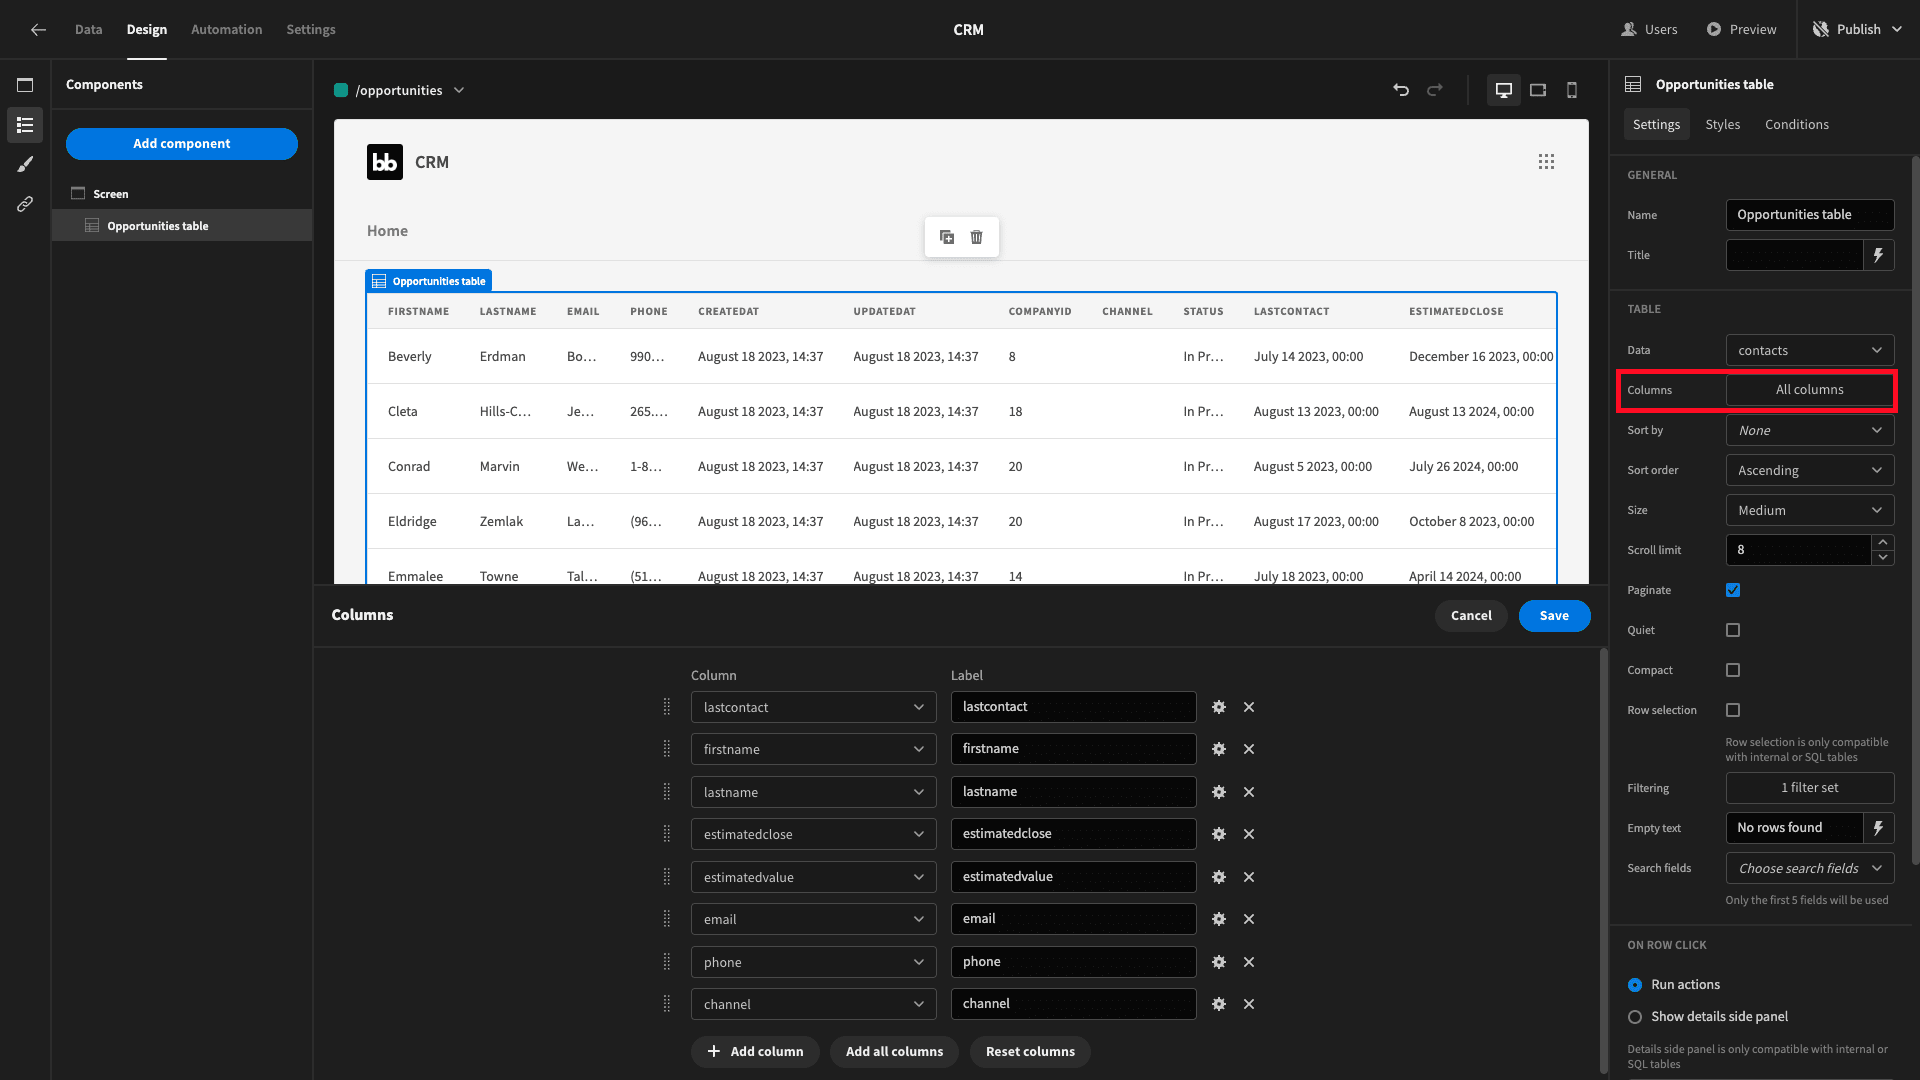
Now, our table displays the right rows, but it’s a bit overwhelming. We want to cut the number of columns that are displayed so that we’re not overloading our users with information.
We can use the columns drawer to define which fields our table is going to display:
But, our table only gives us a way to read opportunities information in its current state. We also need to provide users with a way to edit rows.
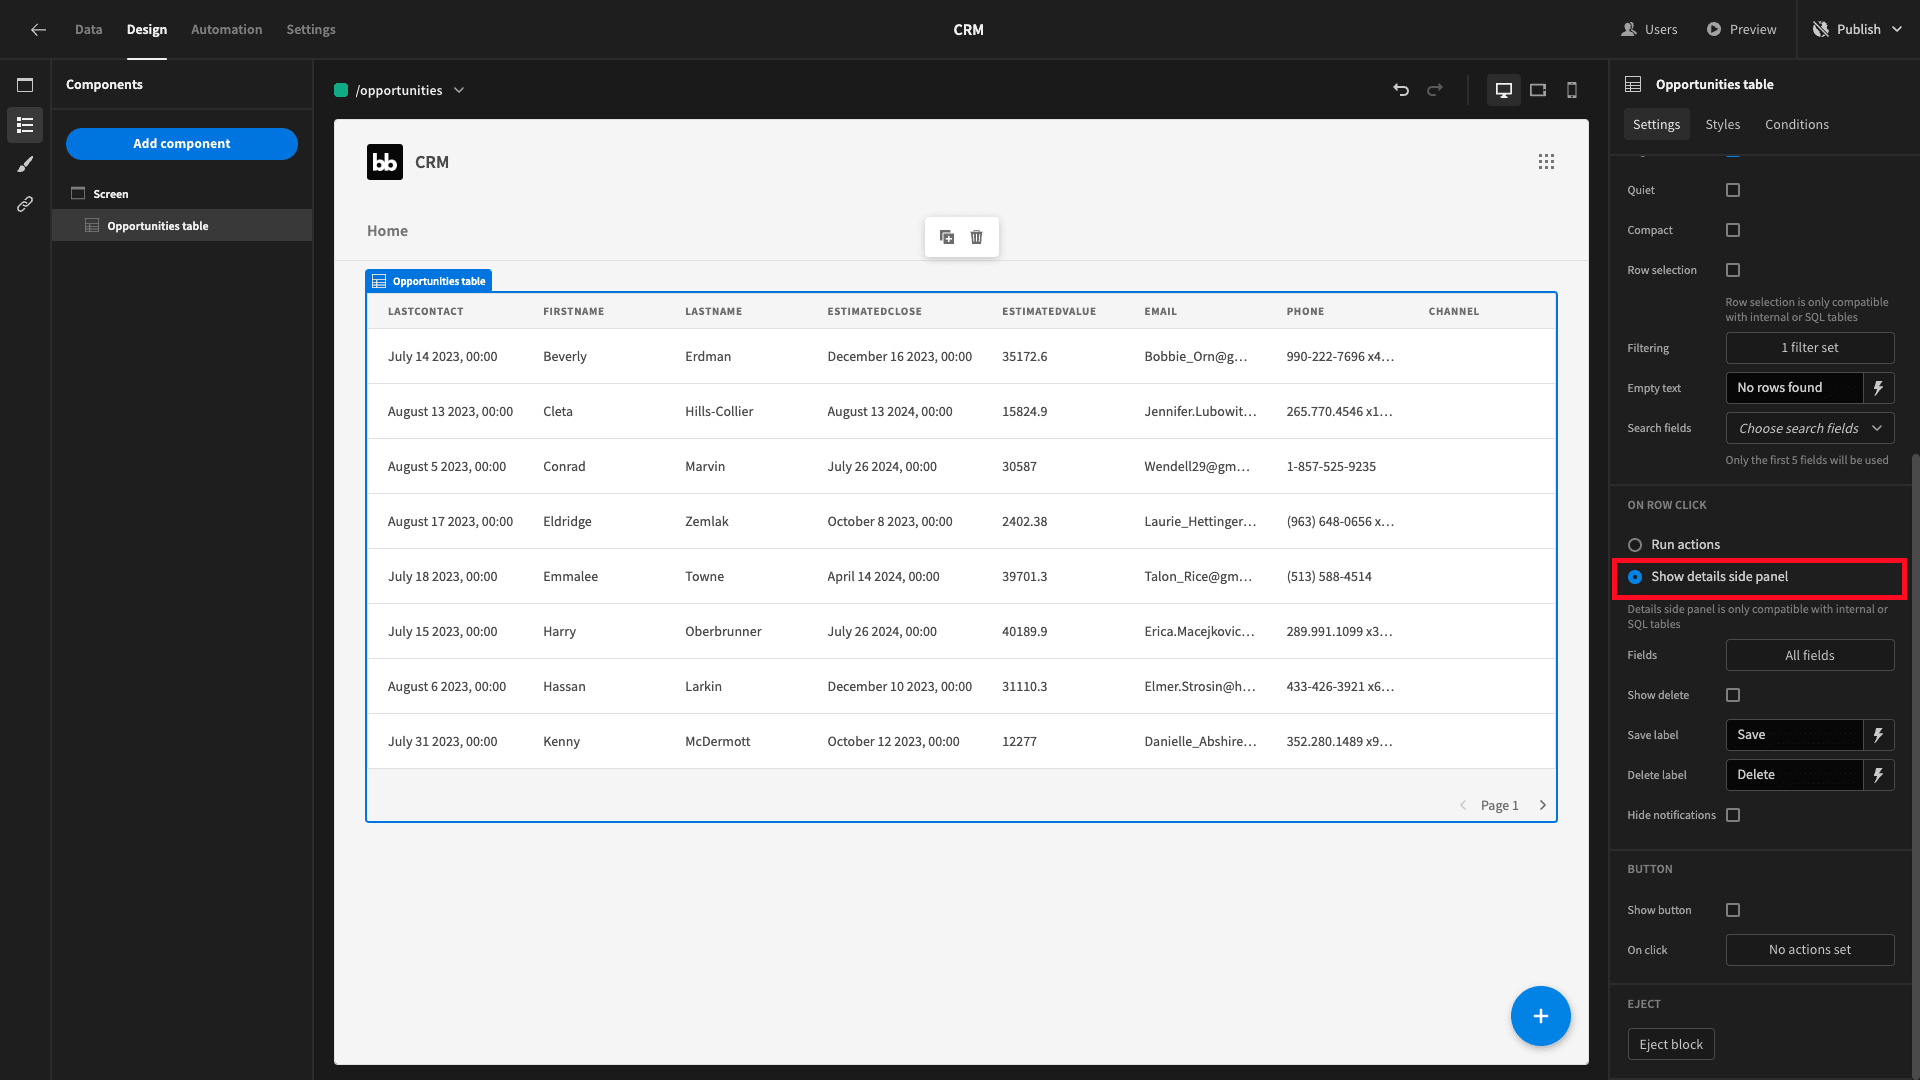
To do this, scroll down and tick the show details side panel option:
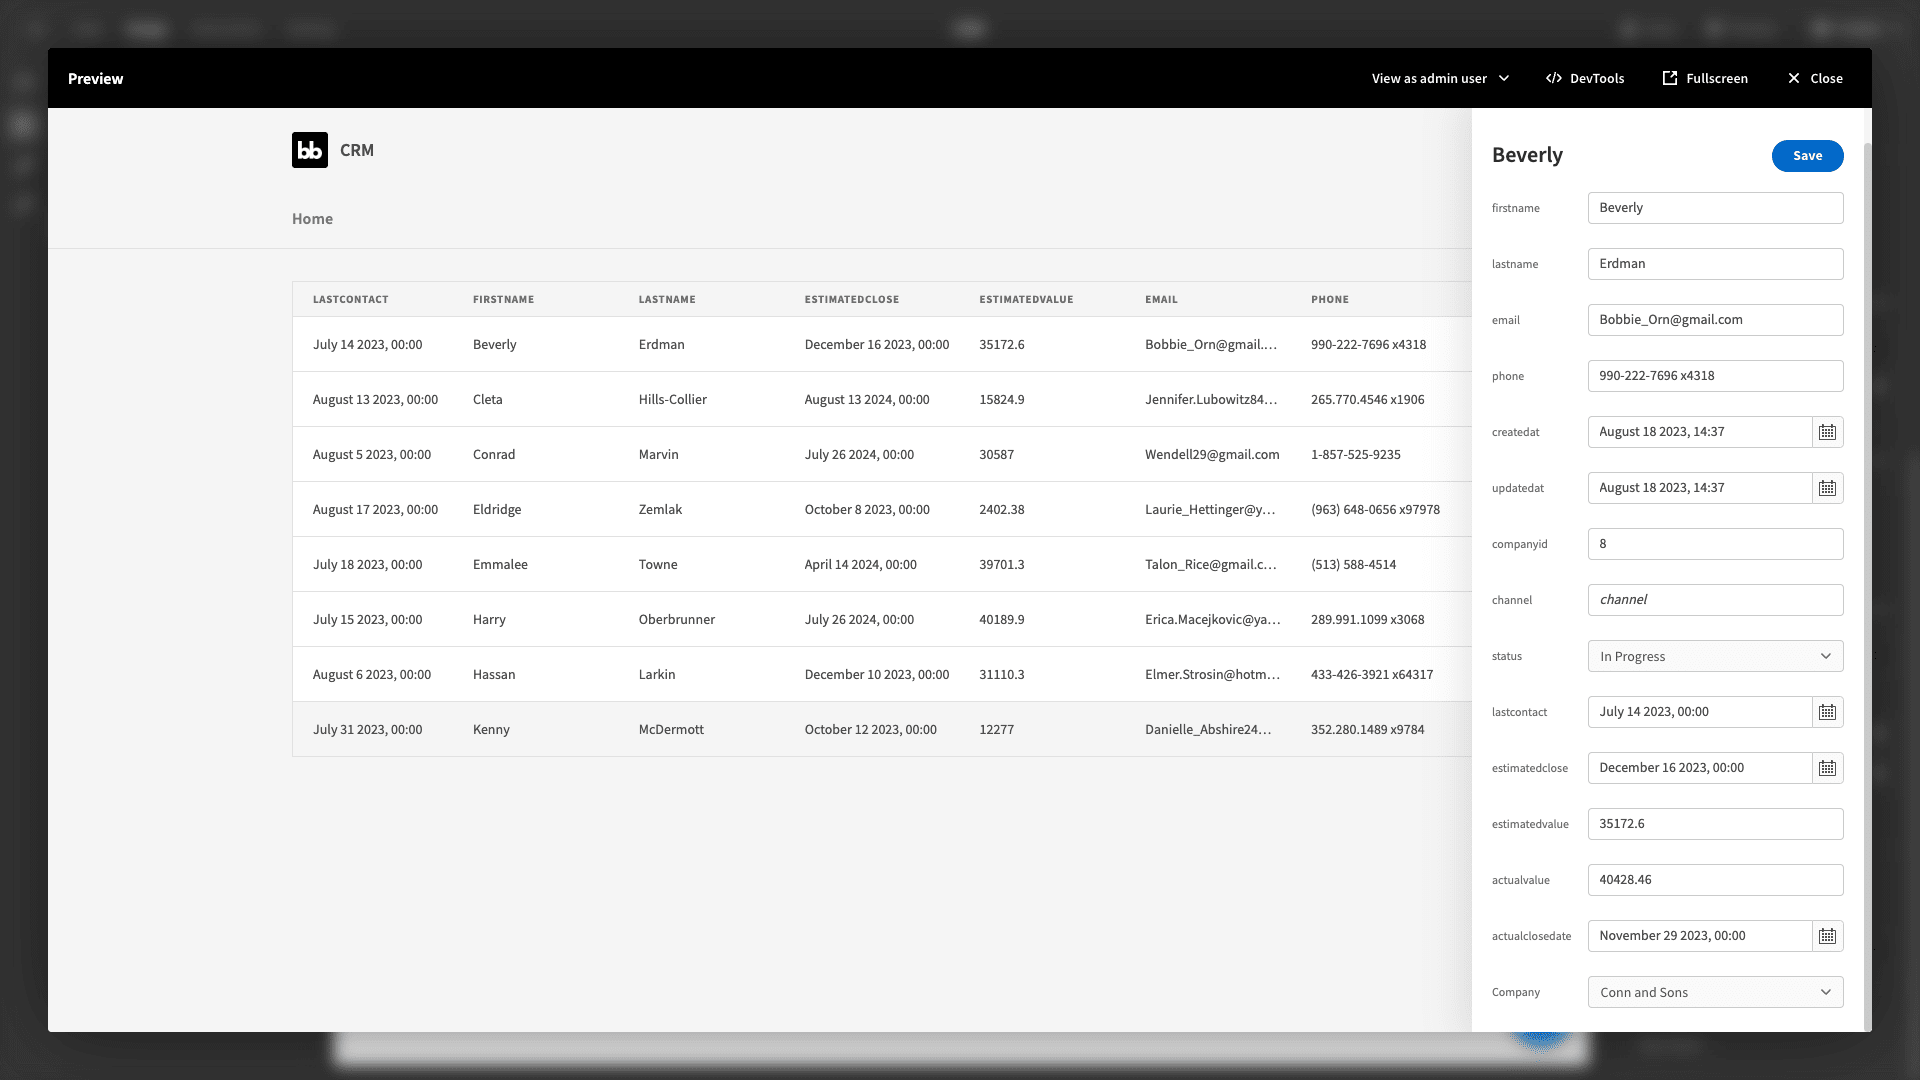
Now, if a user clicks on a row, they can access a form to edit or delete information:
And that’s our opportunities table UI complete. Next, we want to create the statistics cards that we saw in our completed screen.
Custom queries
These cards will display three pieces of information:
- The total estimated value of all of our opportunities.
- The average estimated value.
- The number of opportunities we’ve had contact from in the past seven days.
One query will handle the first two data points, and then we’ll use a second query for the third.
To do this, we’re going to need to head back to the Data section, and create a couple of custom queries under our Postgres data source.
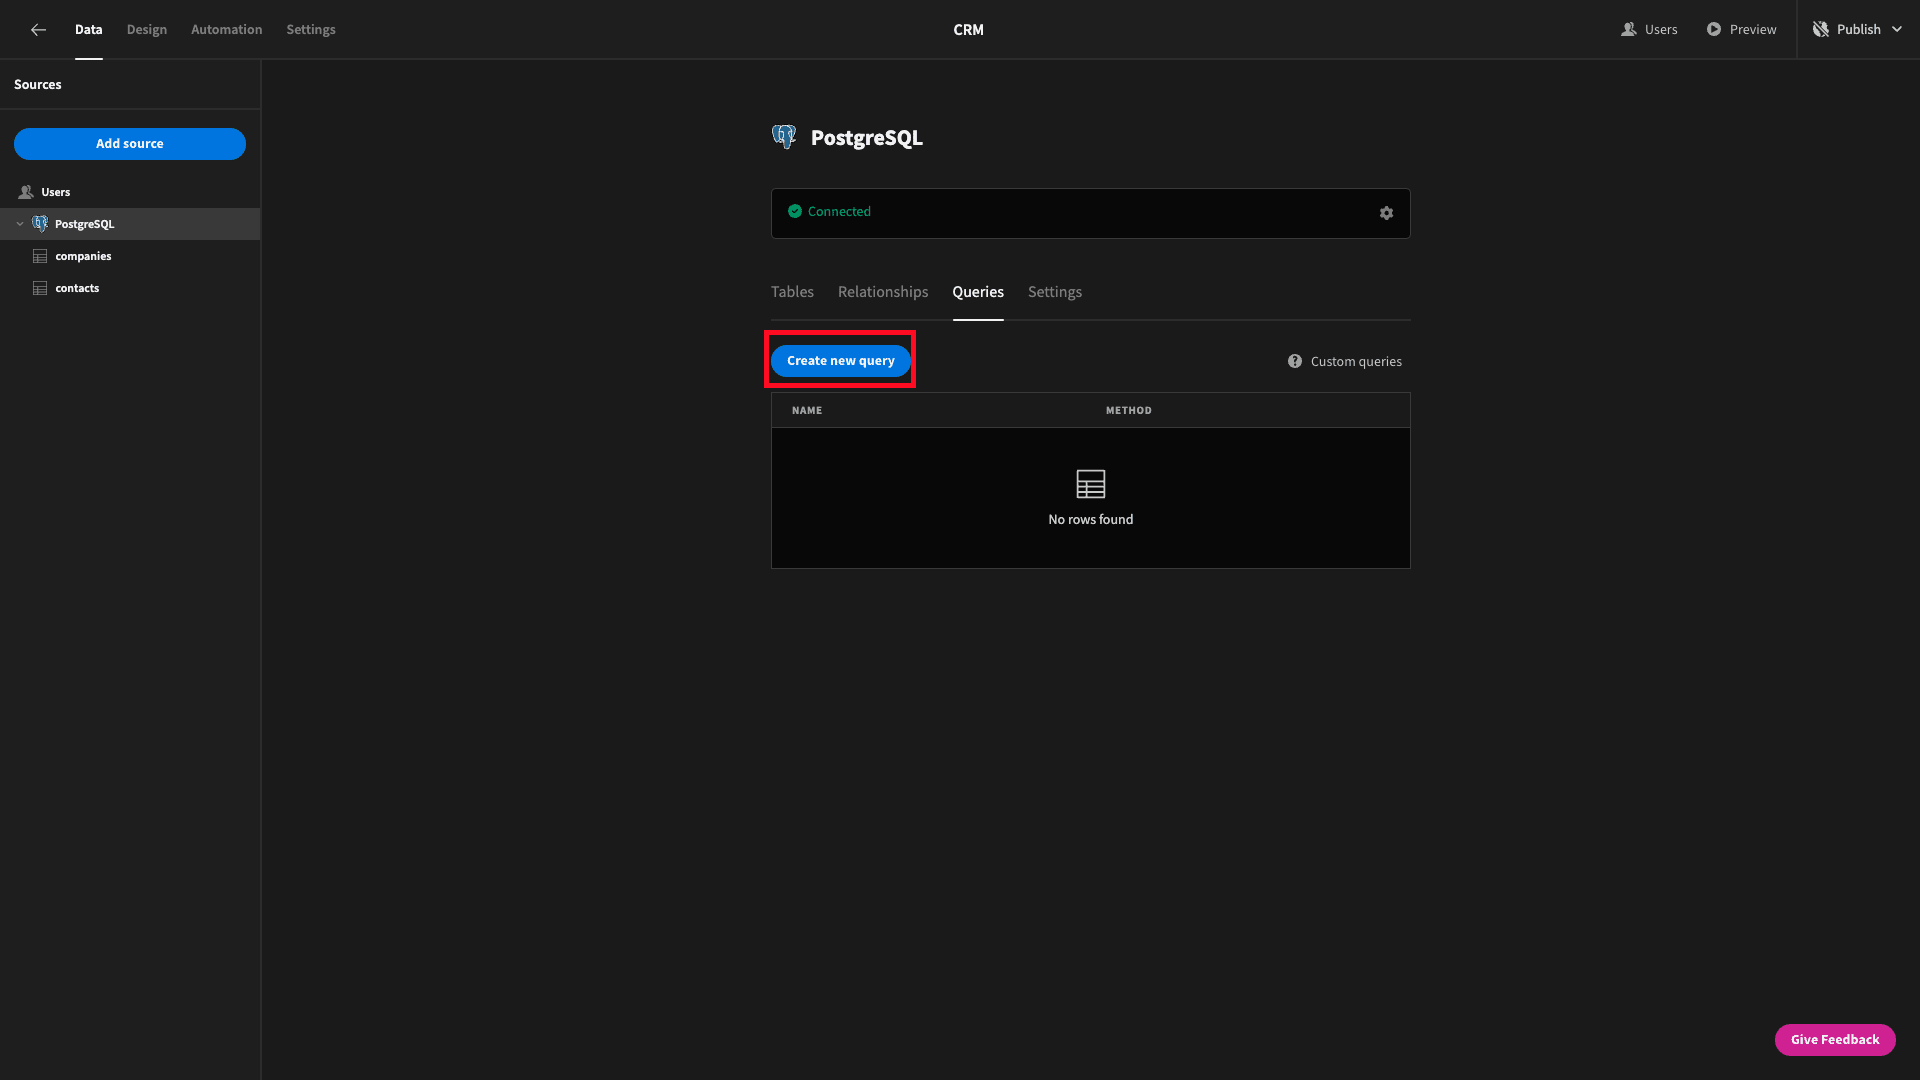
Then, we’re presented with a new screen where we can give our query a name, and enter our custom SQL command.
First, we’ll create a query called AvgAndTotalValue. As the name suggests, this will give us the average and total estimated value of our opportunities.
Here’s the code we’ll use in our query:
1SELECT
2
3 SUM(EstimatedValue) AS TotalEstimatedValue,
4
5 AVG(EstimatedValue) AS AvgEstimatedValue
6
7FROM
8
9 Contacts
10
11WHERE
12
13Status = ‘In Progress’We’re using the built-in SUM() and AVG() functions in Postgres - along with a WHERE clause so the query only returns row with the In Progress status
And here’s what the whole thing will look like in situ:
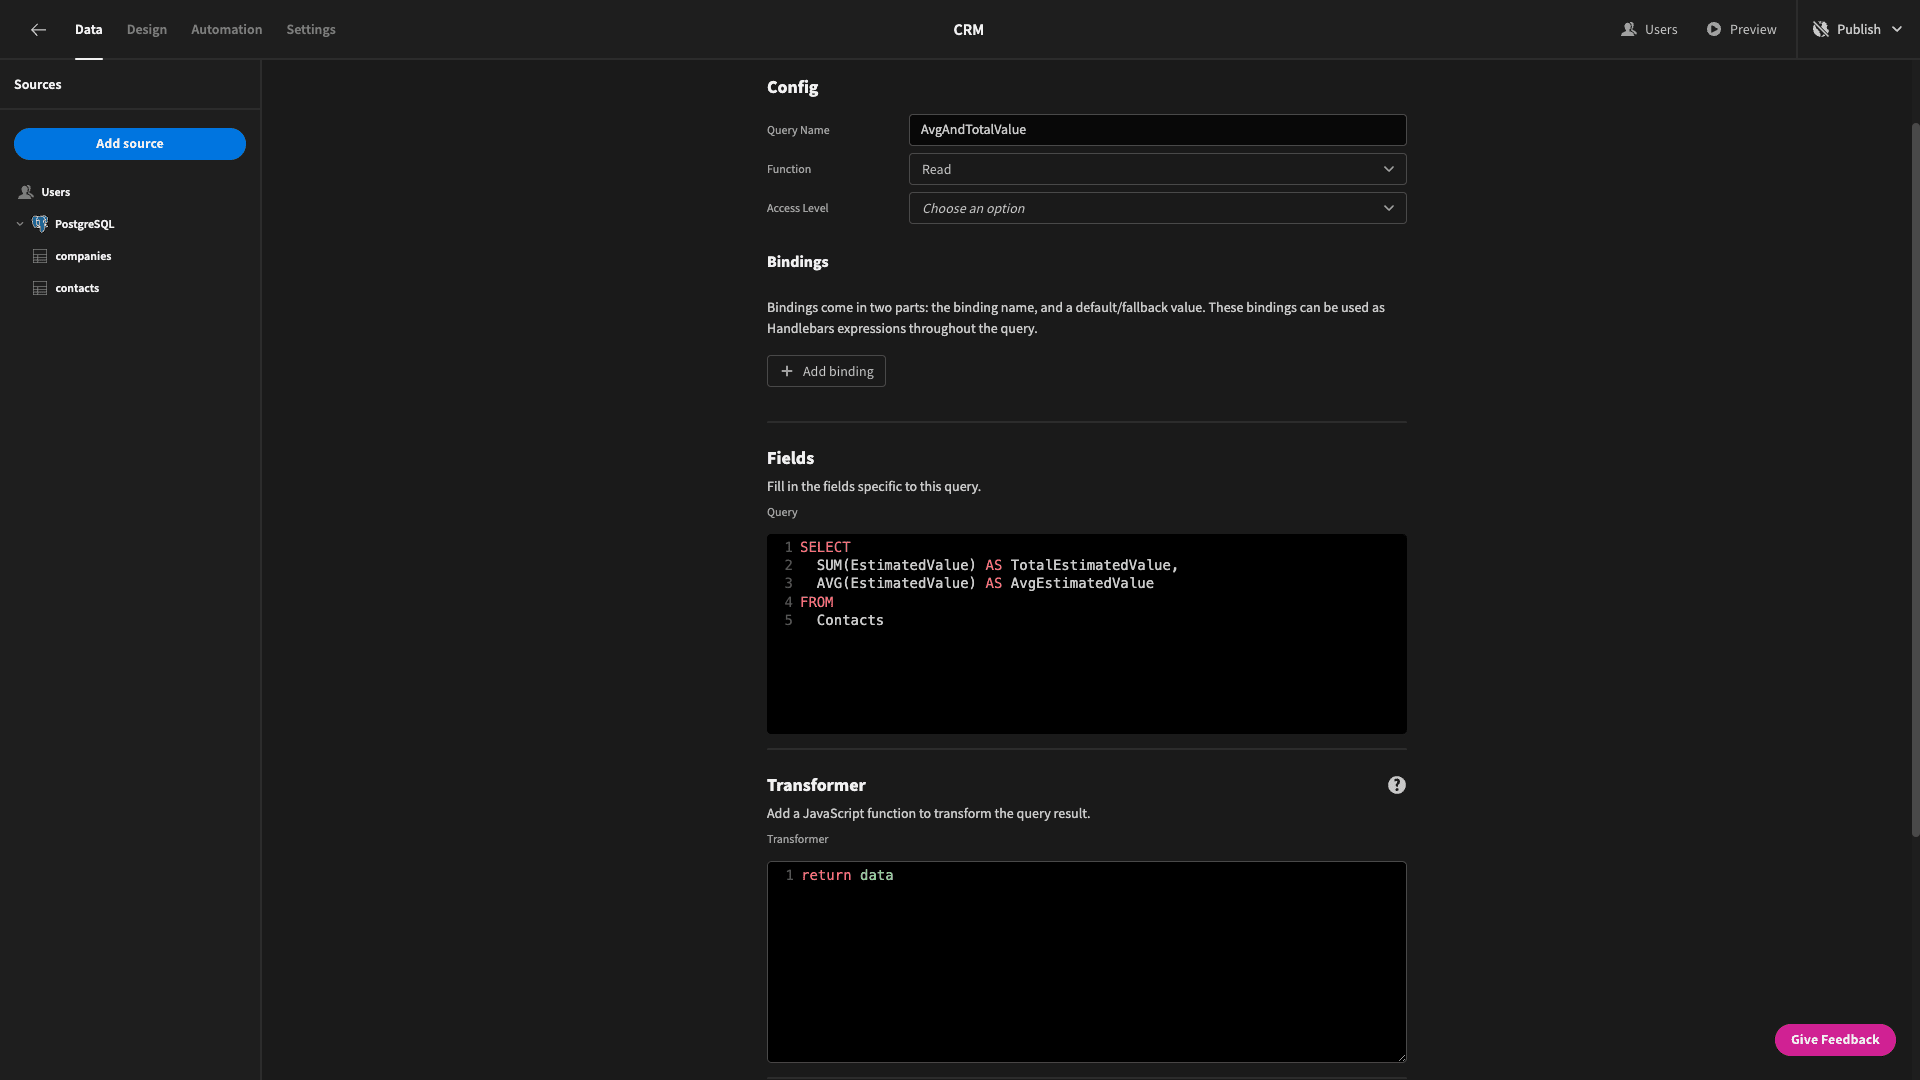
When we hit run query it will return a JSON object with two key/value pairs - totalestimatedvalue and avgestimatedvalue:
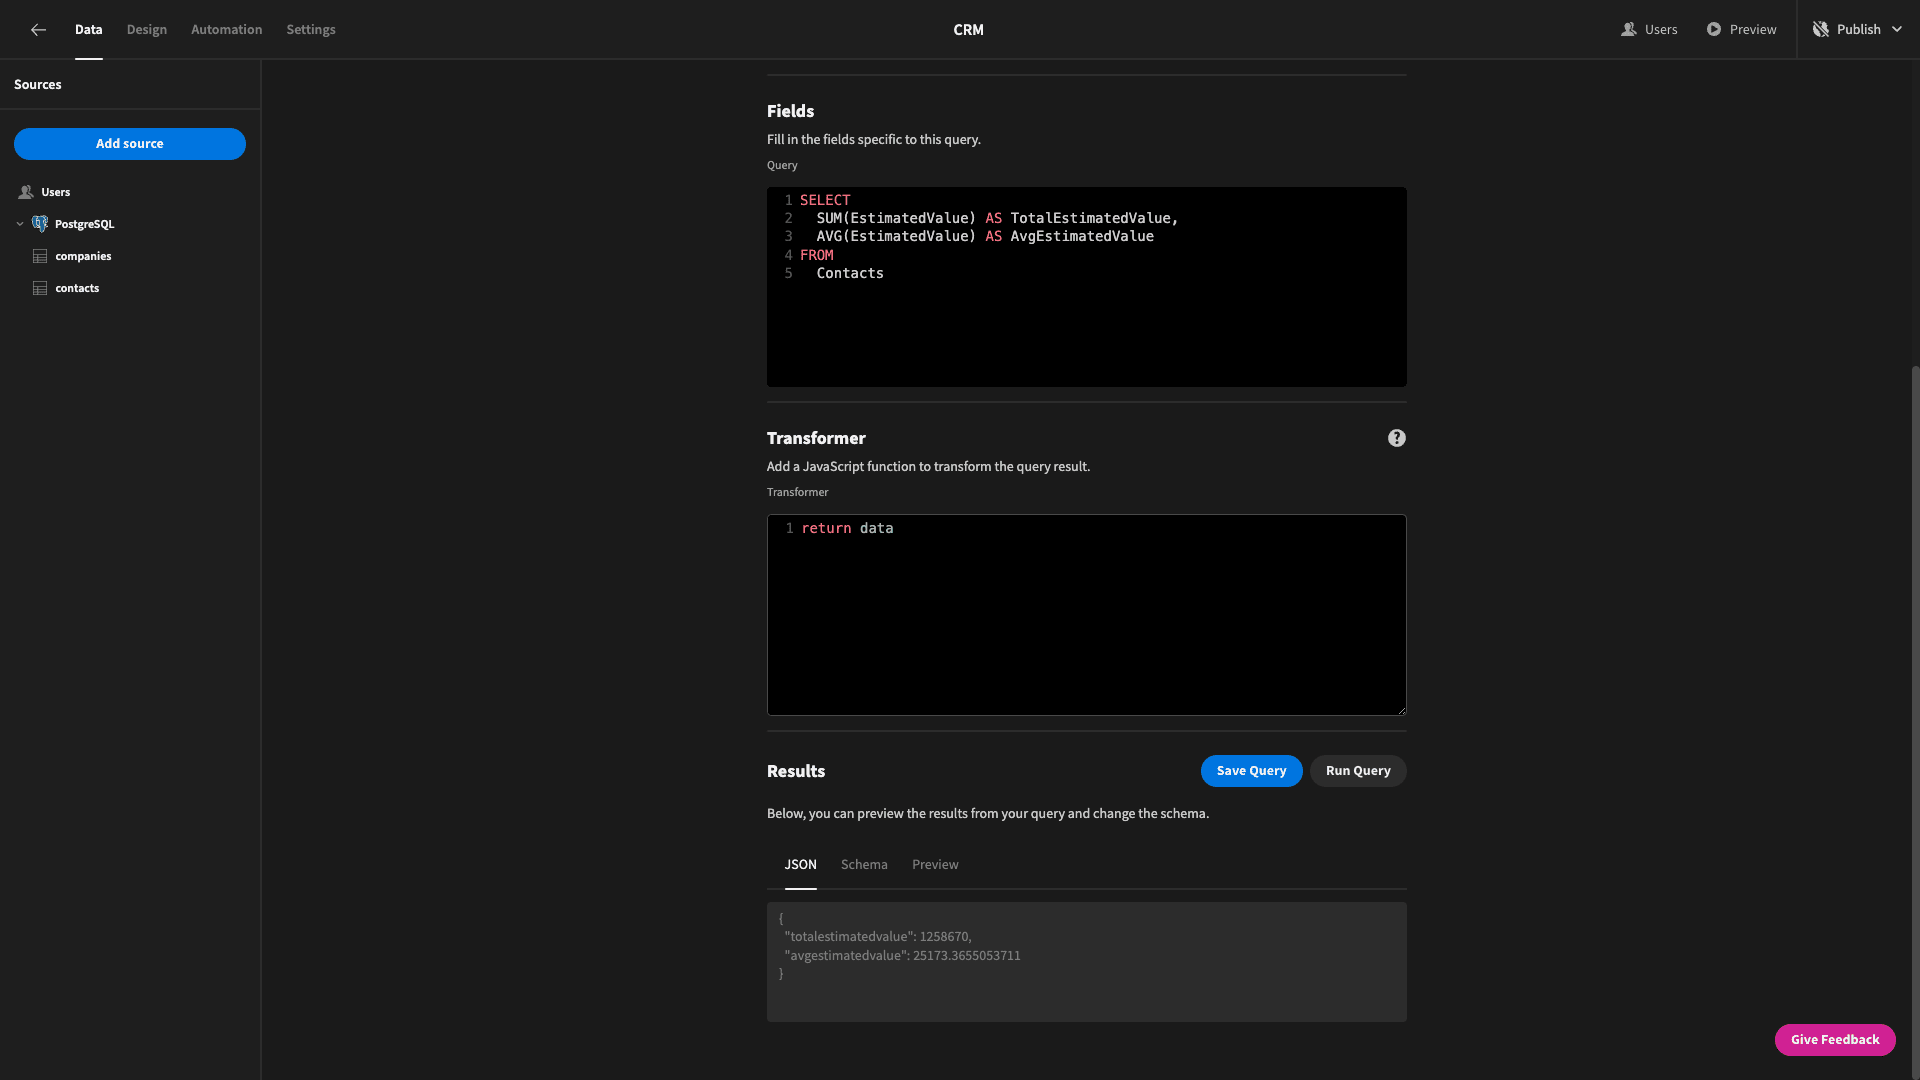
We’ll save that and move on to our other query for finding the number of contacts we’ve had contact with in the past seven days. This one will be called Last7DaysContact.
This time, we want to use the COUNT() function to return the number of rows where the LastContact attribute is within the past seven days, and the status attribute is set to In Progress.
Here’s the query we’ll use:
1SELECT COUNT(*) AS RecentContactCount
2
3FROM Contacts
4
5WHERE LastContact >= CURRENT_DATE - INTERVAL '7 days'
6
7AND LastContact < CURRENT_DATE + INTERVAL '1 day'
8
9AND Status = 'In Progress';
And here’s what it looks like in Budibase:
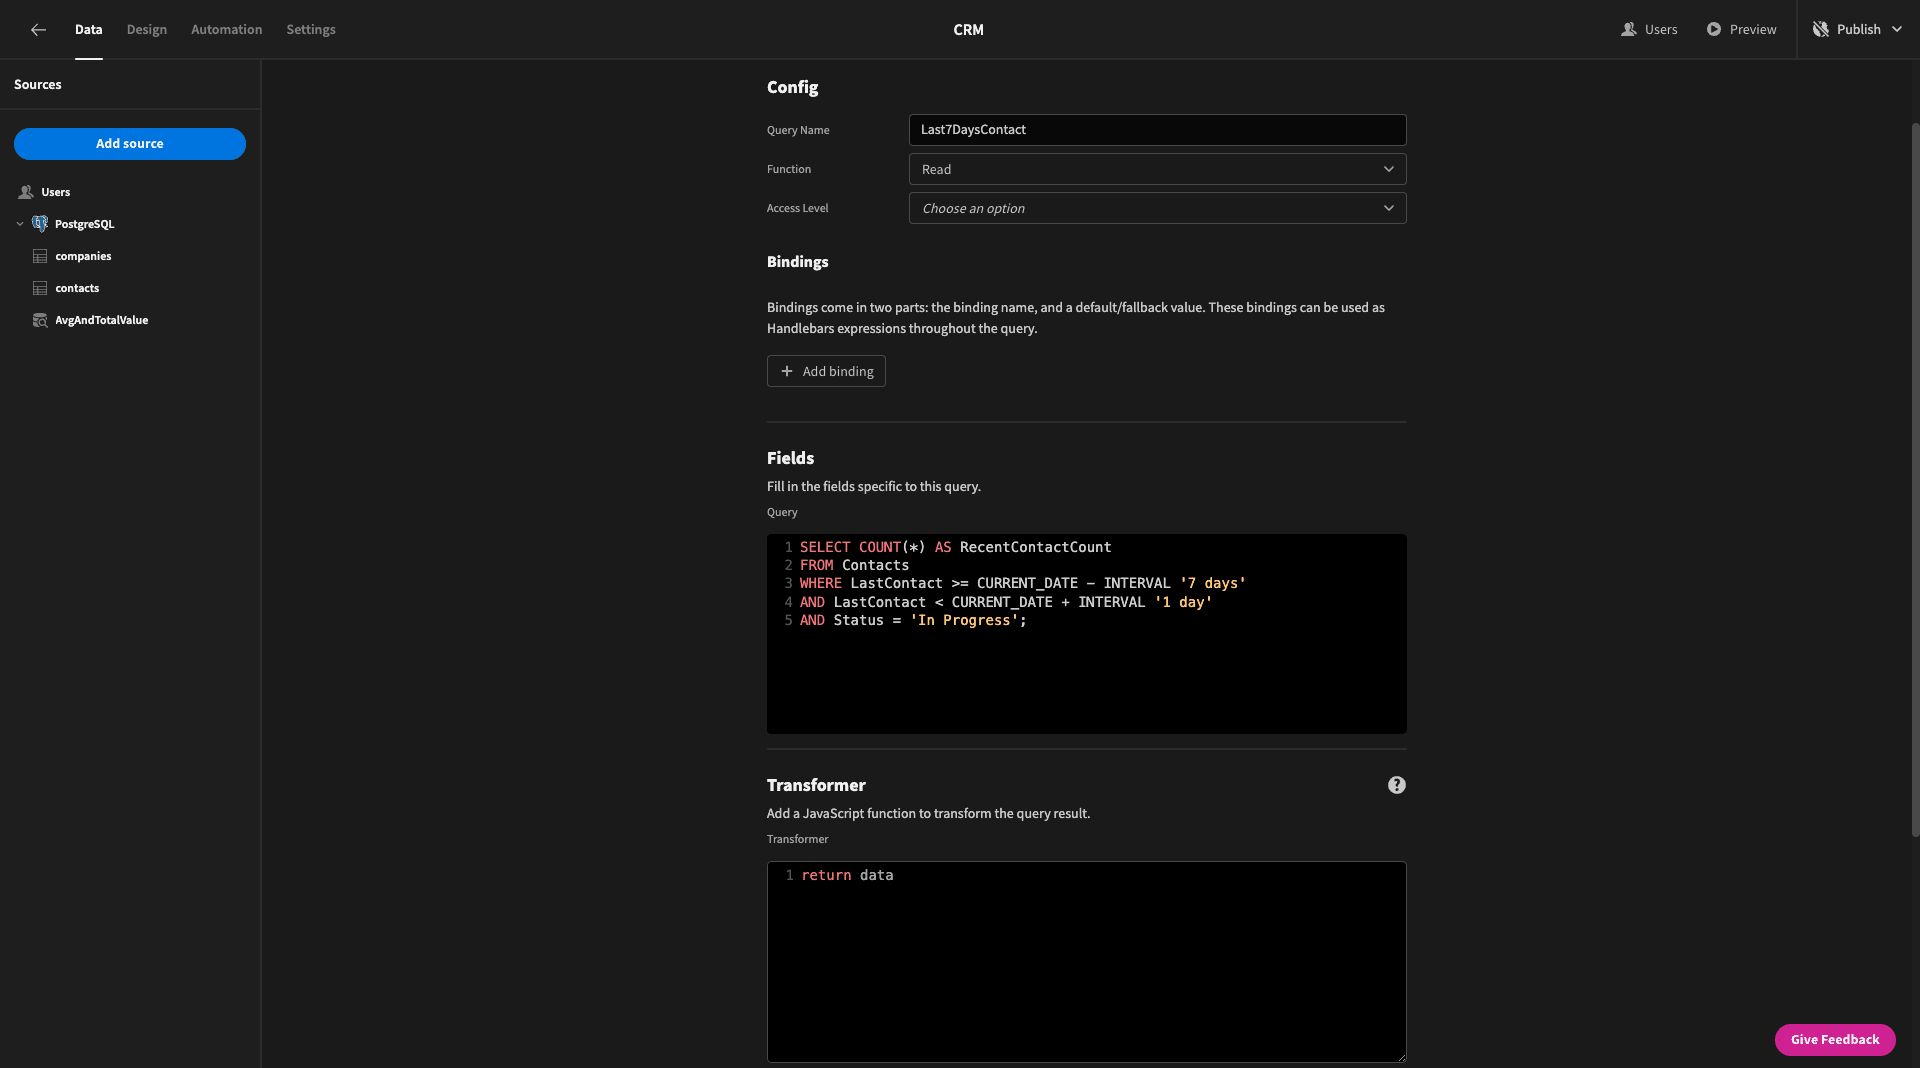
When we run that, we get a single key/value pair for recentcontactcount.
Hit save and head back to the design section.
Stat cards
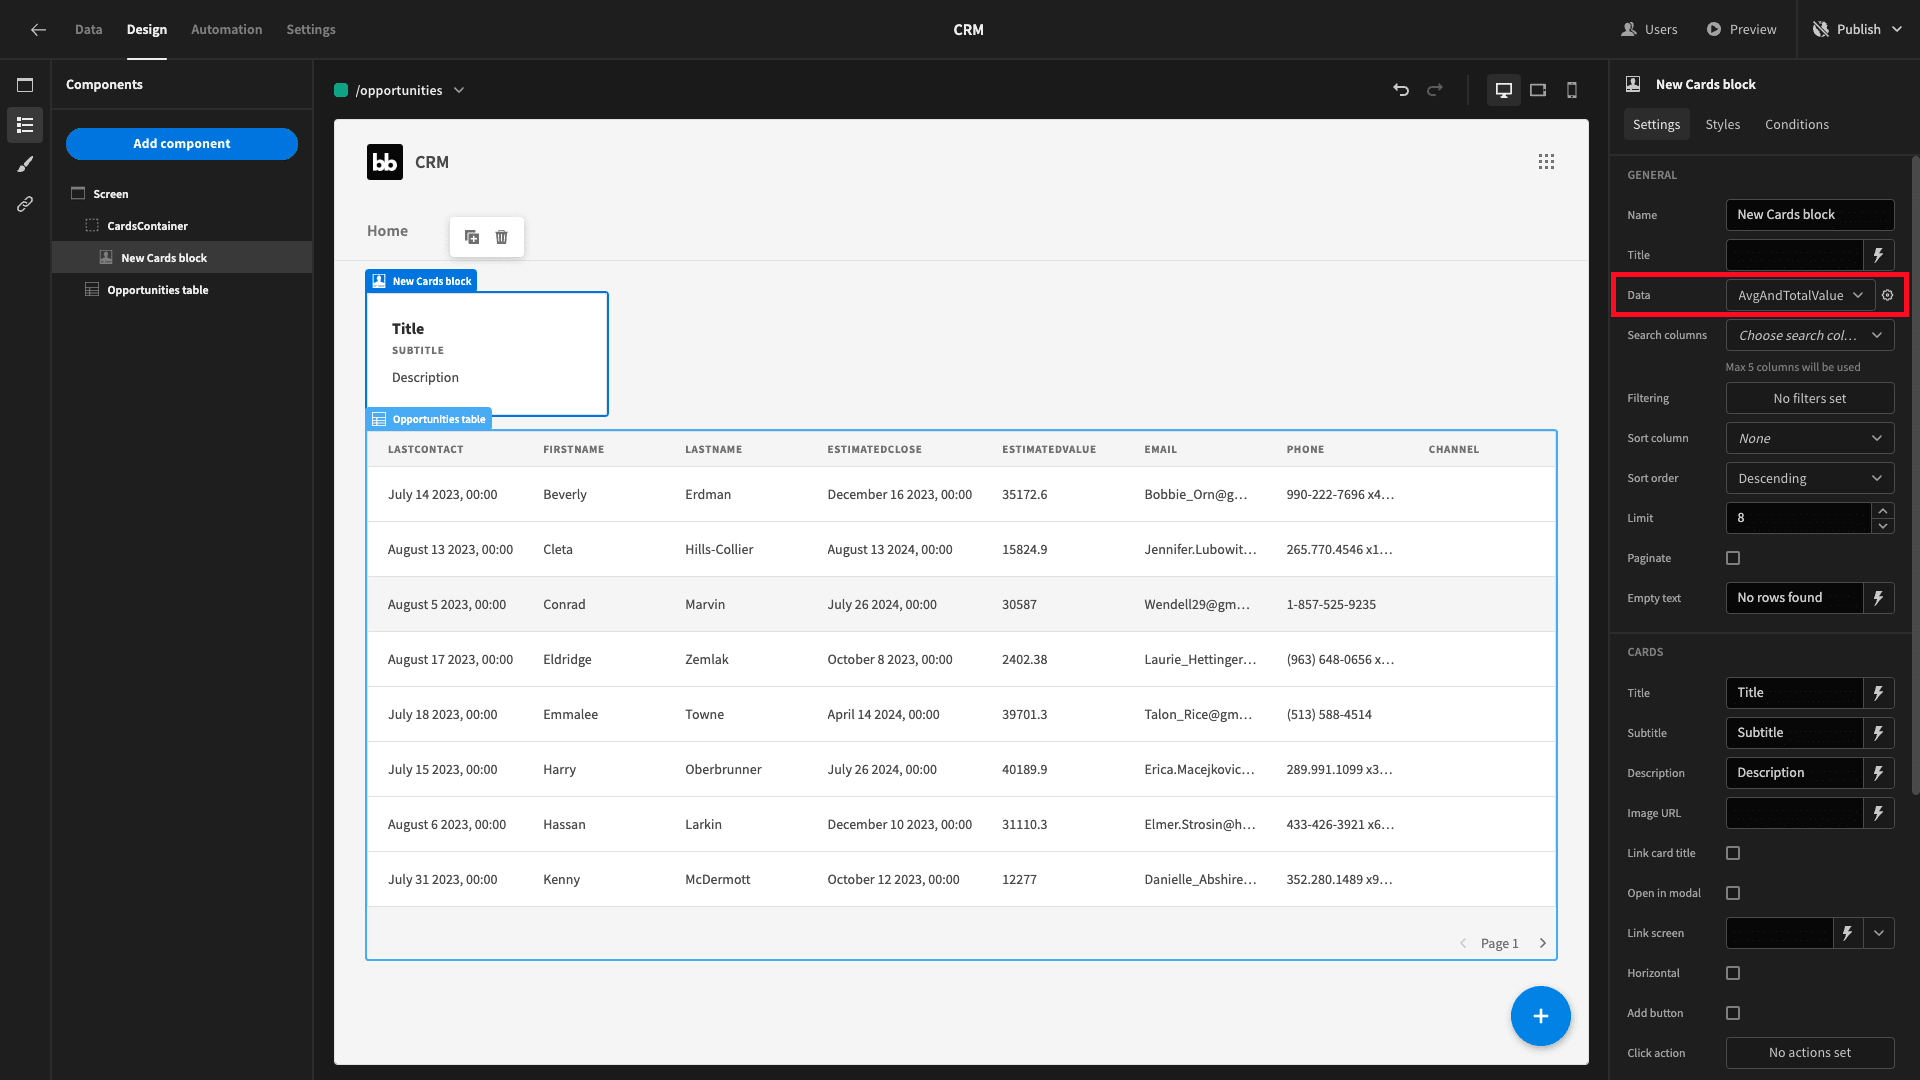
We’re going to start by adding a container component above our existing opportunities table. We’ll set its direction to horizontal:

Inside this we’ll place a Cards Block component, with its data set to our AvgAndTotalValue query:
Then, we’ll bind its Title field to the totalestimatedvalue output of our query:
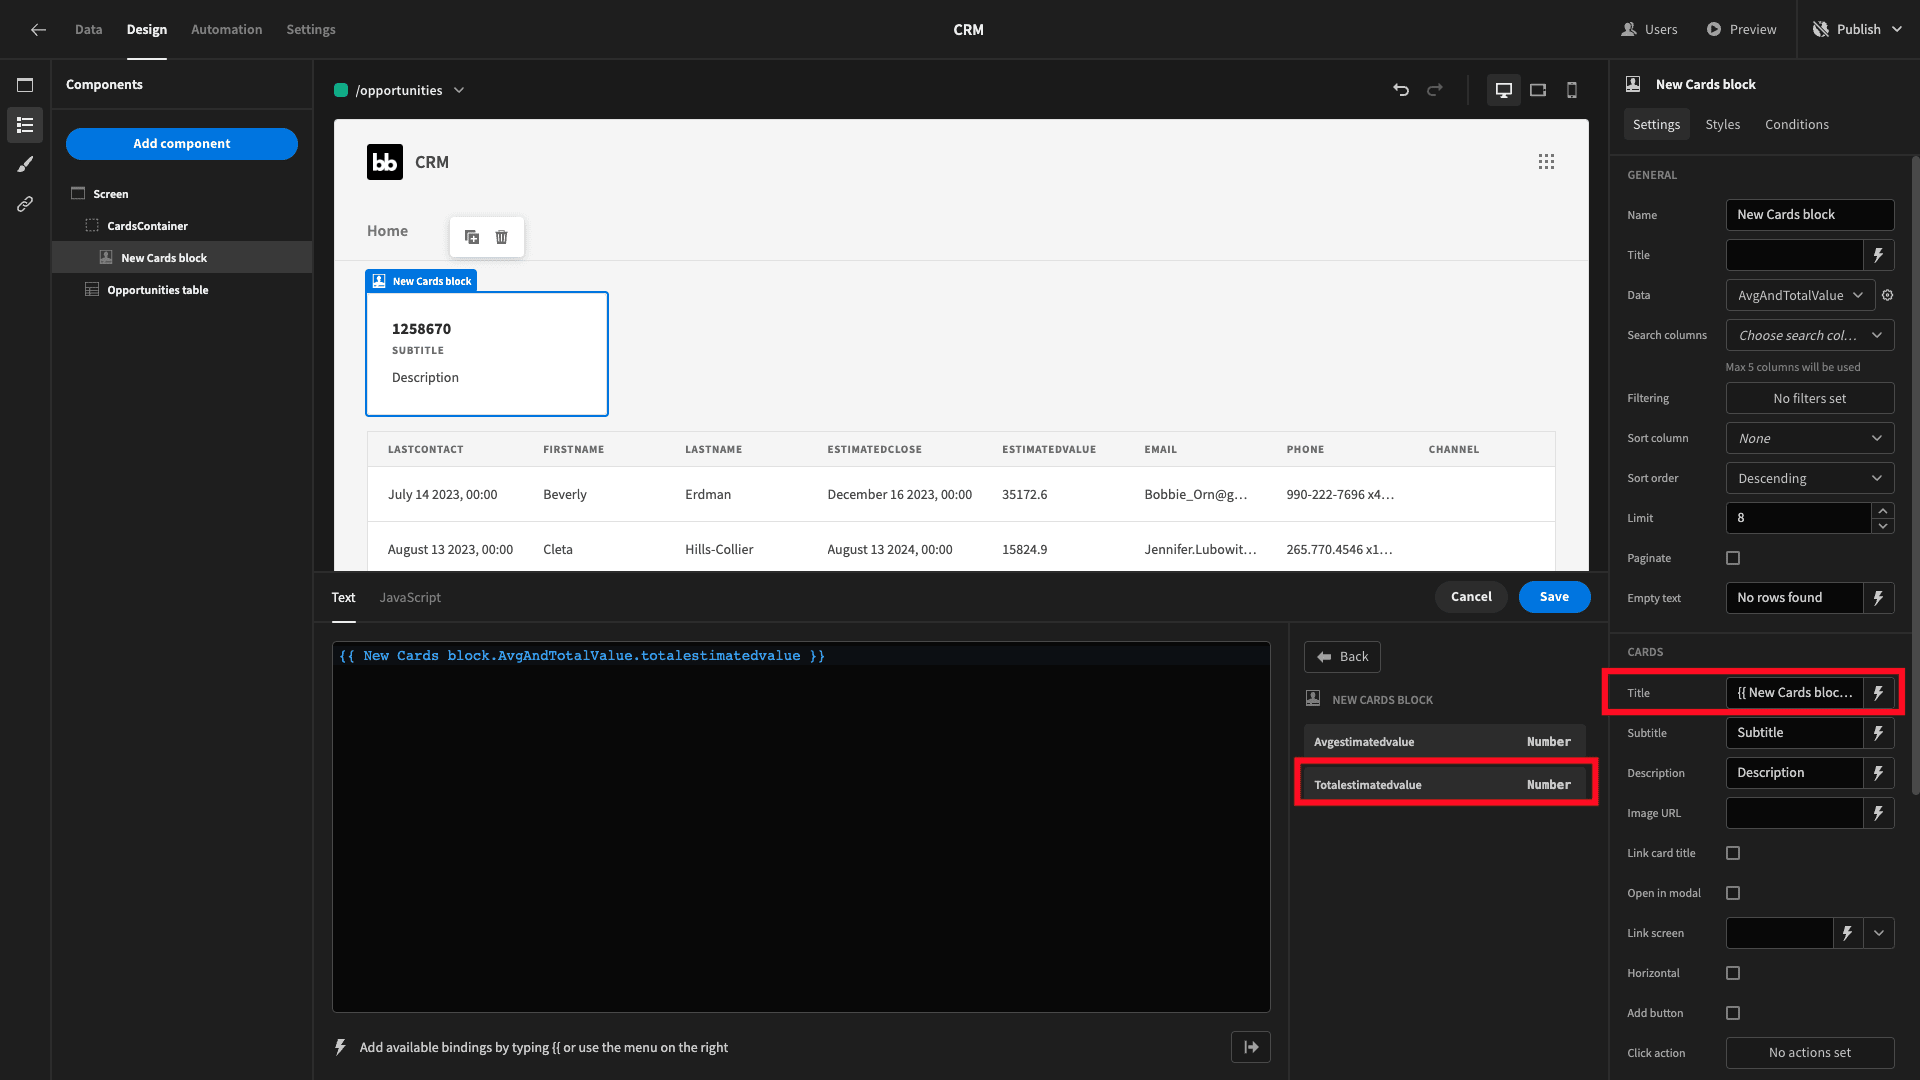
We’ll edit that slightly by adding a £ symbol to the front of the handlebars binding, as well as using the toFixed helper method to give us two decimal places.
The new title binding is:
1£{{ toFixed New Cards block.AvgAndTotalValue.totalestimatedvalue 2}}We’ll set the card’s subtitle field to Total Estimated Value while we’re here and rename the Cards Block to TotalValueBlock in order to avoid confusion.
Here’s what we have now:
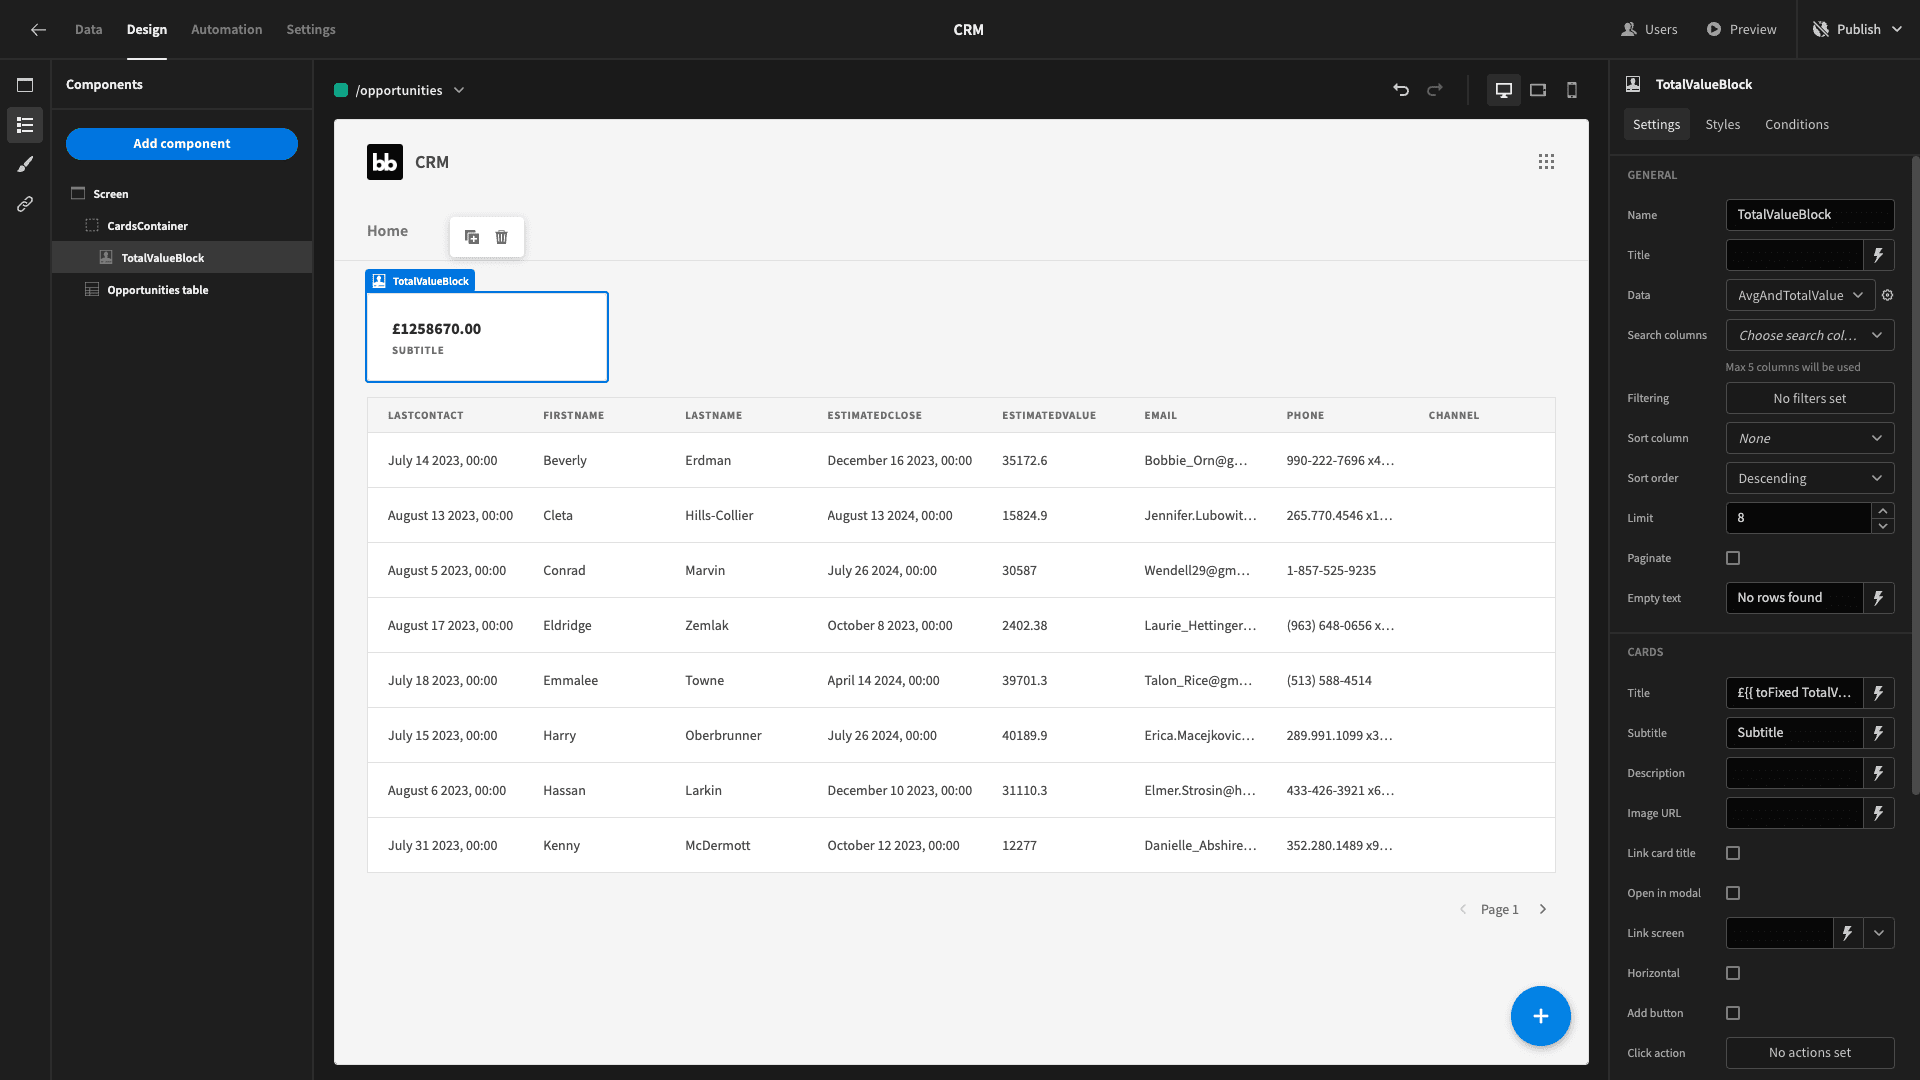
For the average estimated value, we’ll simply duplicate this first card:
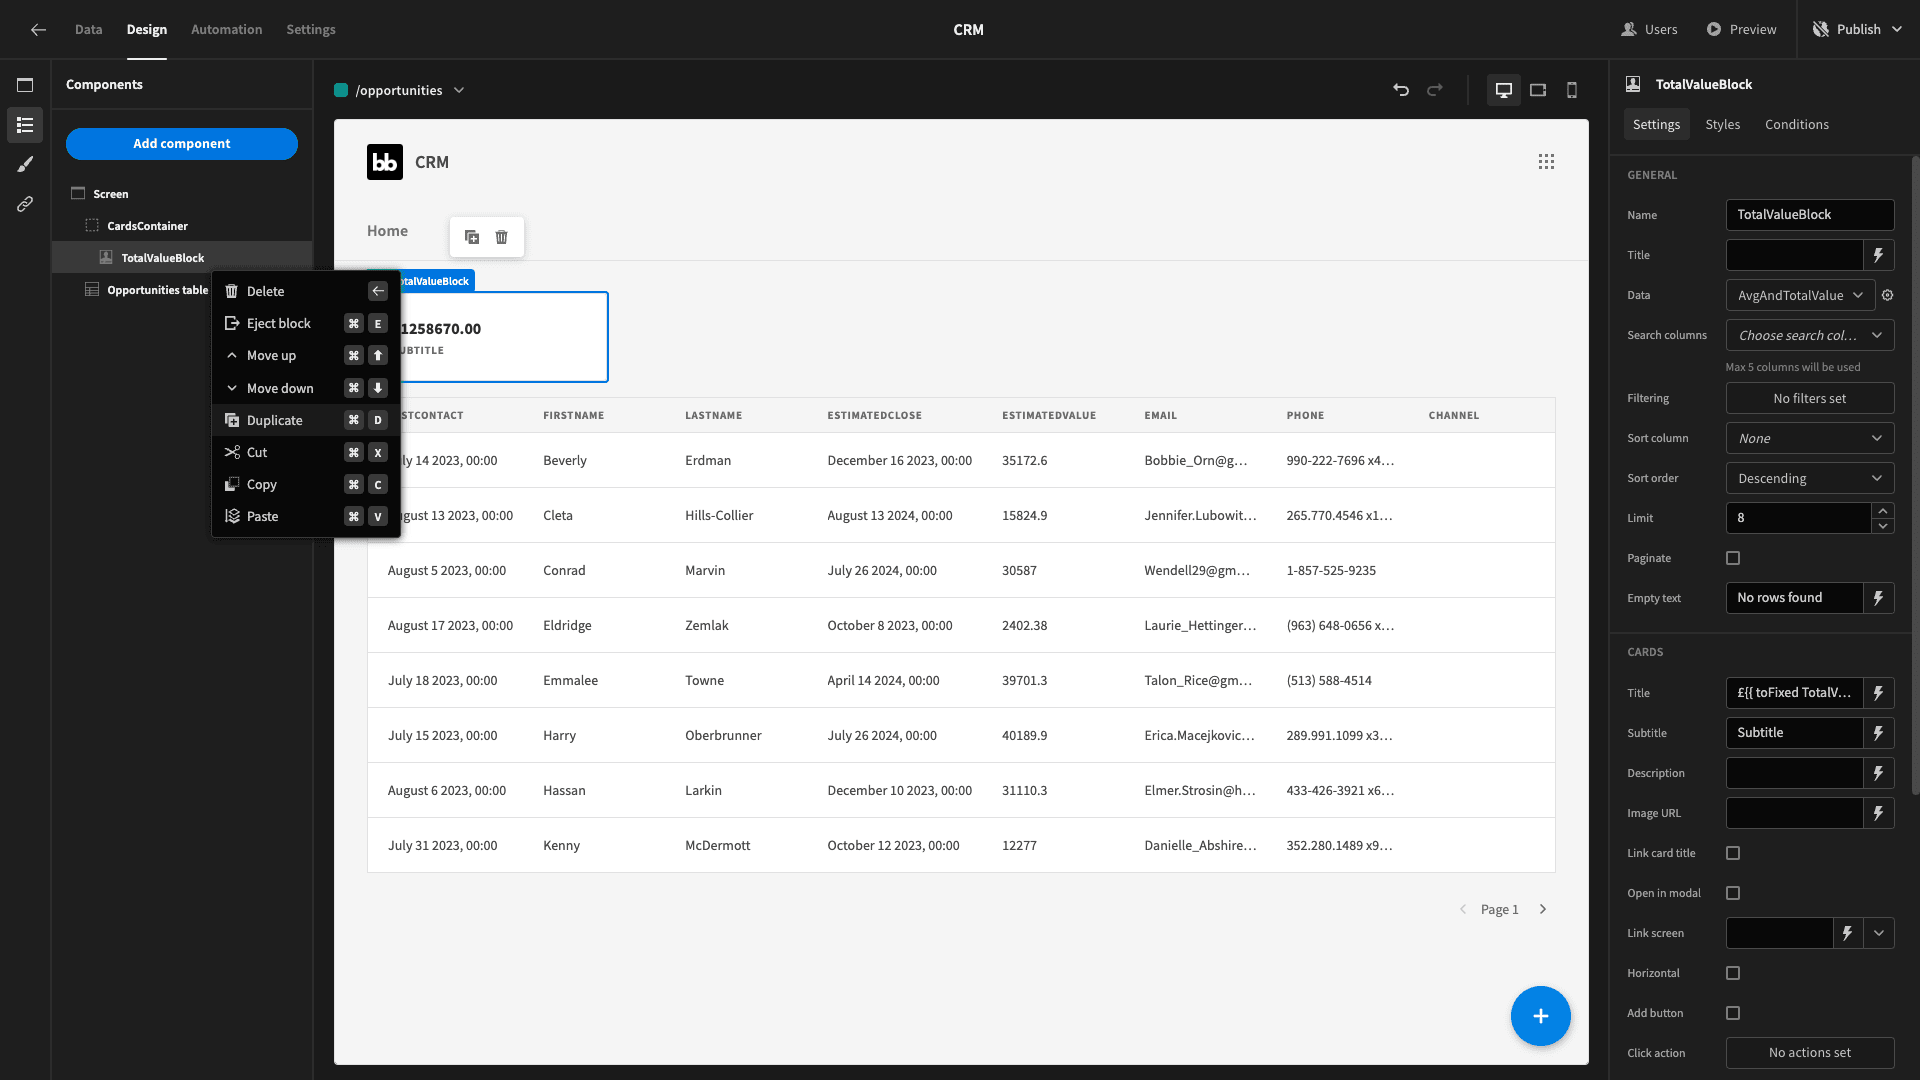
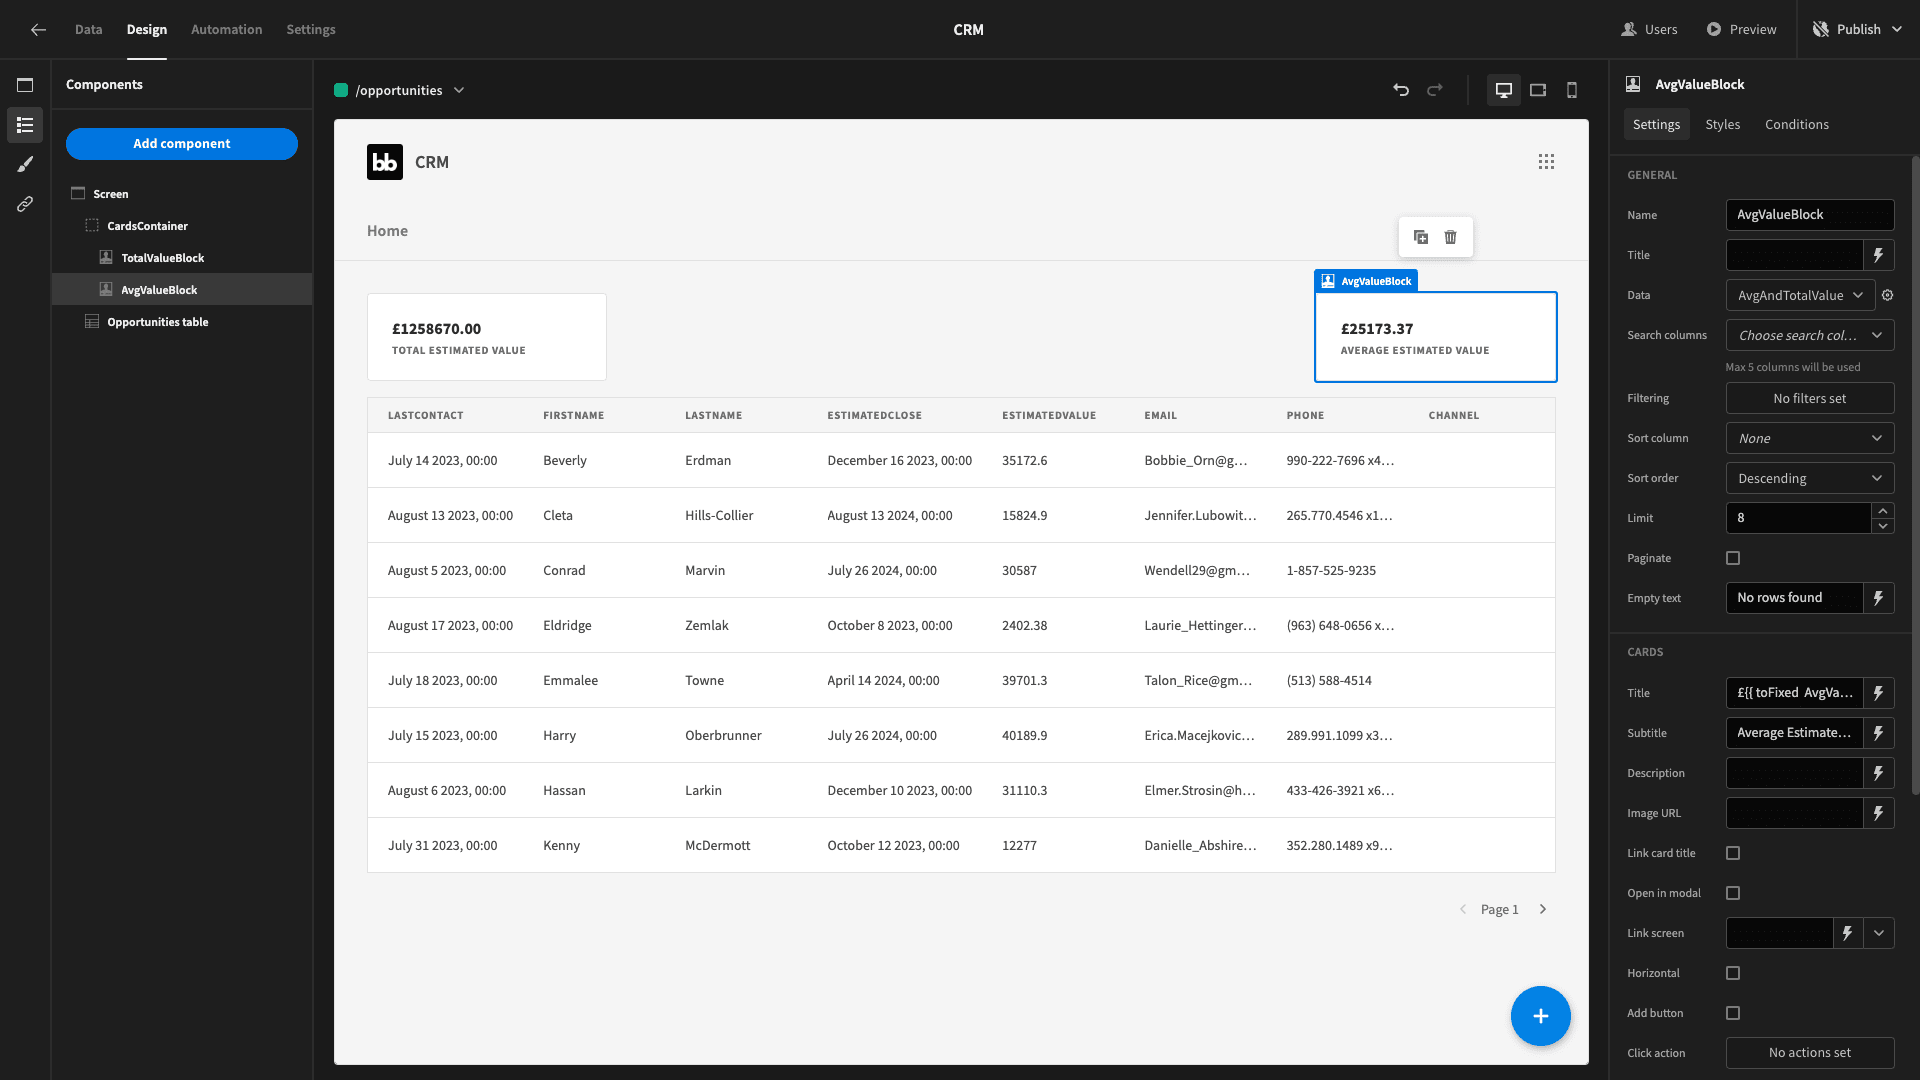
Now, we can swap out the appropriate data. So, set the name to AvgValueBlock and the subtitle to Average Estimated Value.
Then, we can use the following handlebars binding for the title:
1£{{ toFixed New Cards block.AvgAndTotalValue.totalestimatedvalue 2}}And here’s what we’ve got now:
Finally, we’ll add one more card block with our Last7DaysContact query as its data source. We’ll call this one Last7DaysBlock and set its subtitle to Contacted in the last 7 days.
We’ll use this binding for its title:
1{{ Last7DaysBlock.Last7DaysContact.recentcontactcount }}Here’s our screen so far:

We’ll tweak the design of our entire app in a little bit, but for now that’s the first screen completed.
3. Embeddable lead capture form
Next, we need a way to capture new lead’s data in our CRM. On the surface, this will be a relatively simple form, but we’re going to use a combination of Budibase’s built-in RBAC and embeddable apps functionality to make something a bit more sophisticated.
We’re going to start by creating another blank screen, with the URL slug:
1/contact-form/:channel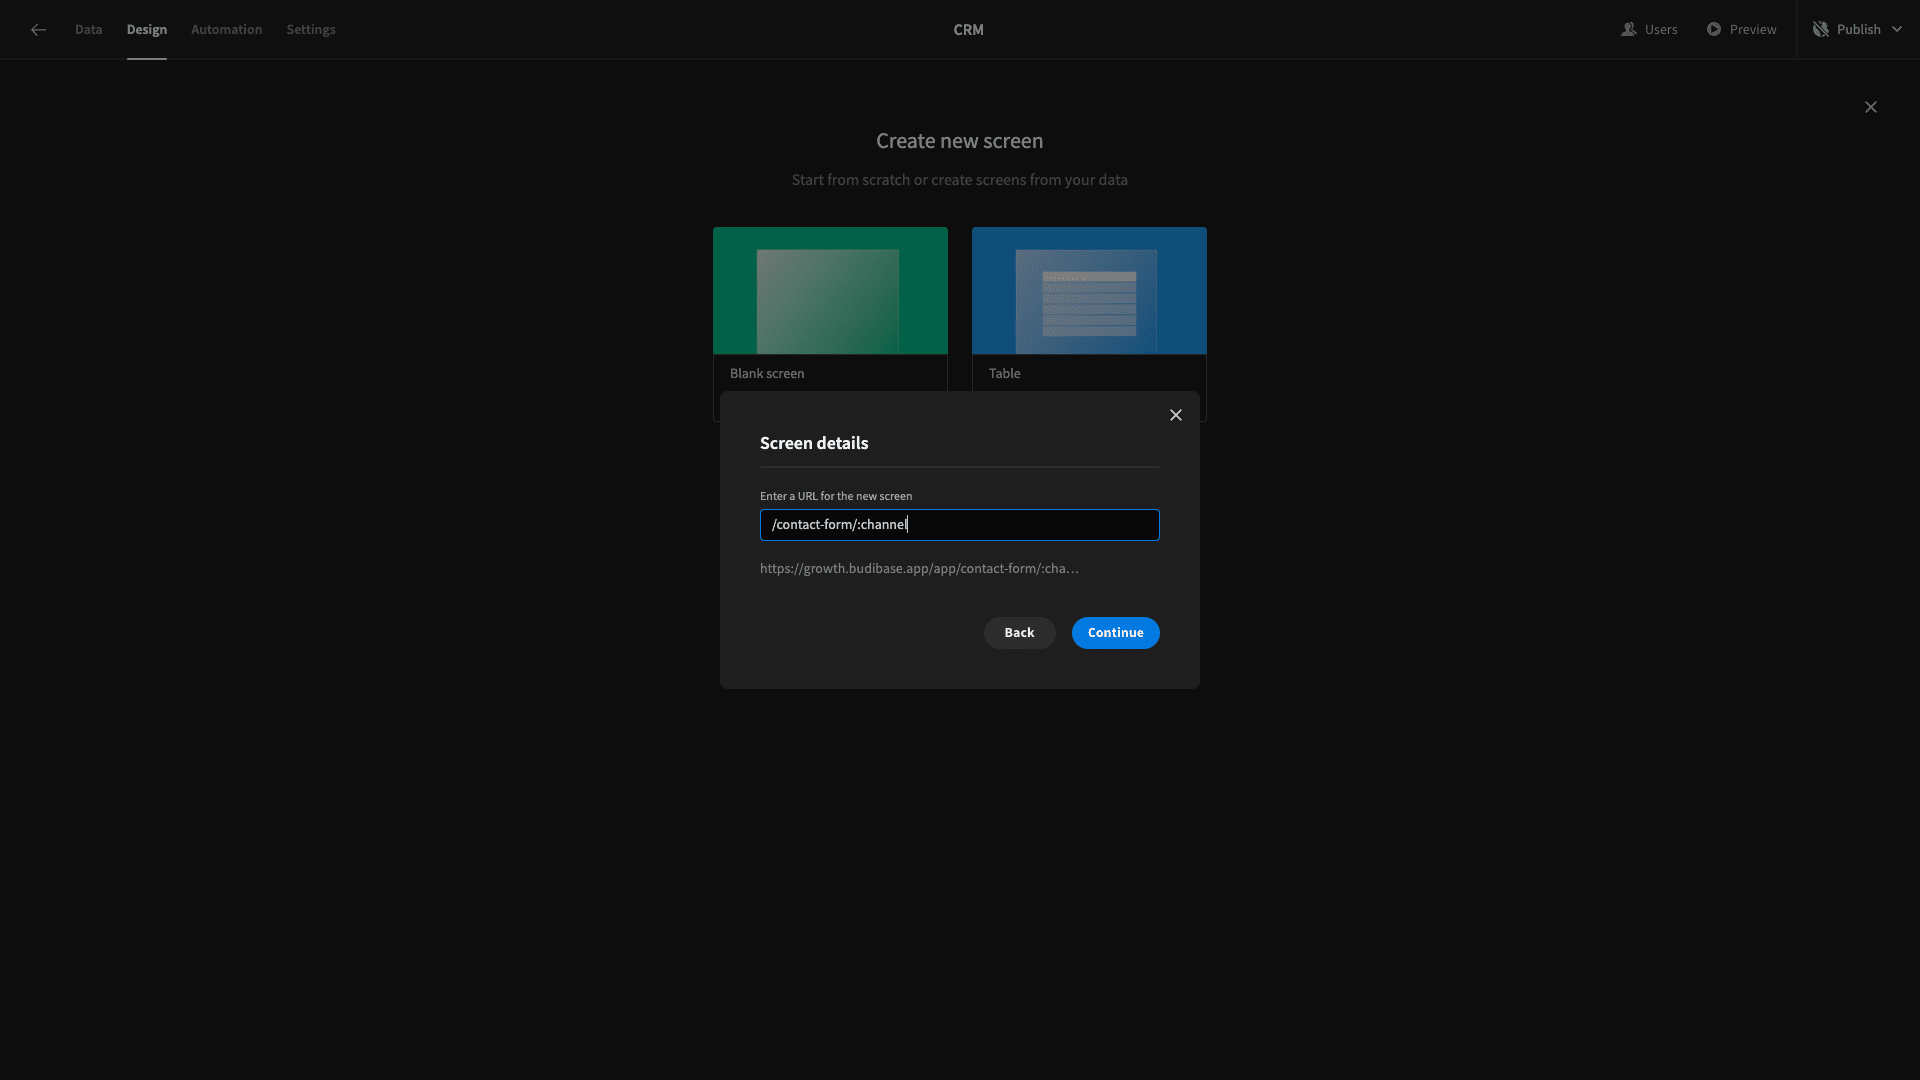
When we use a semicolon in a screen’s URL, it gives us a dynamic variable. So, :channel is just a placeholder that we can populate with whatever actual channel we want to later, when we embed our app.
We’ll then be able to access this a bindable value in our UIs.
Hit continue and then when prompted set the Access Level to Public:
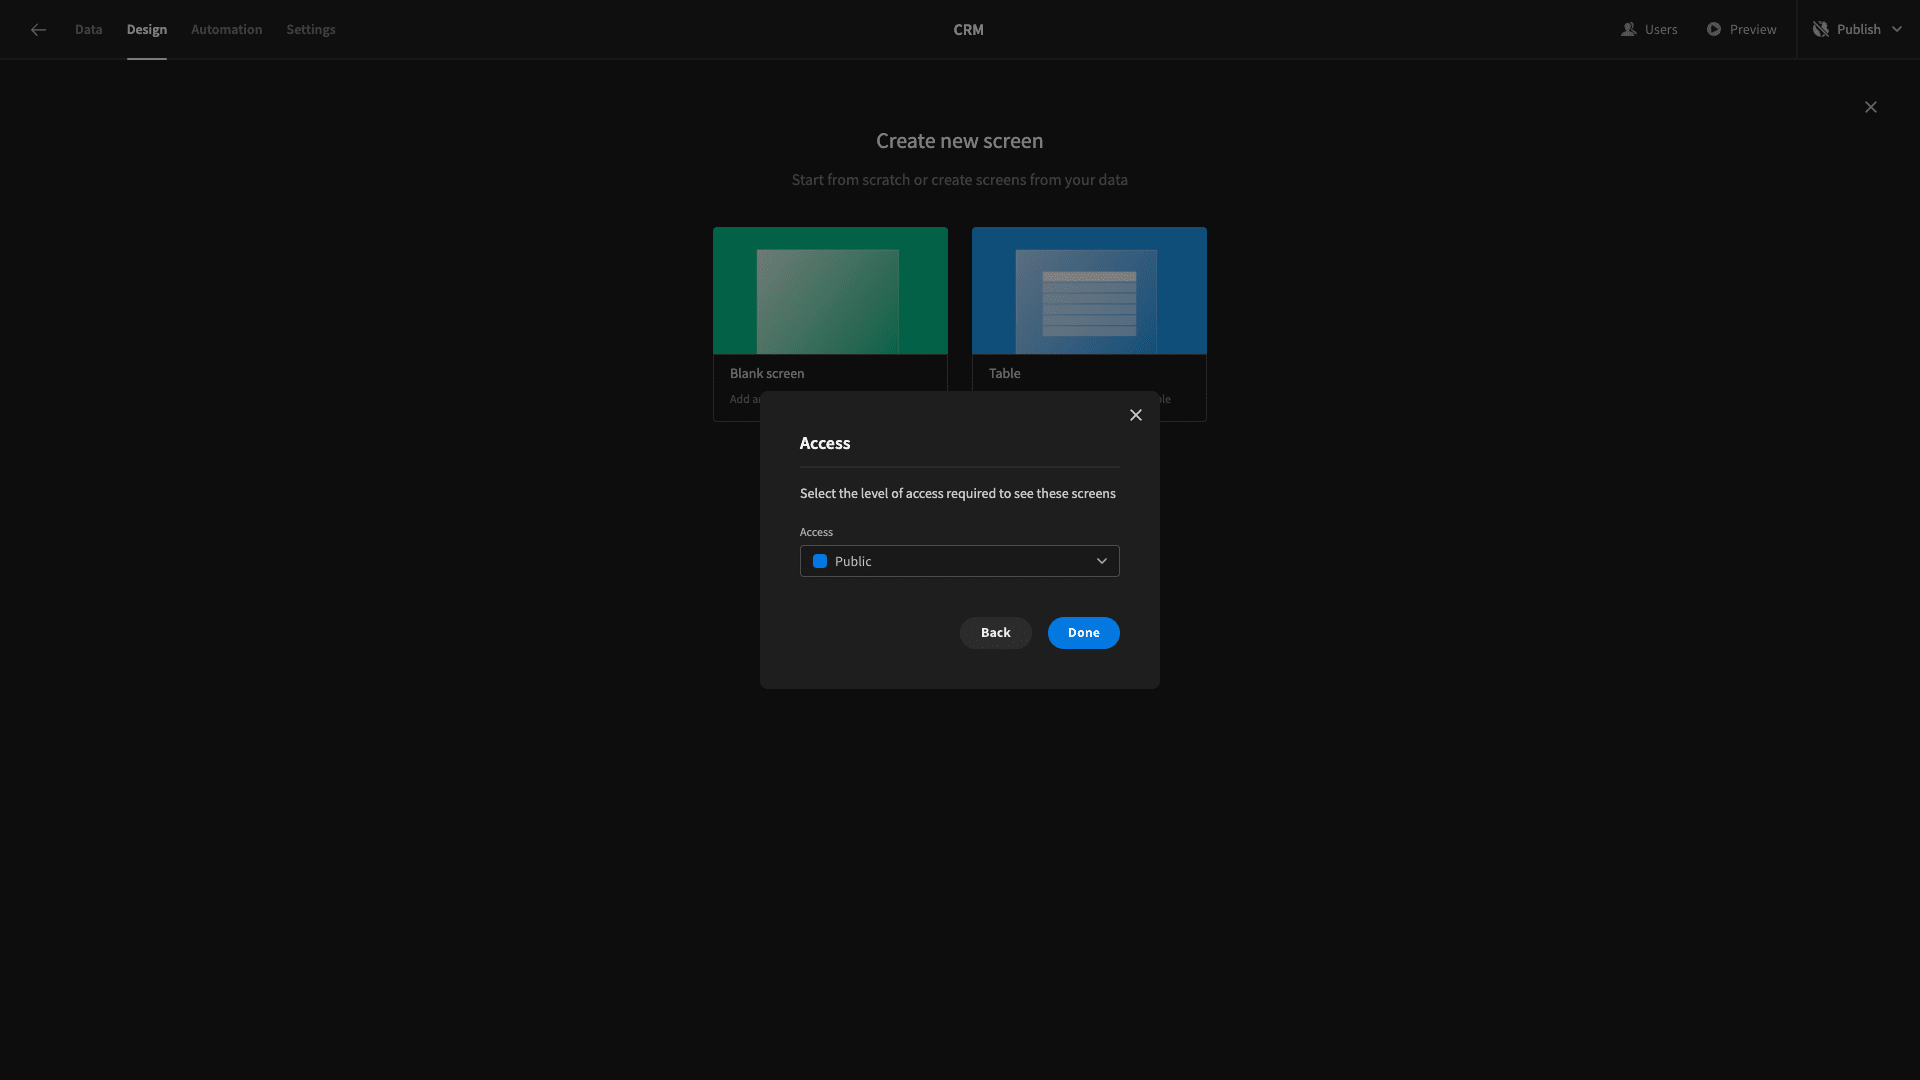
This means anyone will be able to access this particular screen - even if they don’t have an account associated with your Budibase tenant.
When unauthenticated users see the embedded version of the app, this is the only screen they’ll be able to access.
But, we’ll get to embedding the app in few minutes.
Building our basic form
We’ll start by center aligning everything in our new UI’s screen space:
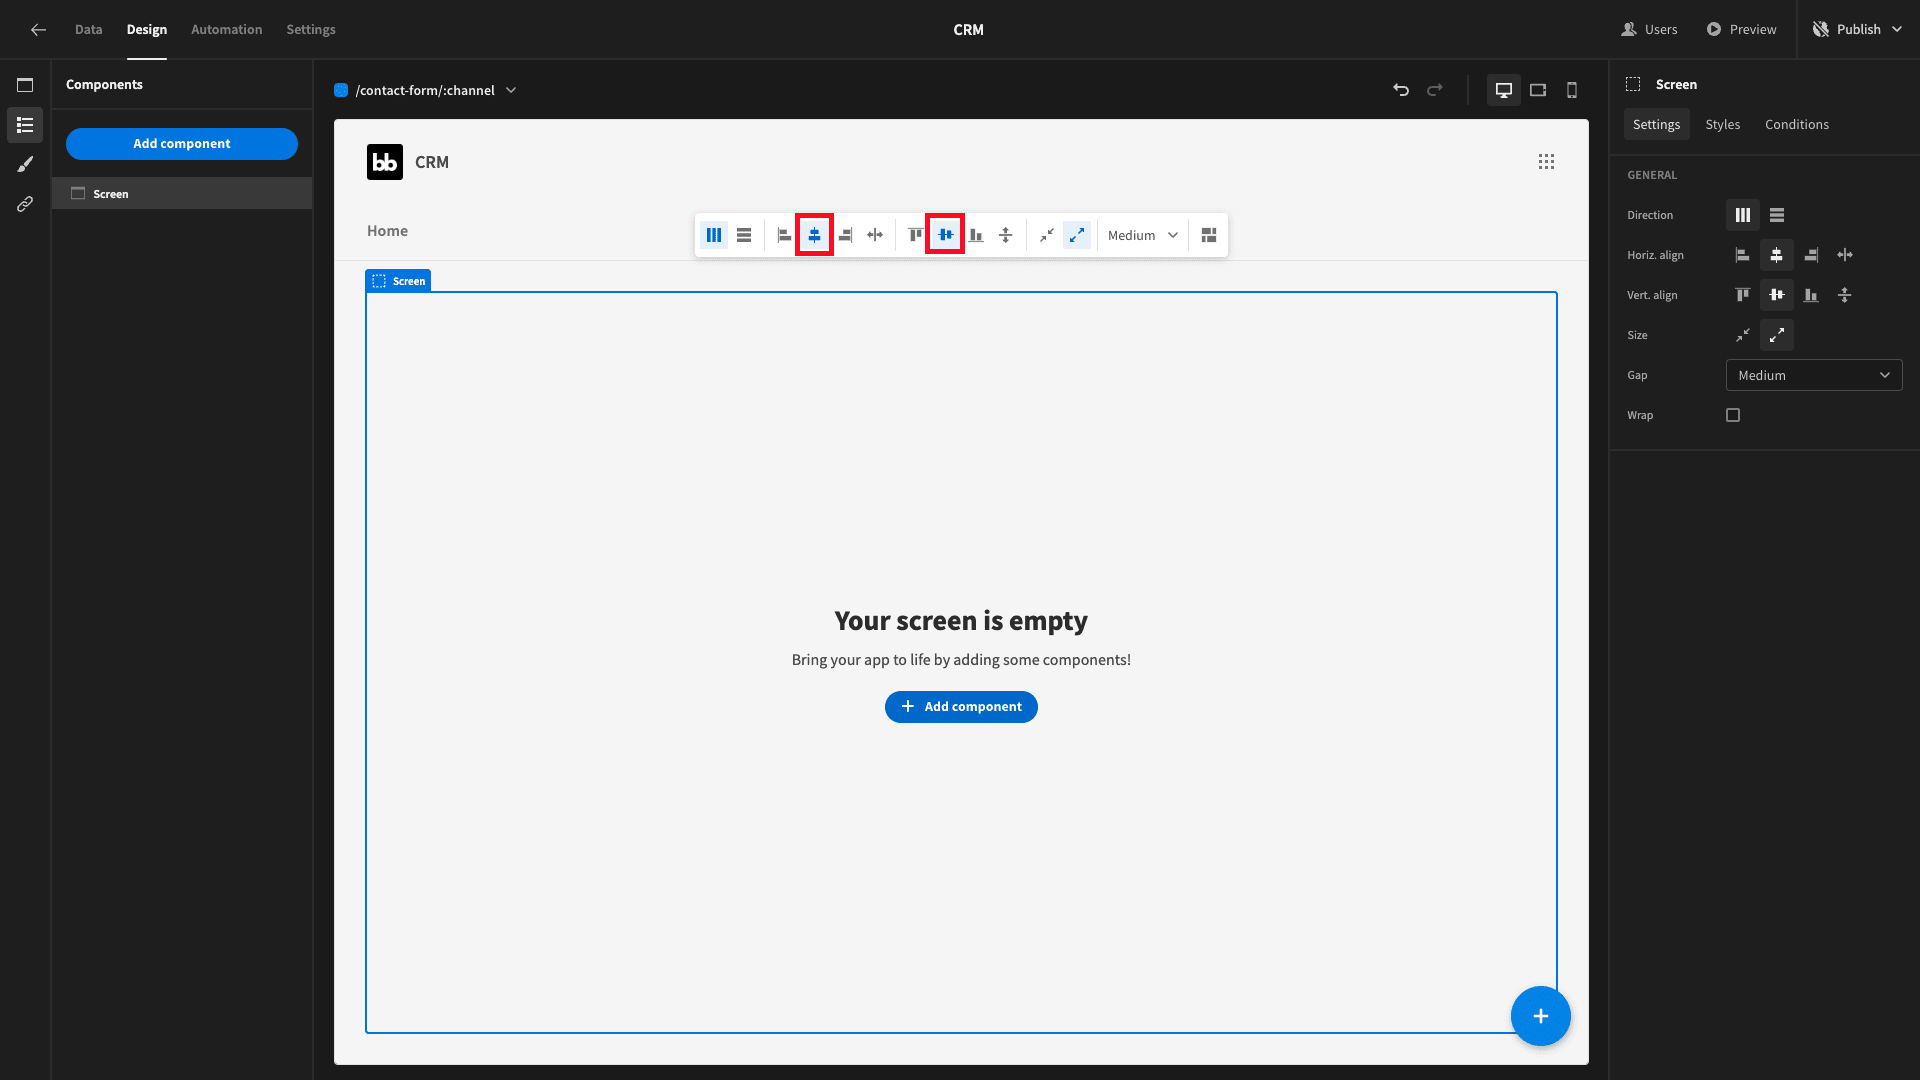
Then, we’ll add a Form component, which is going to wrap around our lead capture form fields.
We’ll call this Contact Form and set its schema to contacts:
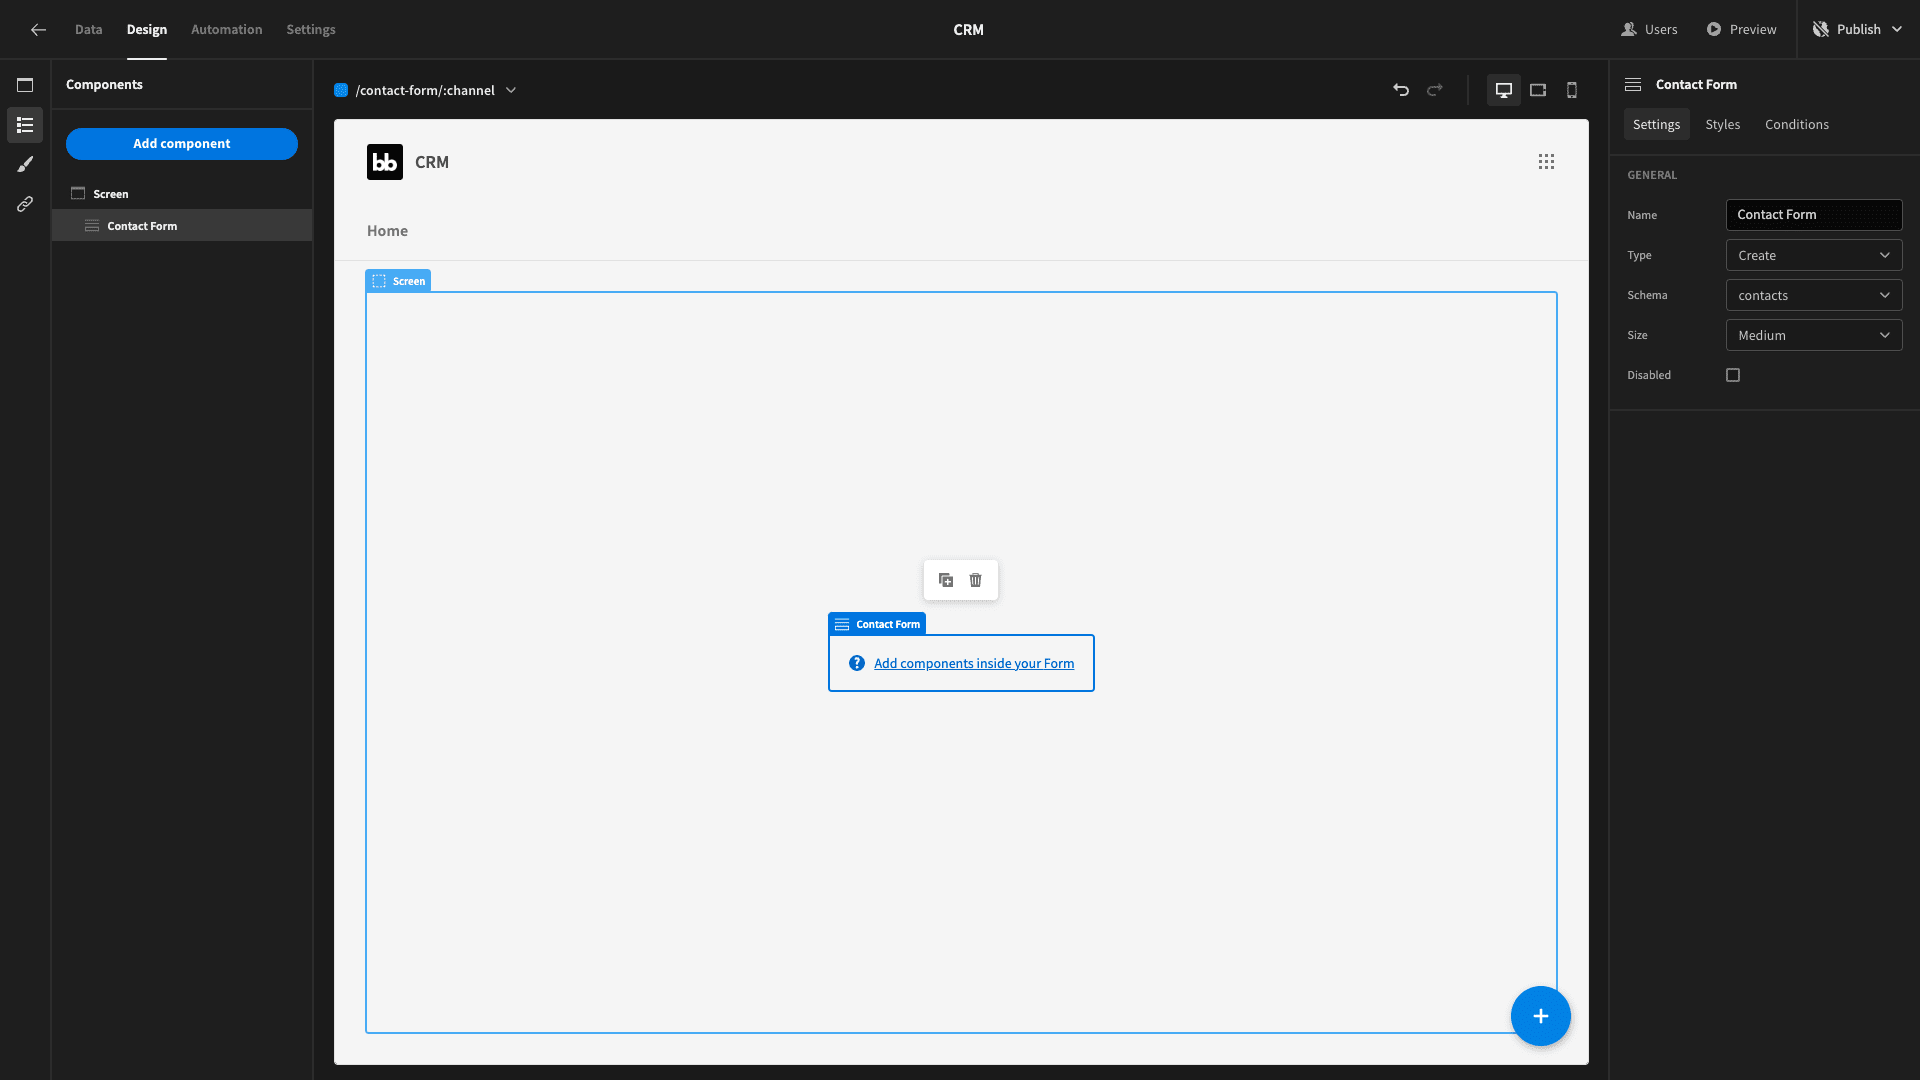
Inside this, we’ll nest a Field Group component and hit Update form fields:
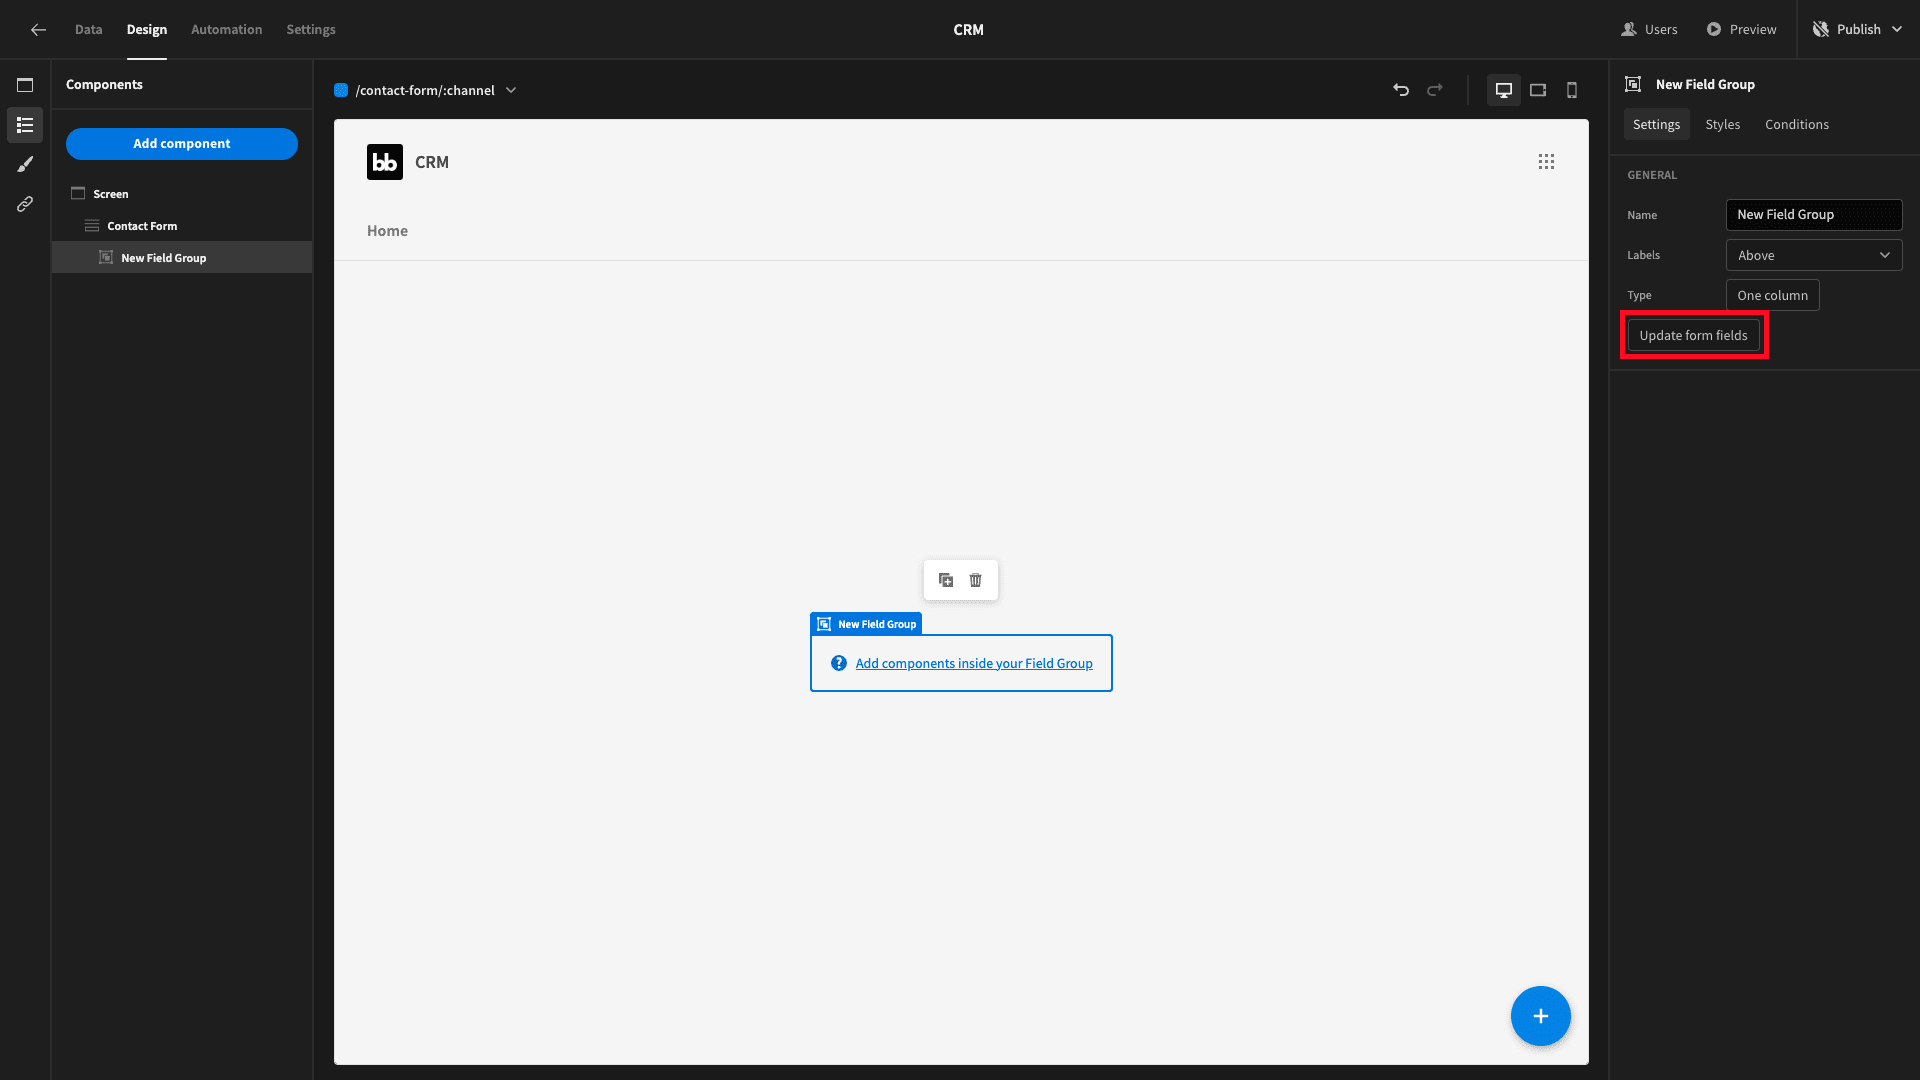
This will automatically create form fields for every attribute in our contacts table.
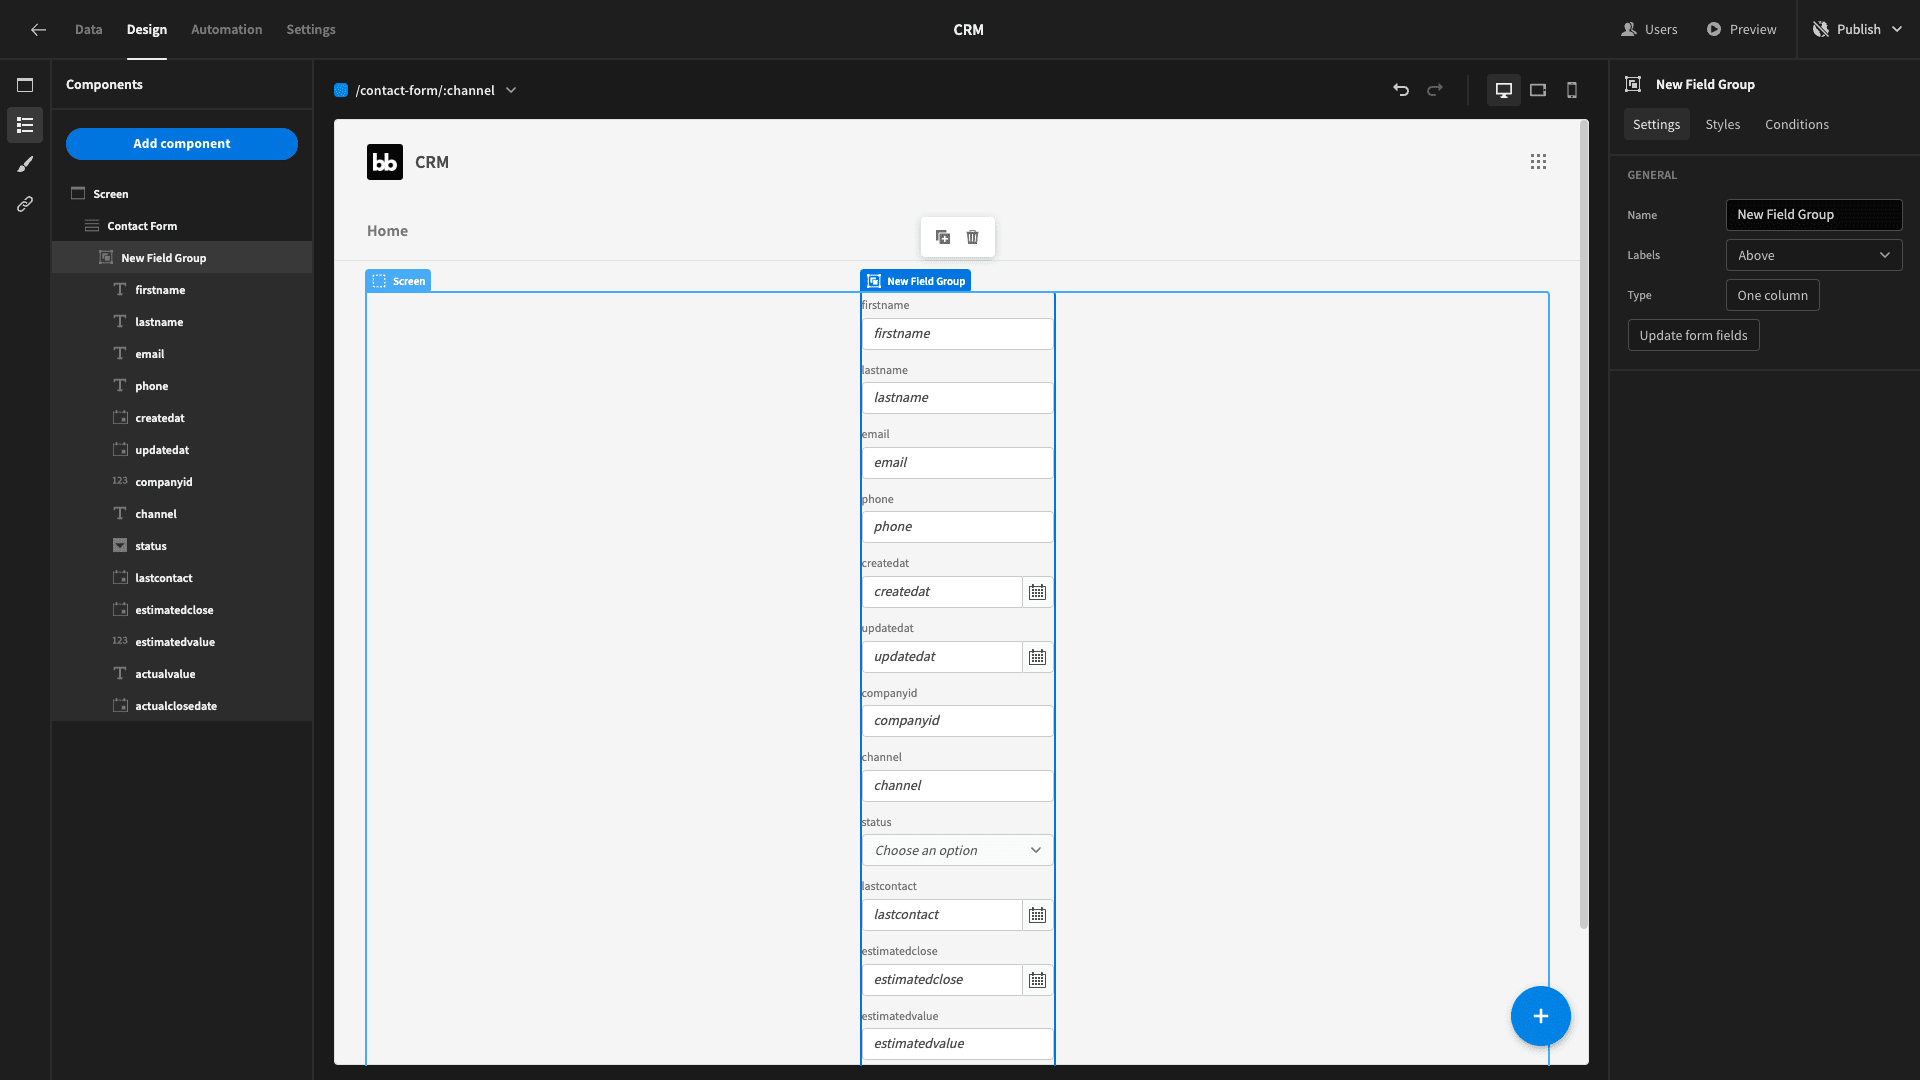
Obviously, we don’t want users to add all of these, so we’ll delete everything except first name, last name, email, and phone:
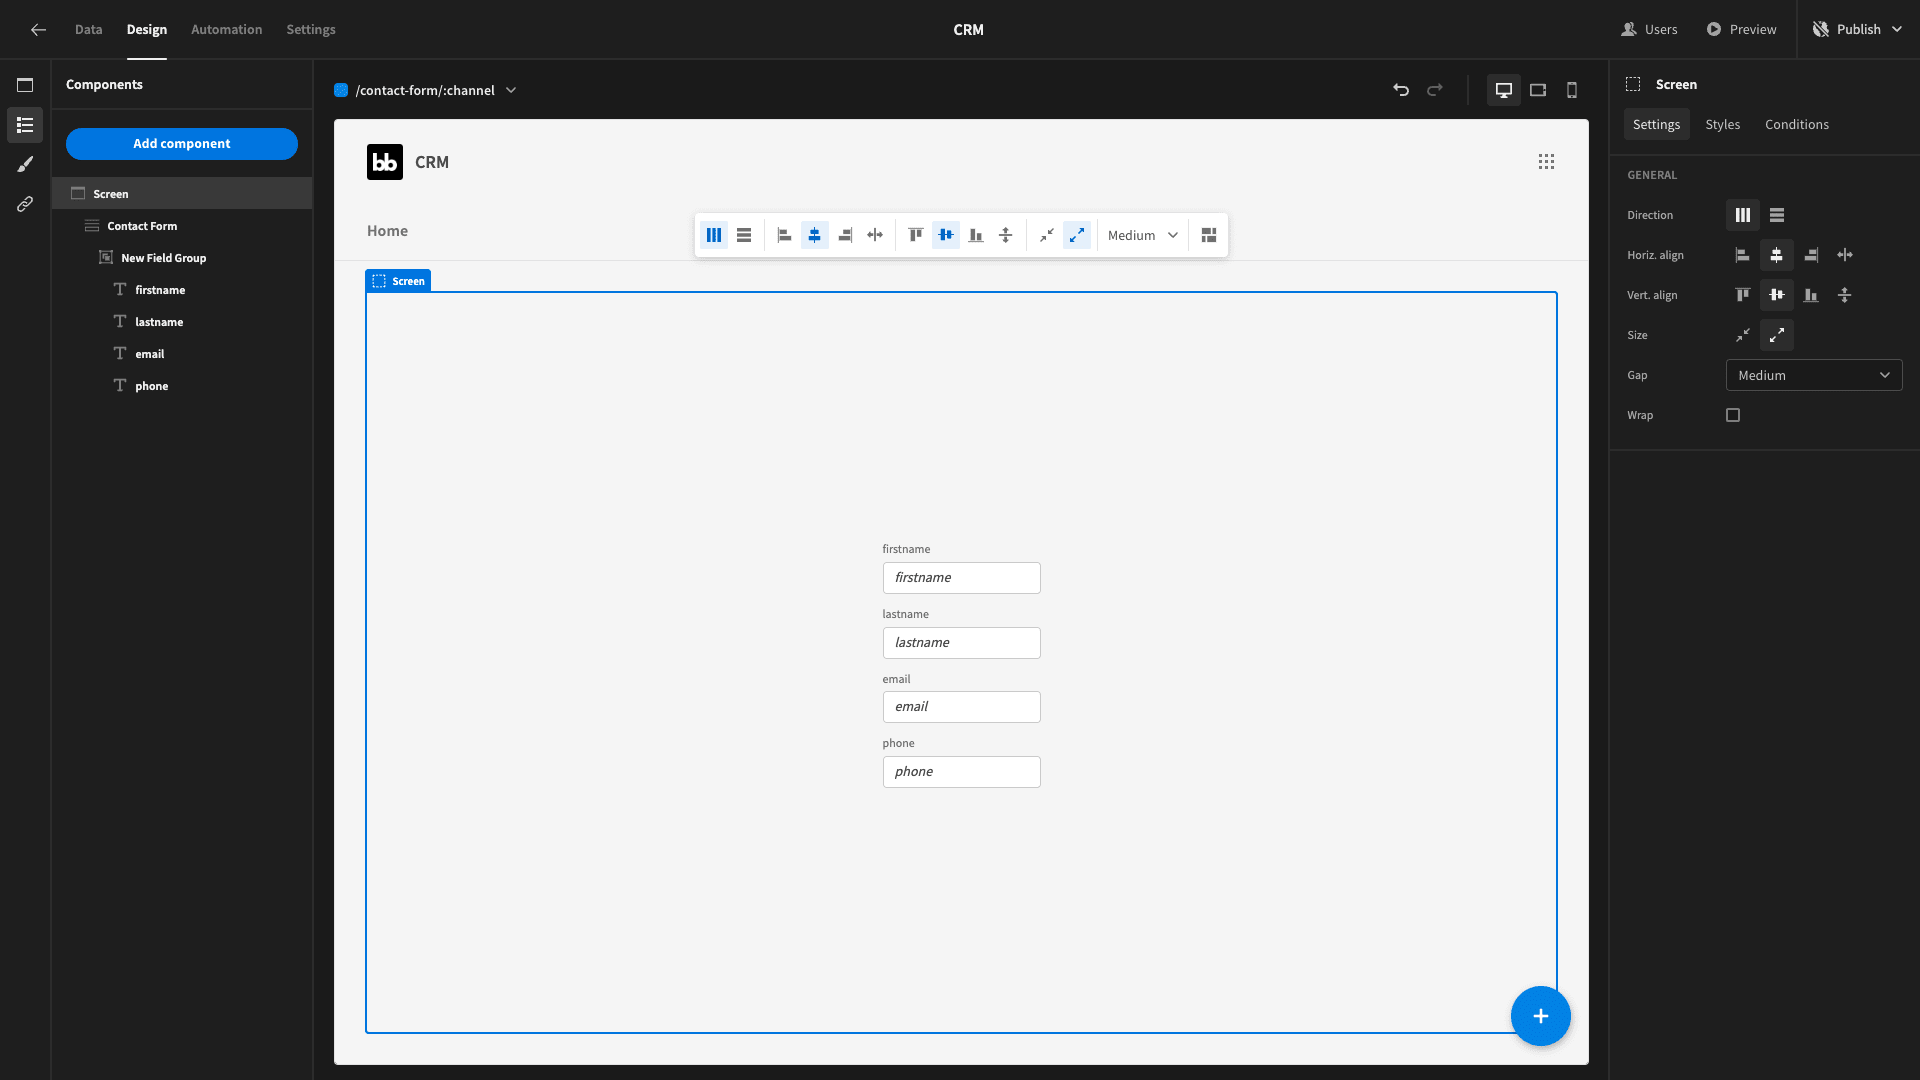
For the other fields, we’ll either populate these automatically when the row is saved or as the new lead works its way through our CRM’s data flow.
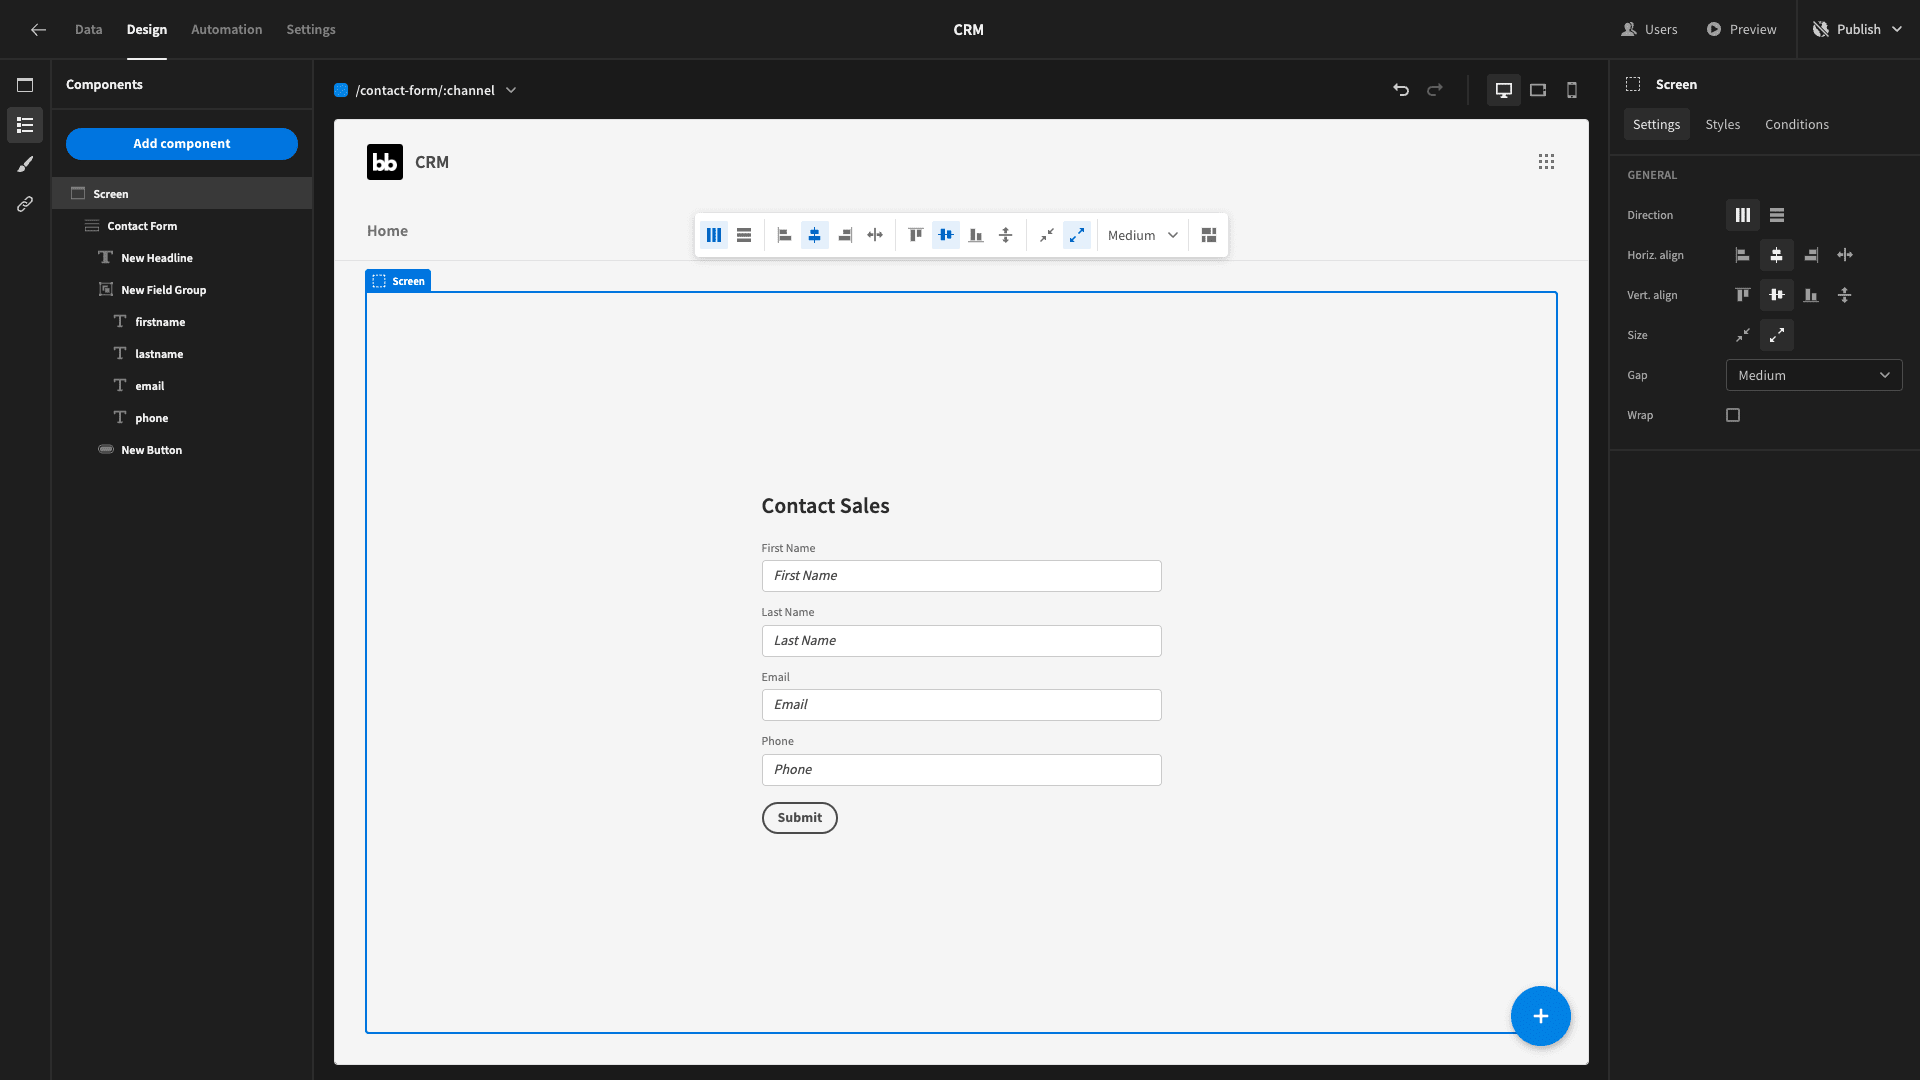
Next, we want to tidy up the design a bit. We’ll start by capitalizing the Label and Placeholder for each form field component and setting their widths to 400px:

Then, let’s add a headline component above our field group and a submit button below:
Defining button actions
Next, we need to configure what our button does. It’ll actually do a couple of things:
- Save the row - including populating certain values that aren’t included in the form.
- Make the form disappear once a new lead has been submitted - to confirm that their details have been recorded.
We can use the side panel to open the on-click actions drawer:
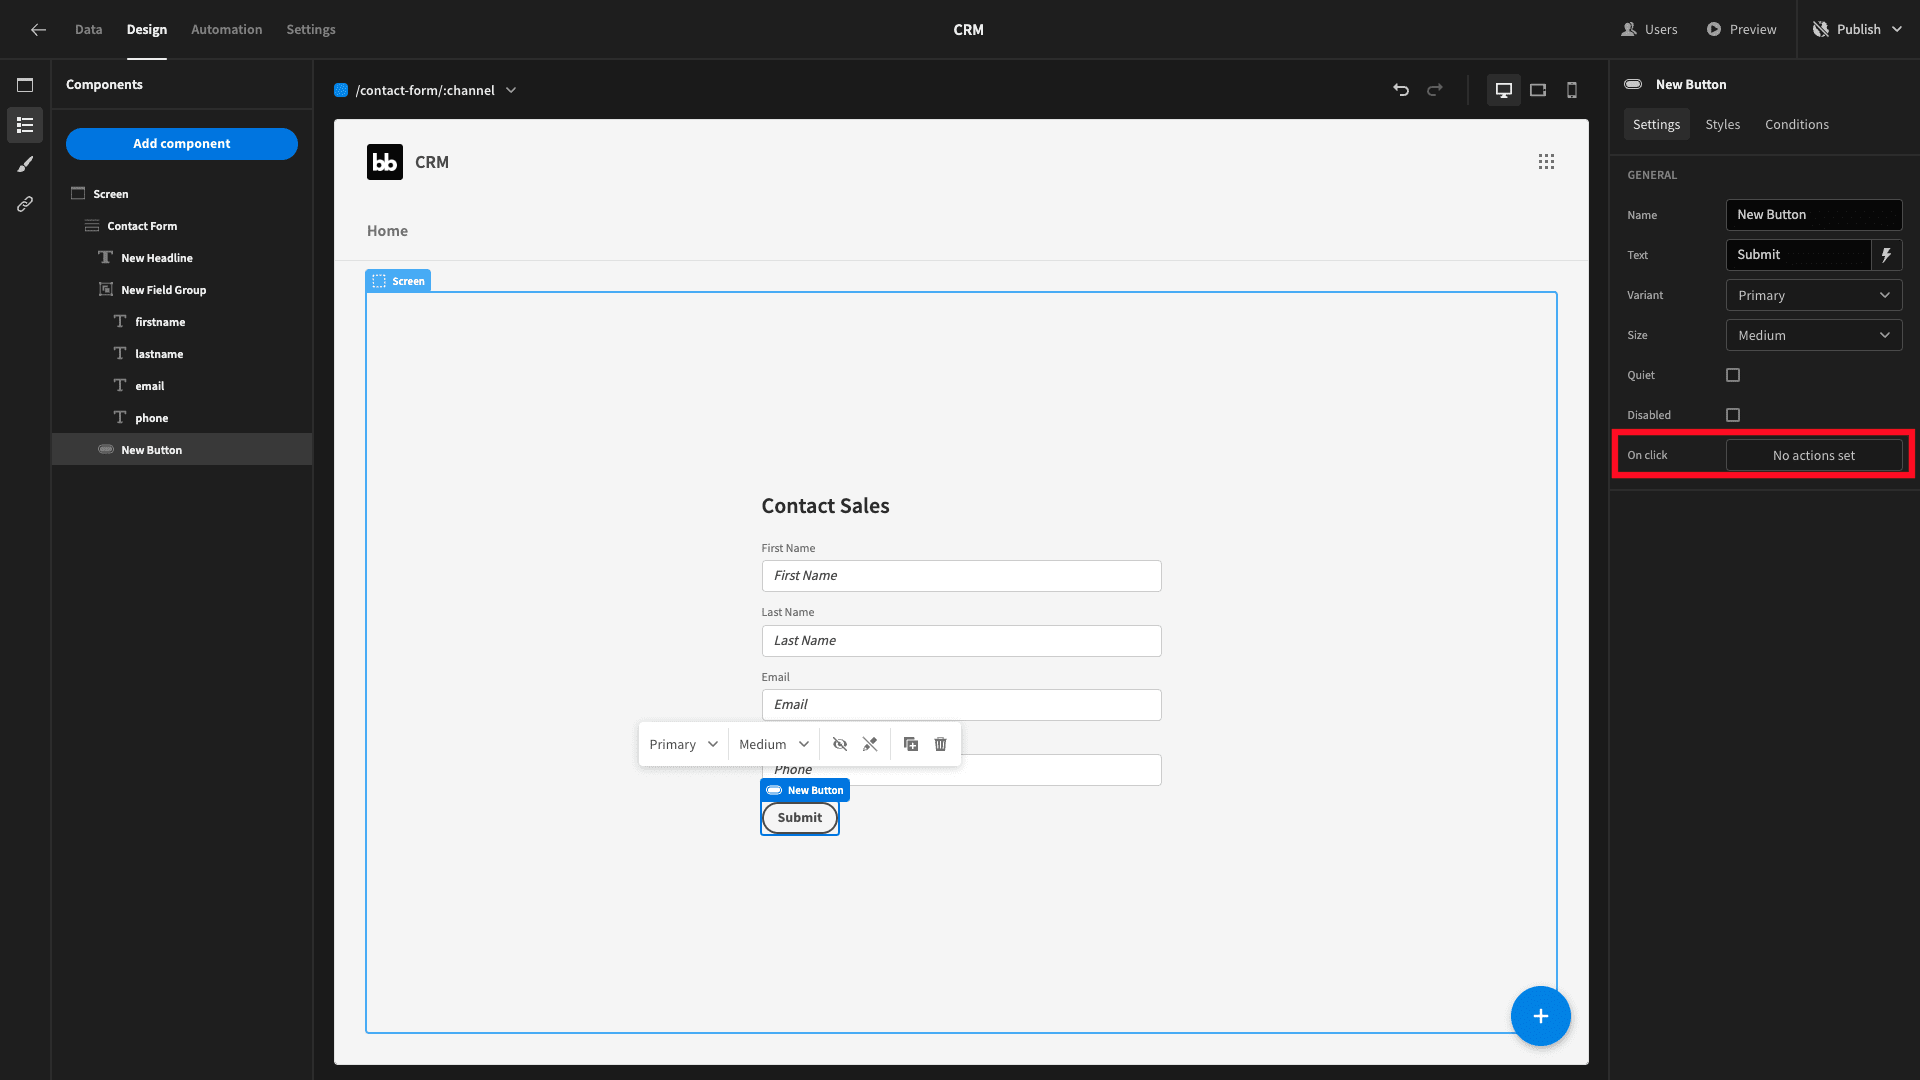
We’ll start by adding a save row action with the table set to contacts:

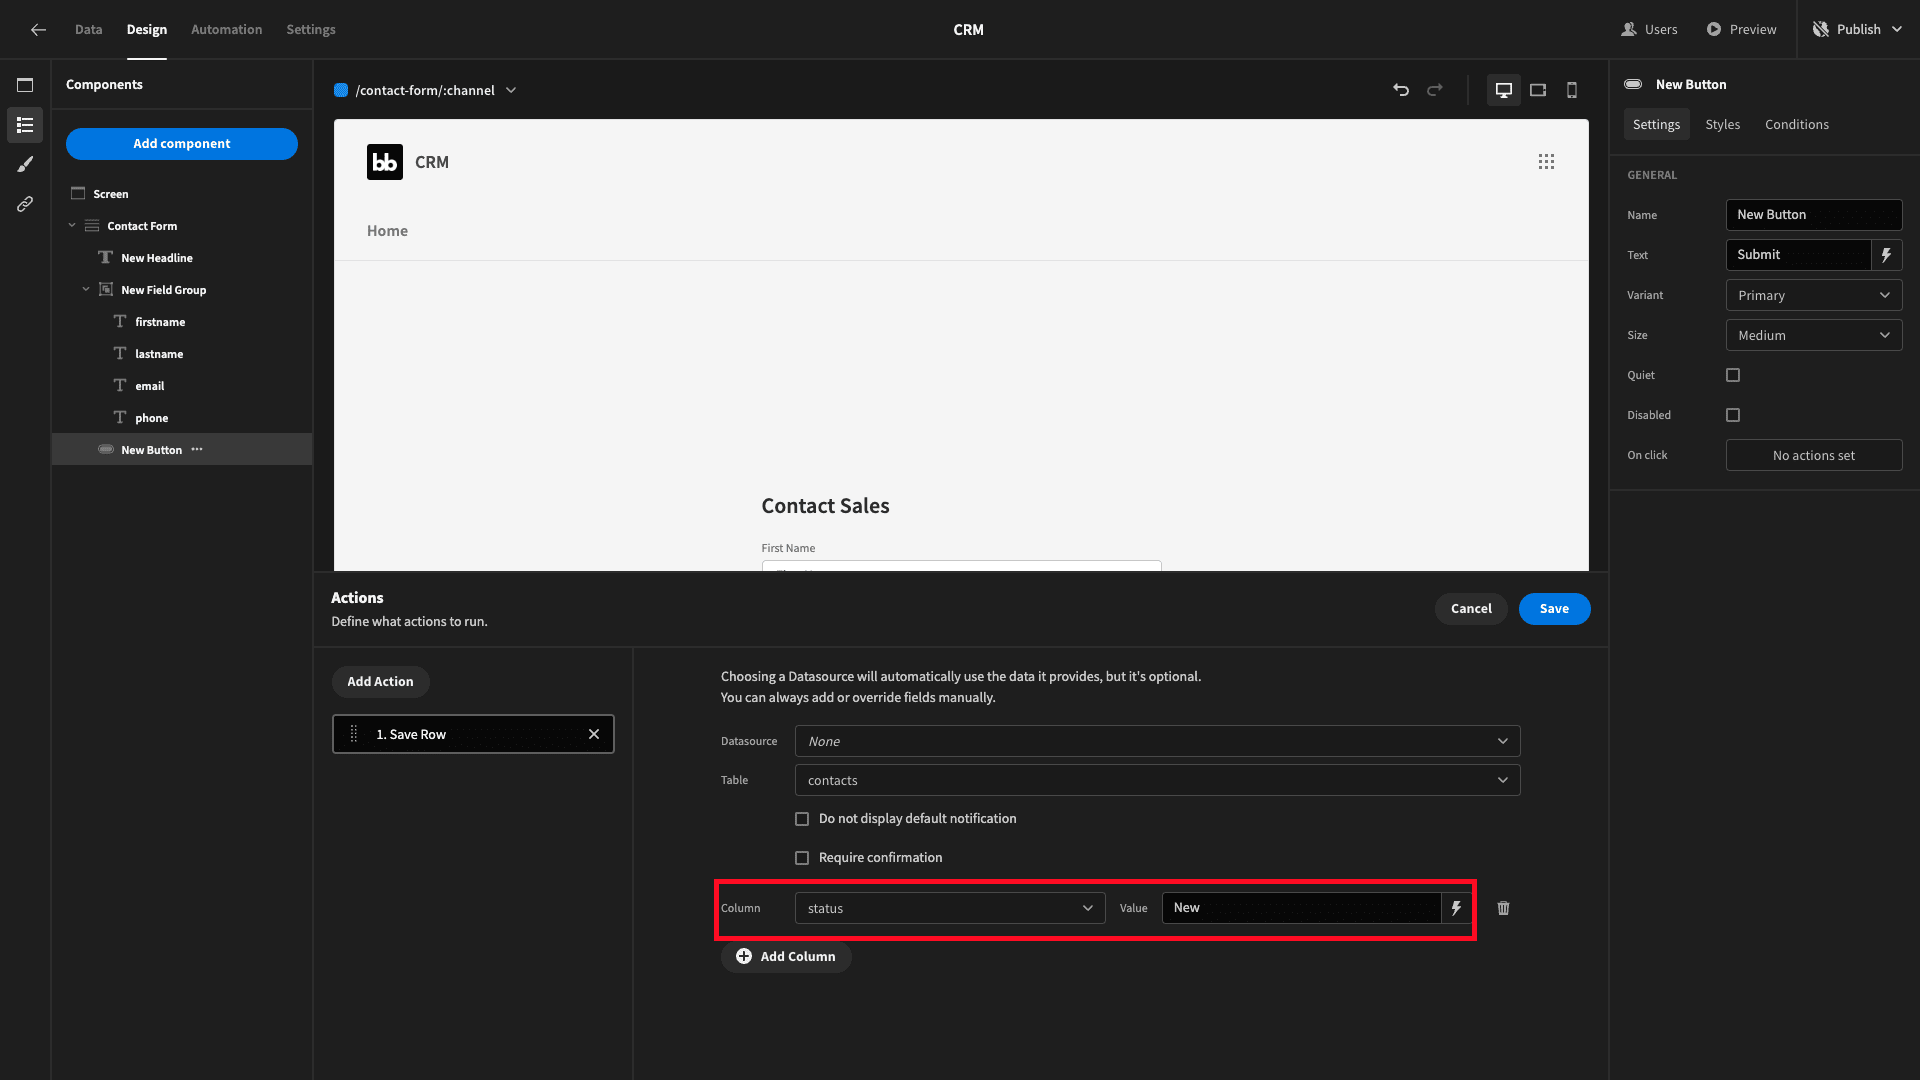
Then, we’ll hit the Add Columns button to save a few other attributes in addition to what’s prodived in the form.
First, we’ll set the status to New:
Then, we need to set the channel attribute to whatever is bound to the :channel element of our URL:
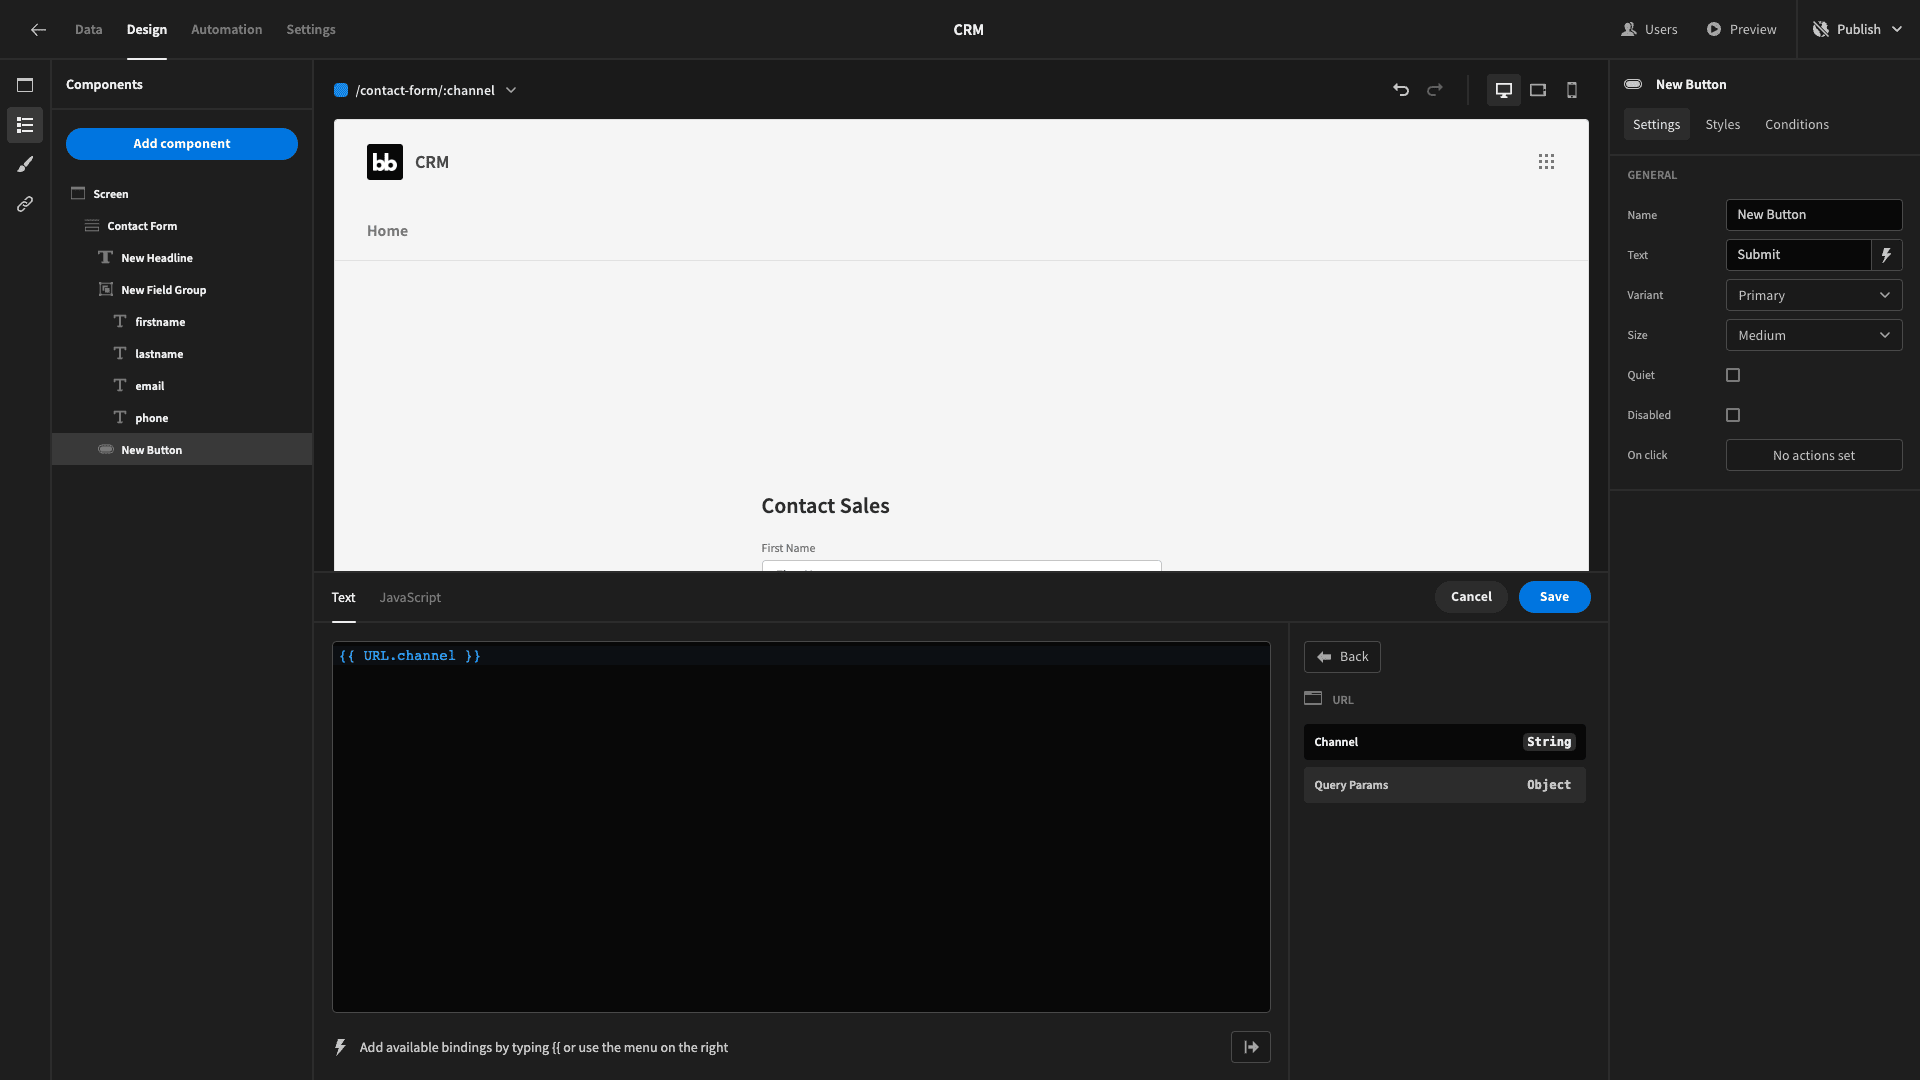
So we’re using {{ URL.channel }} as a bindable value. This means that when we save a row, the channel attribute will be set to whatever we provide in the UI when we embed to form. We’ll return to this in a second.
At this point, we’re also going to head to the theme section of Budibase and set our app’s color scheme to Nord - to make it a bit more attractive for prospective customers:
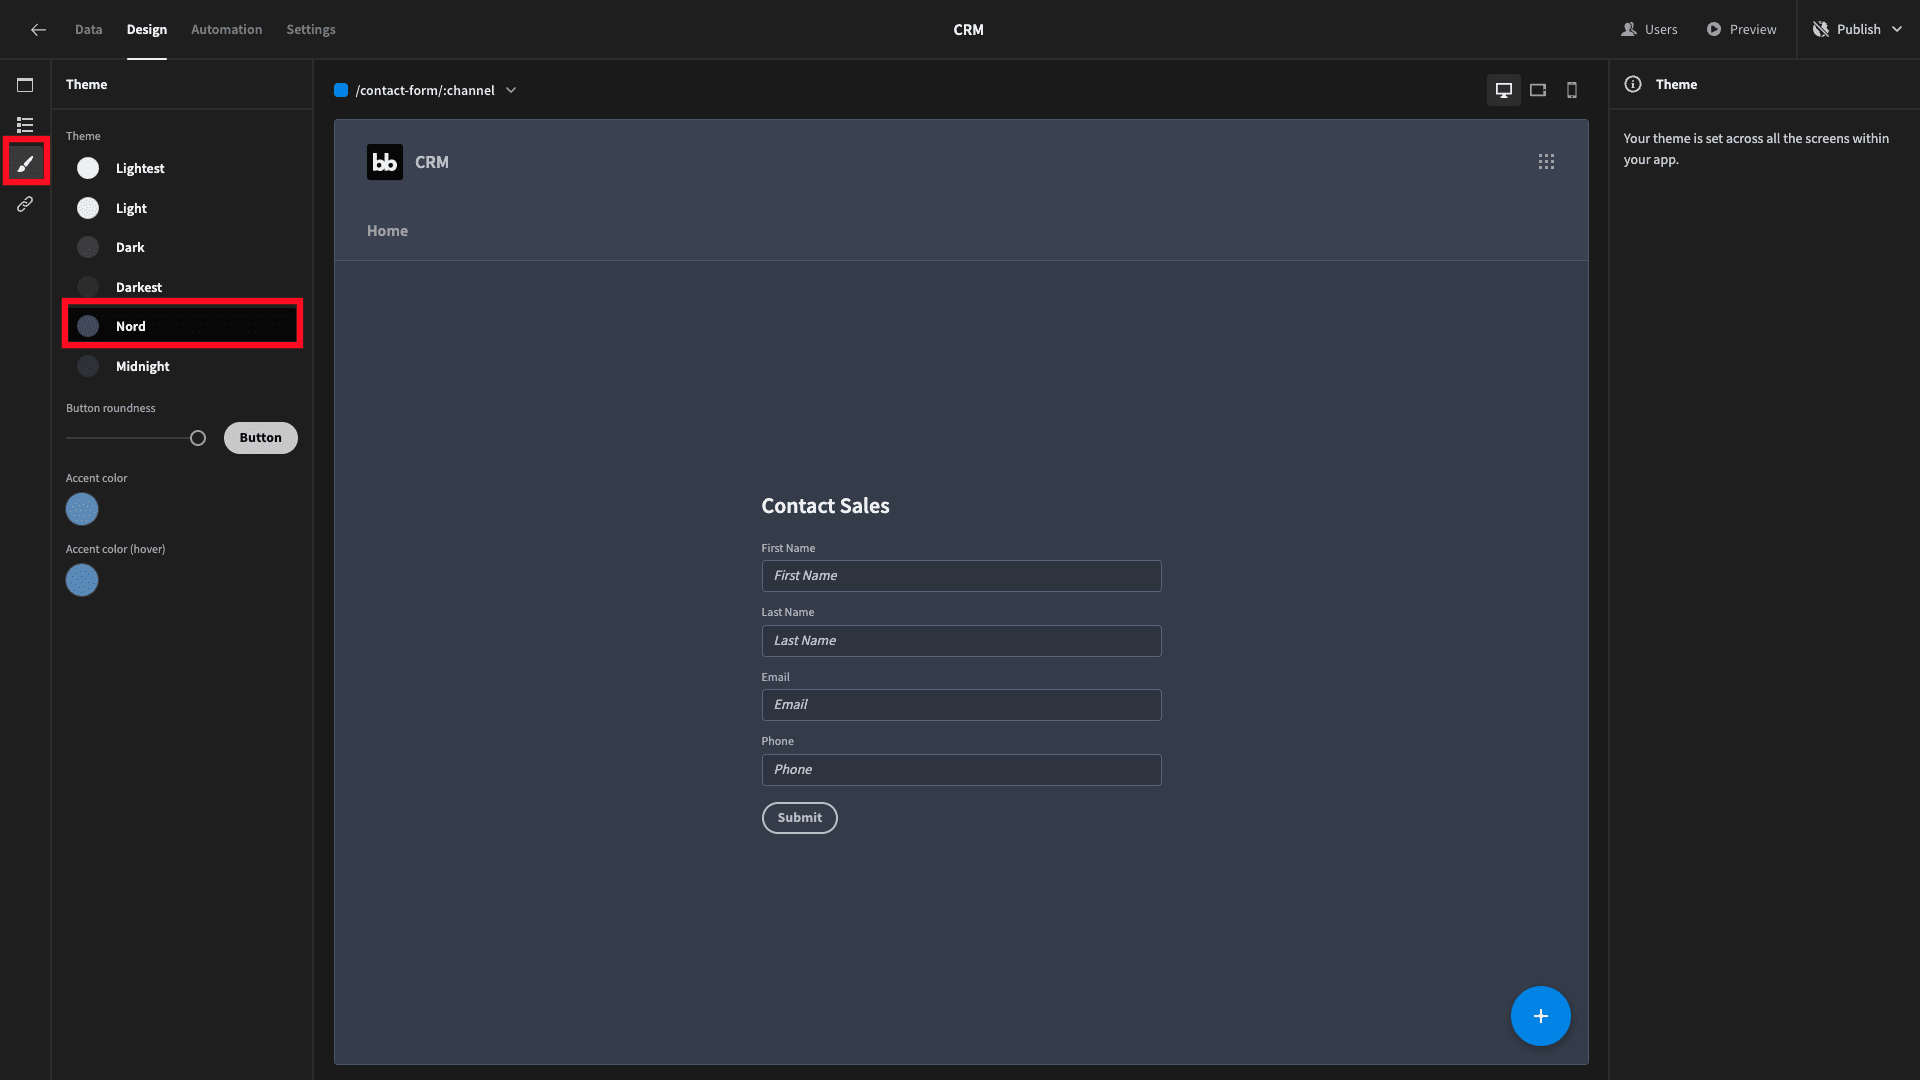
We’ll also disable the show nav option for this screen.
In order for a submission to make the whole form disappear, we need to add another action to our button. This time, we’re using the update state action. We’ll add a new key called form-submitted and set this to yes when someone clicks the button:
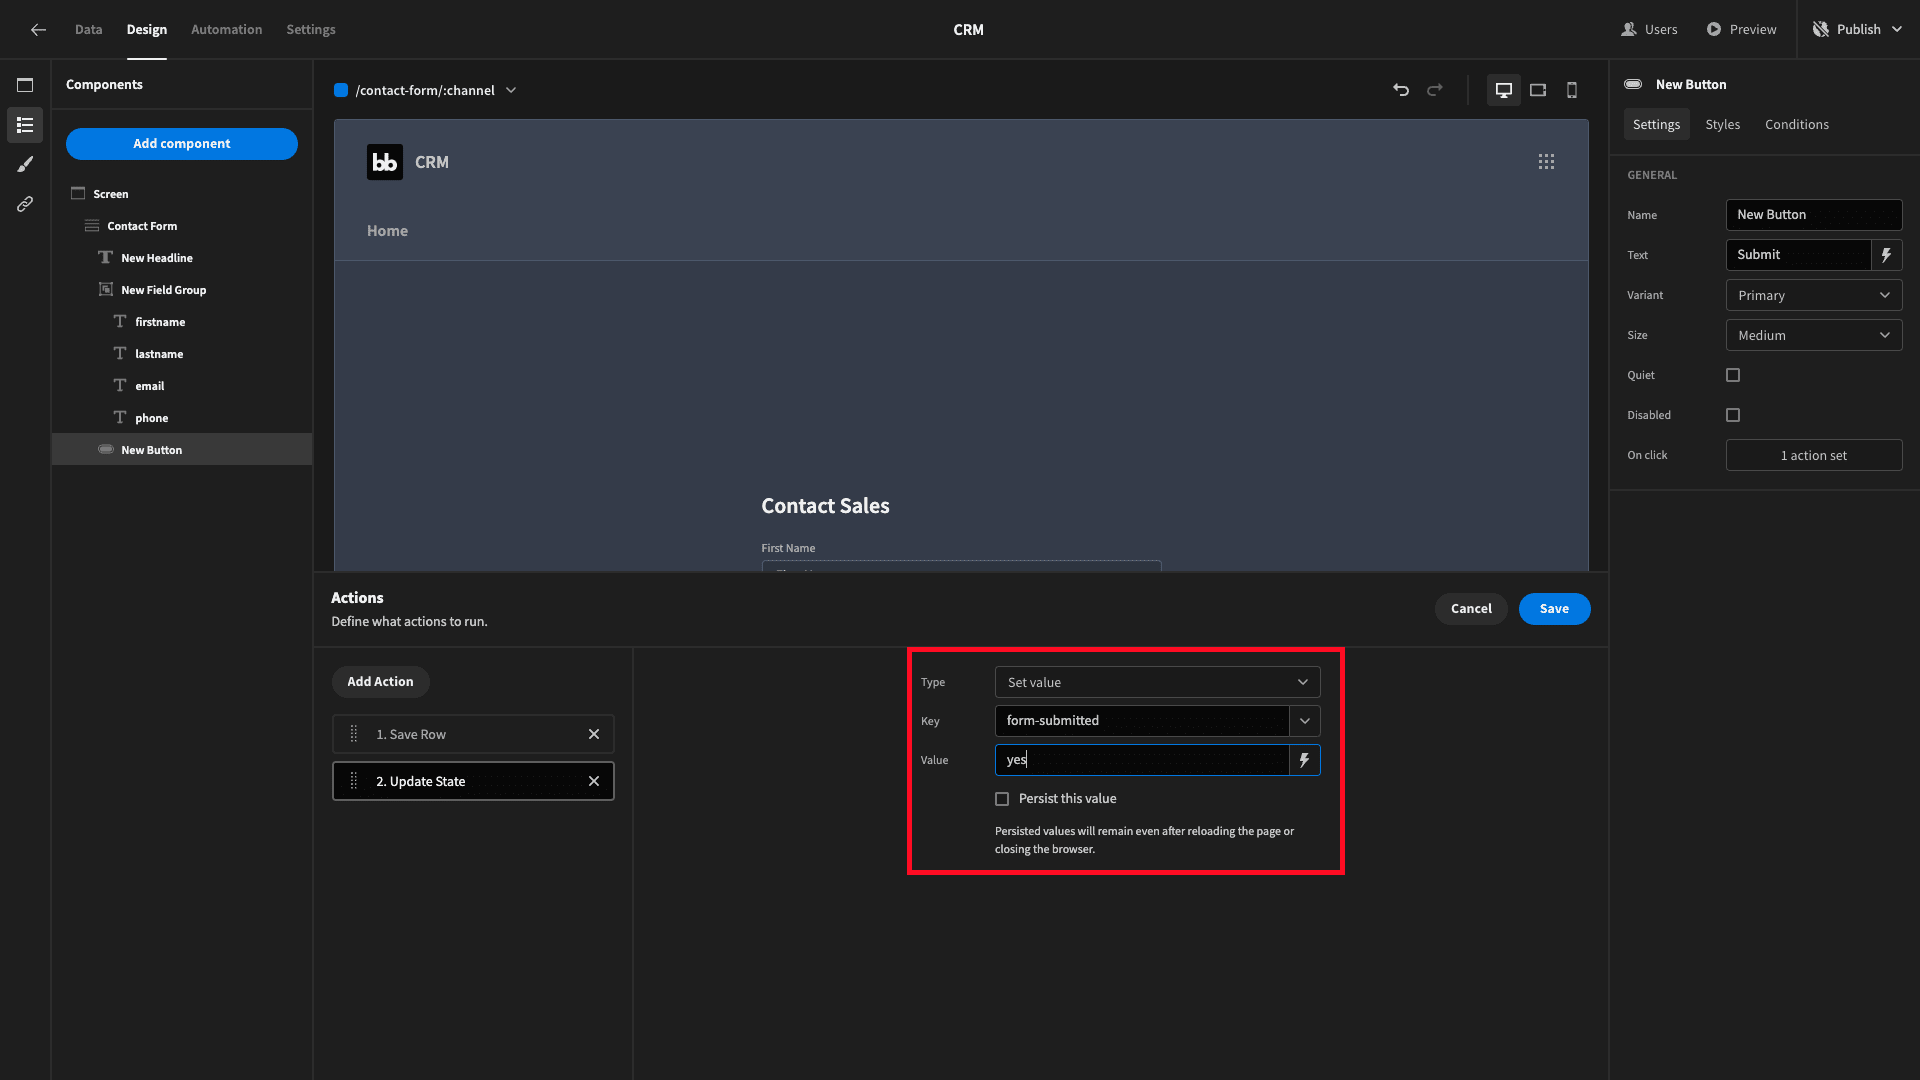
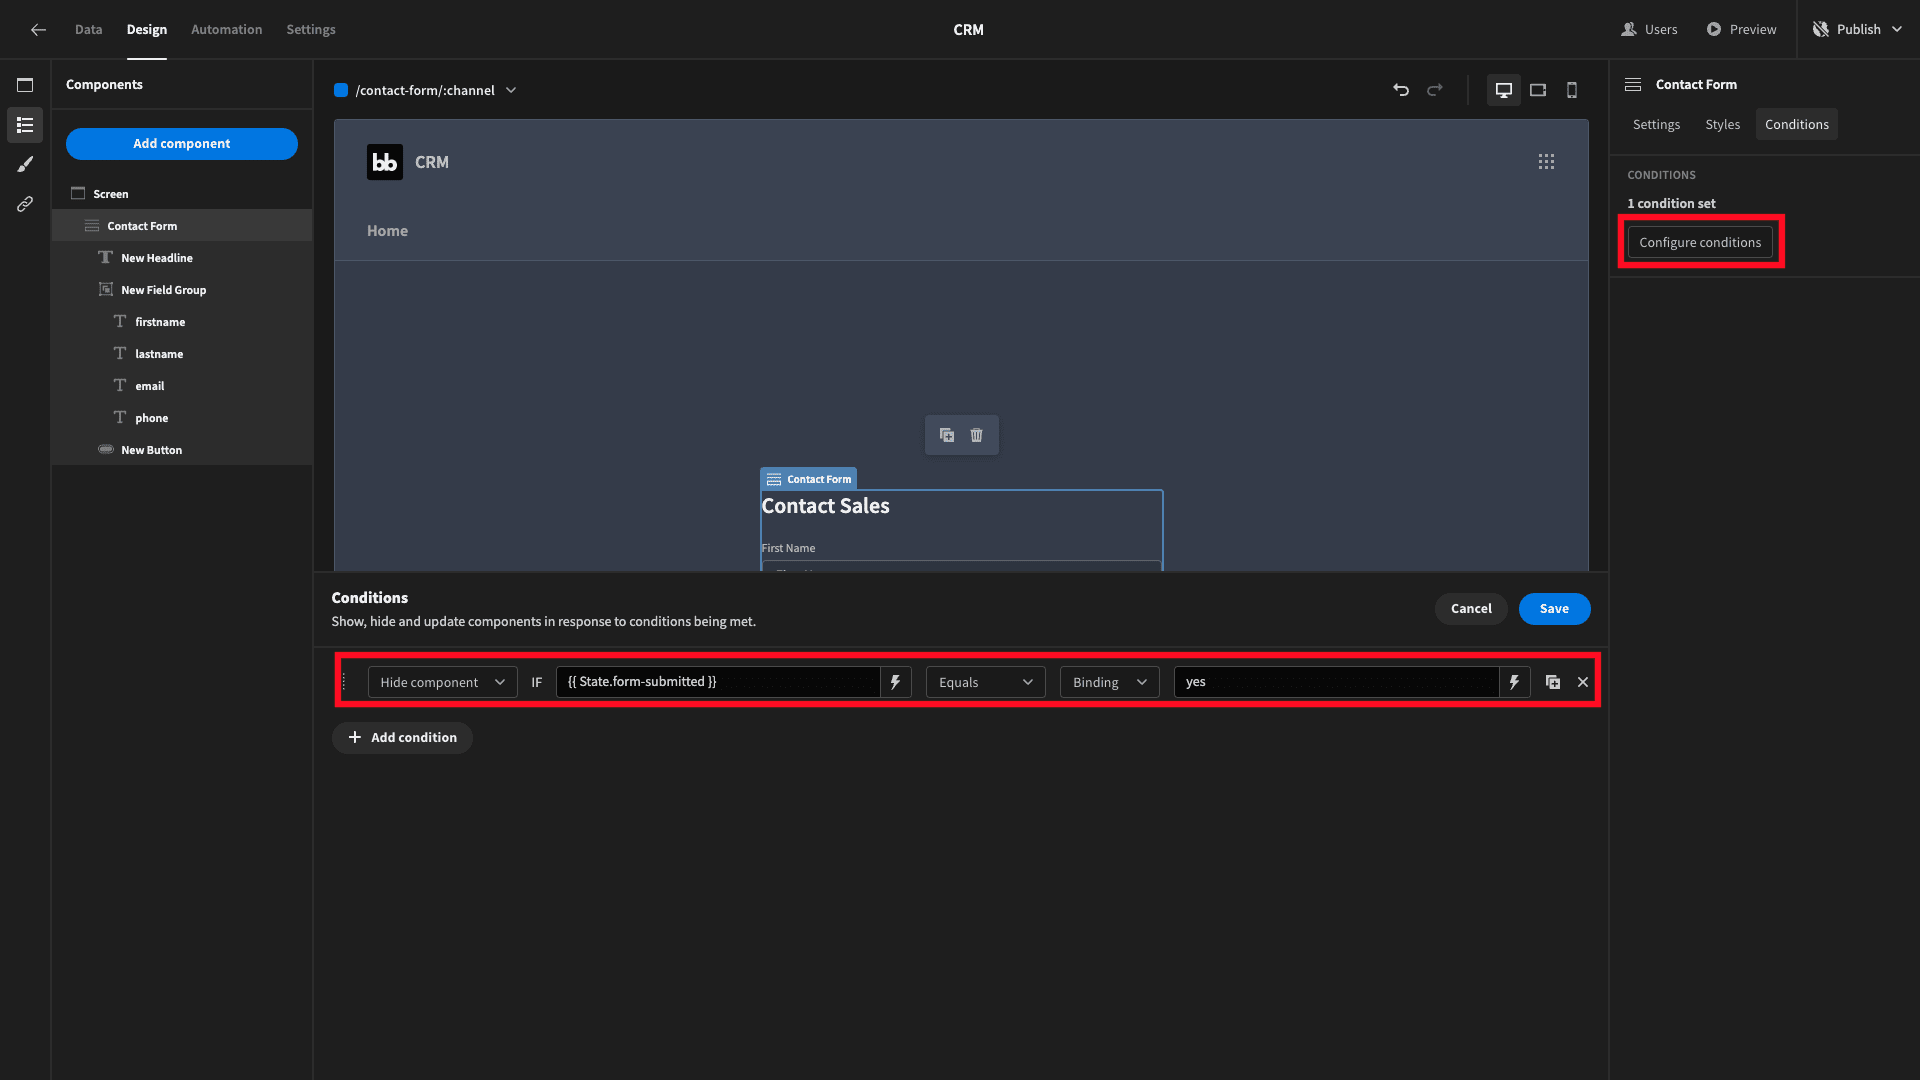
Then, we’ll select our Form component again and hit configure conditions. We’ll create a conditonality rule so that the whole form is hidden is form-submitted equals yes:
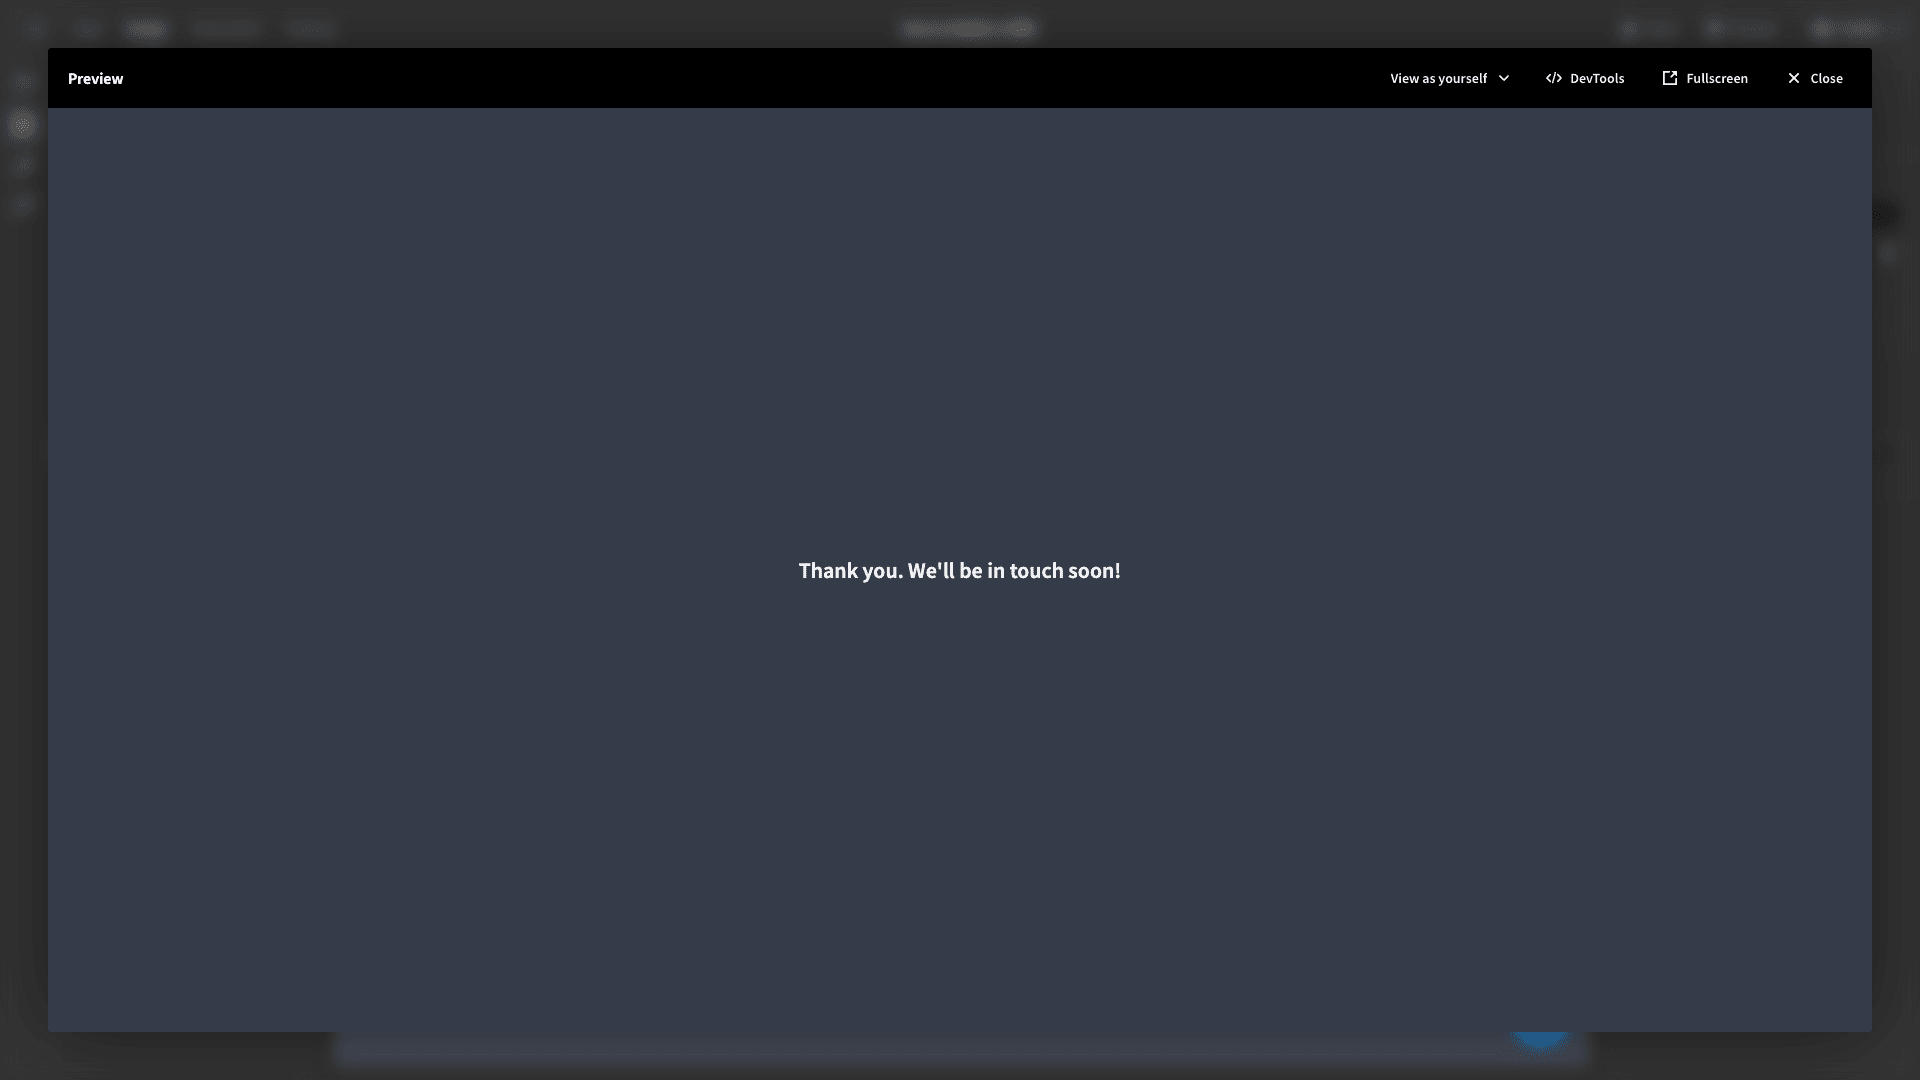
Then, we’ll add a second headline component below our Contact Form to say Thank you. We’ll be in touch soon! We’ll give this the opposite conditionality rule, so it’s only displayed when a user clicks submit and hidden if the state is empty.
Embedding a form
Now, our form is ready to go. The last thing we need to do is embed it somewhere. We can do this using an iFrame in HTML.
Each time we do this, we’ll replace the :channel string with whatever we want to call the channel where it’s hosted - like our website, emails, or social networks.
So, if we put this on our website, the URL slug might be:
1/contact-form/websiteIn an email we might call it:
1/contact-form/emailOr even:
1/contact-form/sales-email-23-08-2023You get the picture.
If we want to embed the form in an iFrame on our website, the full HTML might be:
1"<iframe width="800" height="800" frameborder="0" allow="clipboard-write;camera;geolocation" src="https://your-budibase-host/embed/crm/#/contact-form/website"> </iframe>"
You can use your own custom HTML to define the size of your embedded iFrame - or any permissions you want to provide it.
Automatic notifications
We also said that we want to notify our sales team when a new lead has submitted their details. We’re going to do this using Discord messages - but you could just as easily do it with Slack, email, or the communication channel of your choice.
We’ll start by heading over to the Automation tab and hitting create automation. We’ll be prompted to choose a name and a trigger.
We’ll call our rule NewContact and use a row created trigger:
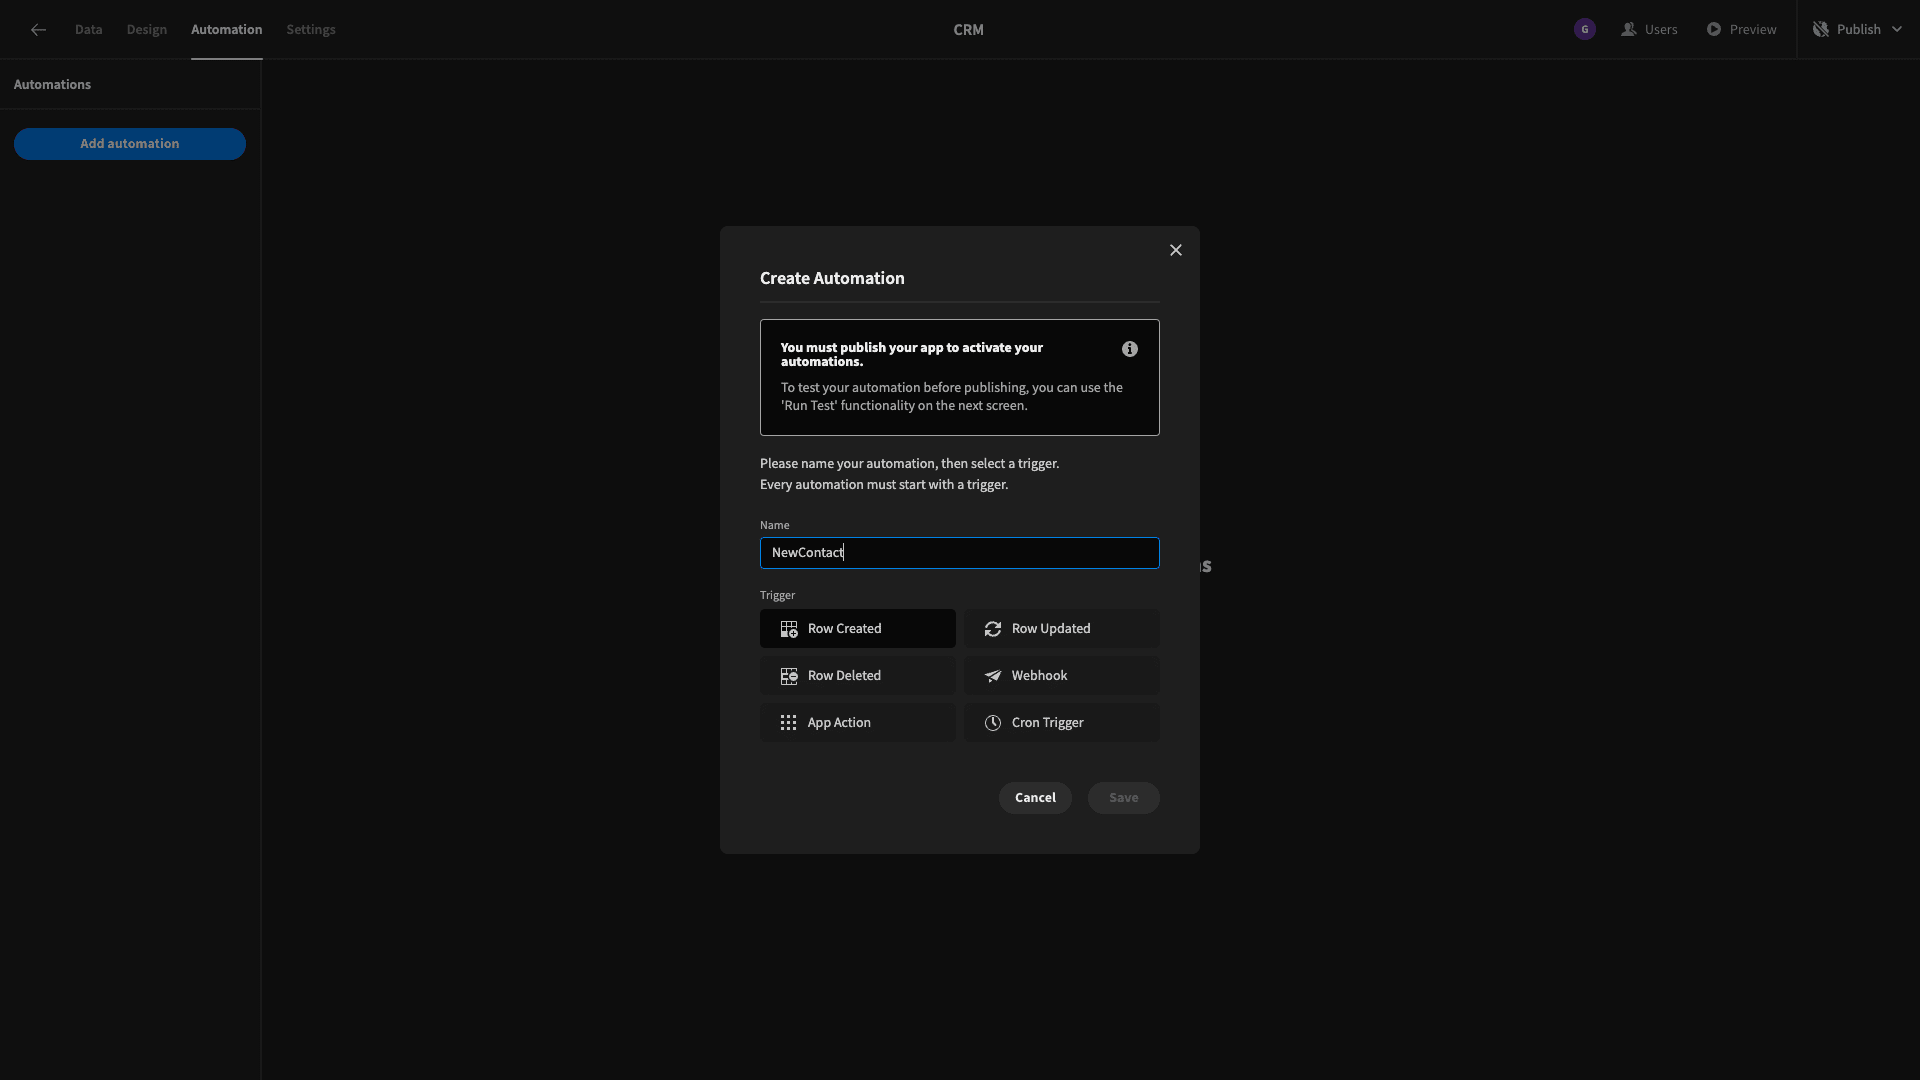
This means that our automation sequence will be initiated each time a row is added to whichever table we choose - in our case, contacts.
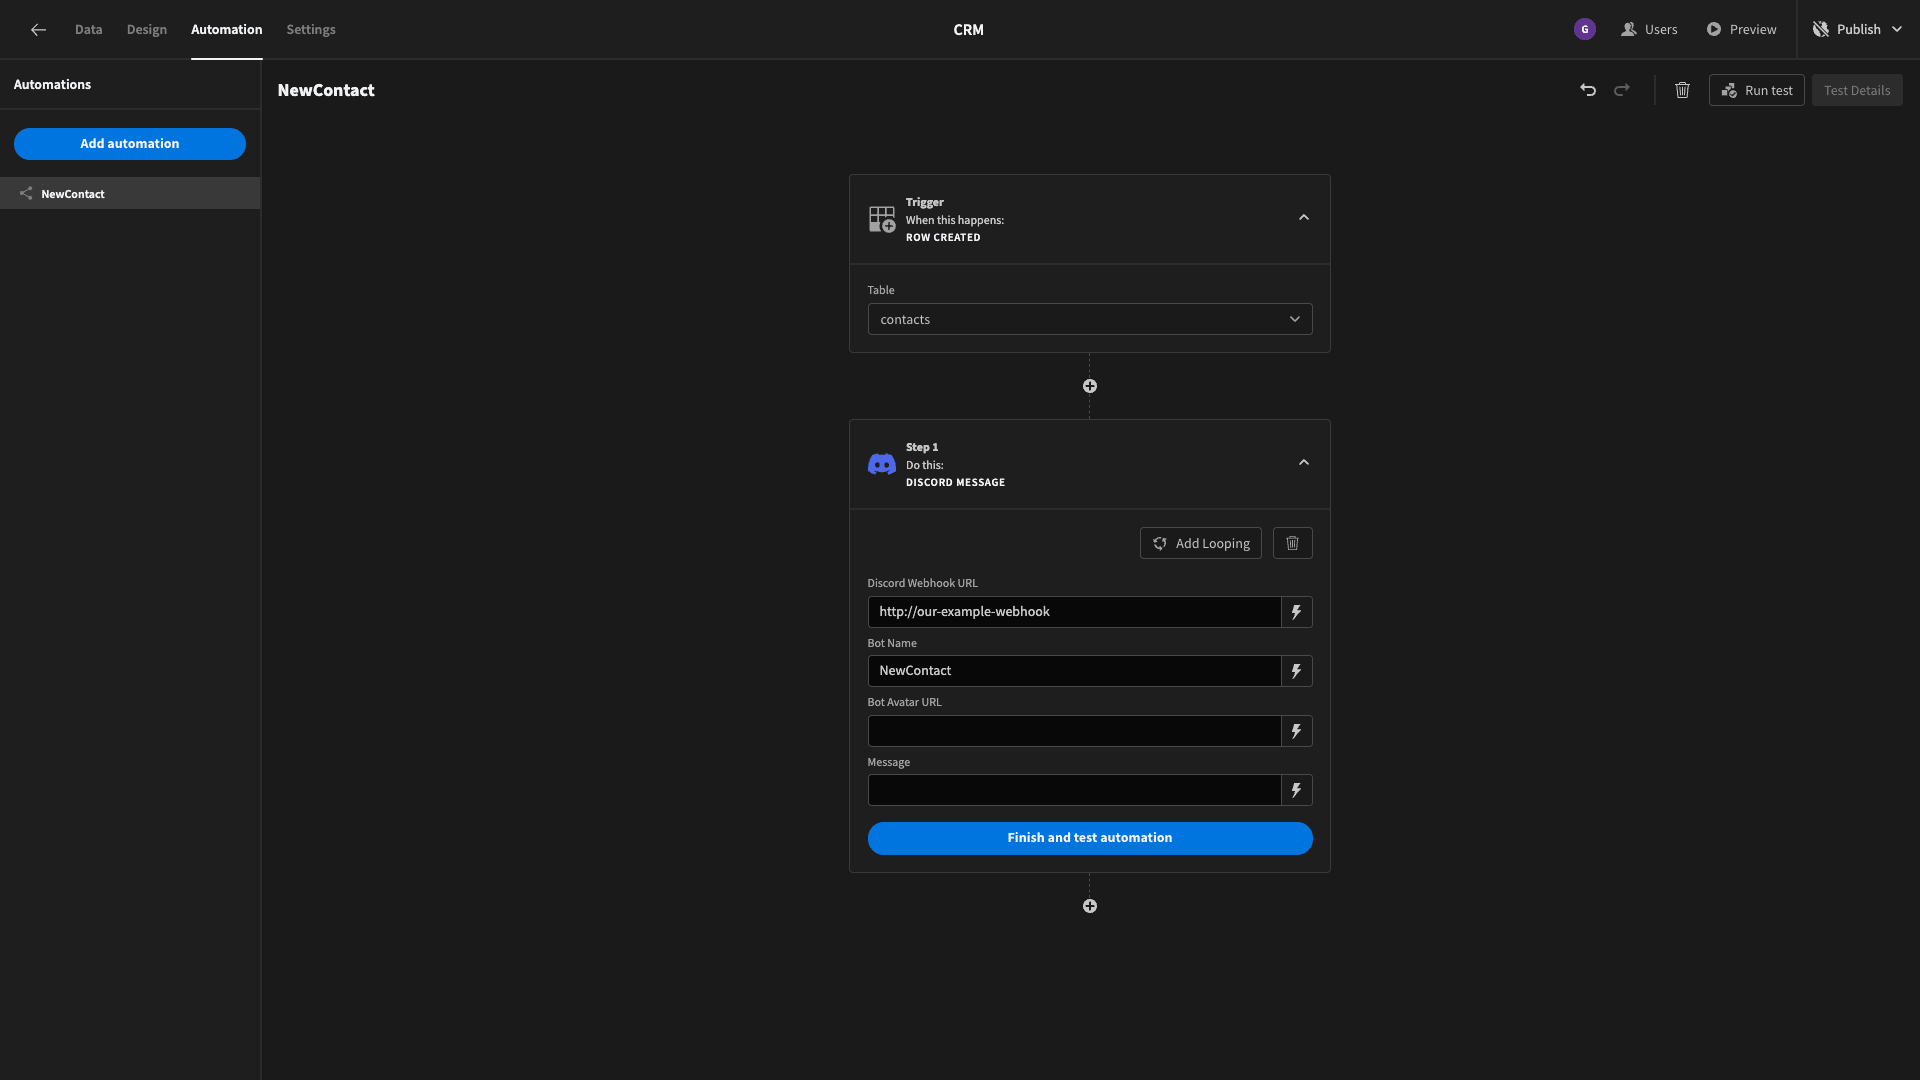
Now, we need to define what happens next. Luckily, Budibase has built-in automation actions for messaging tools like Discord and Slack. So, we’ll add a Discord action:
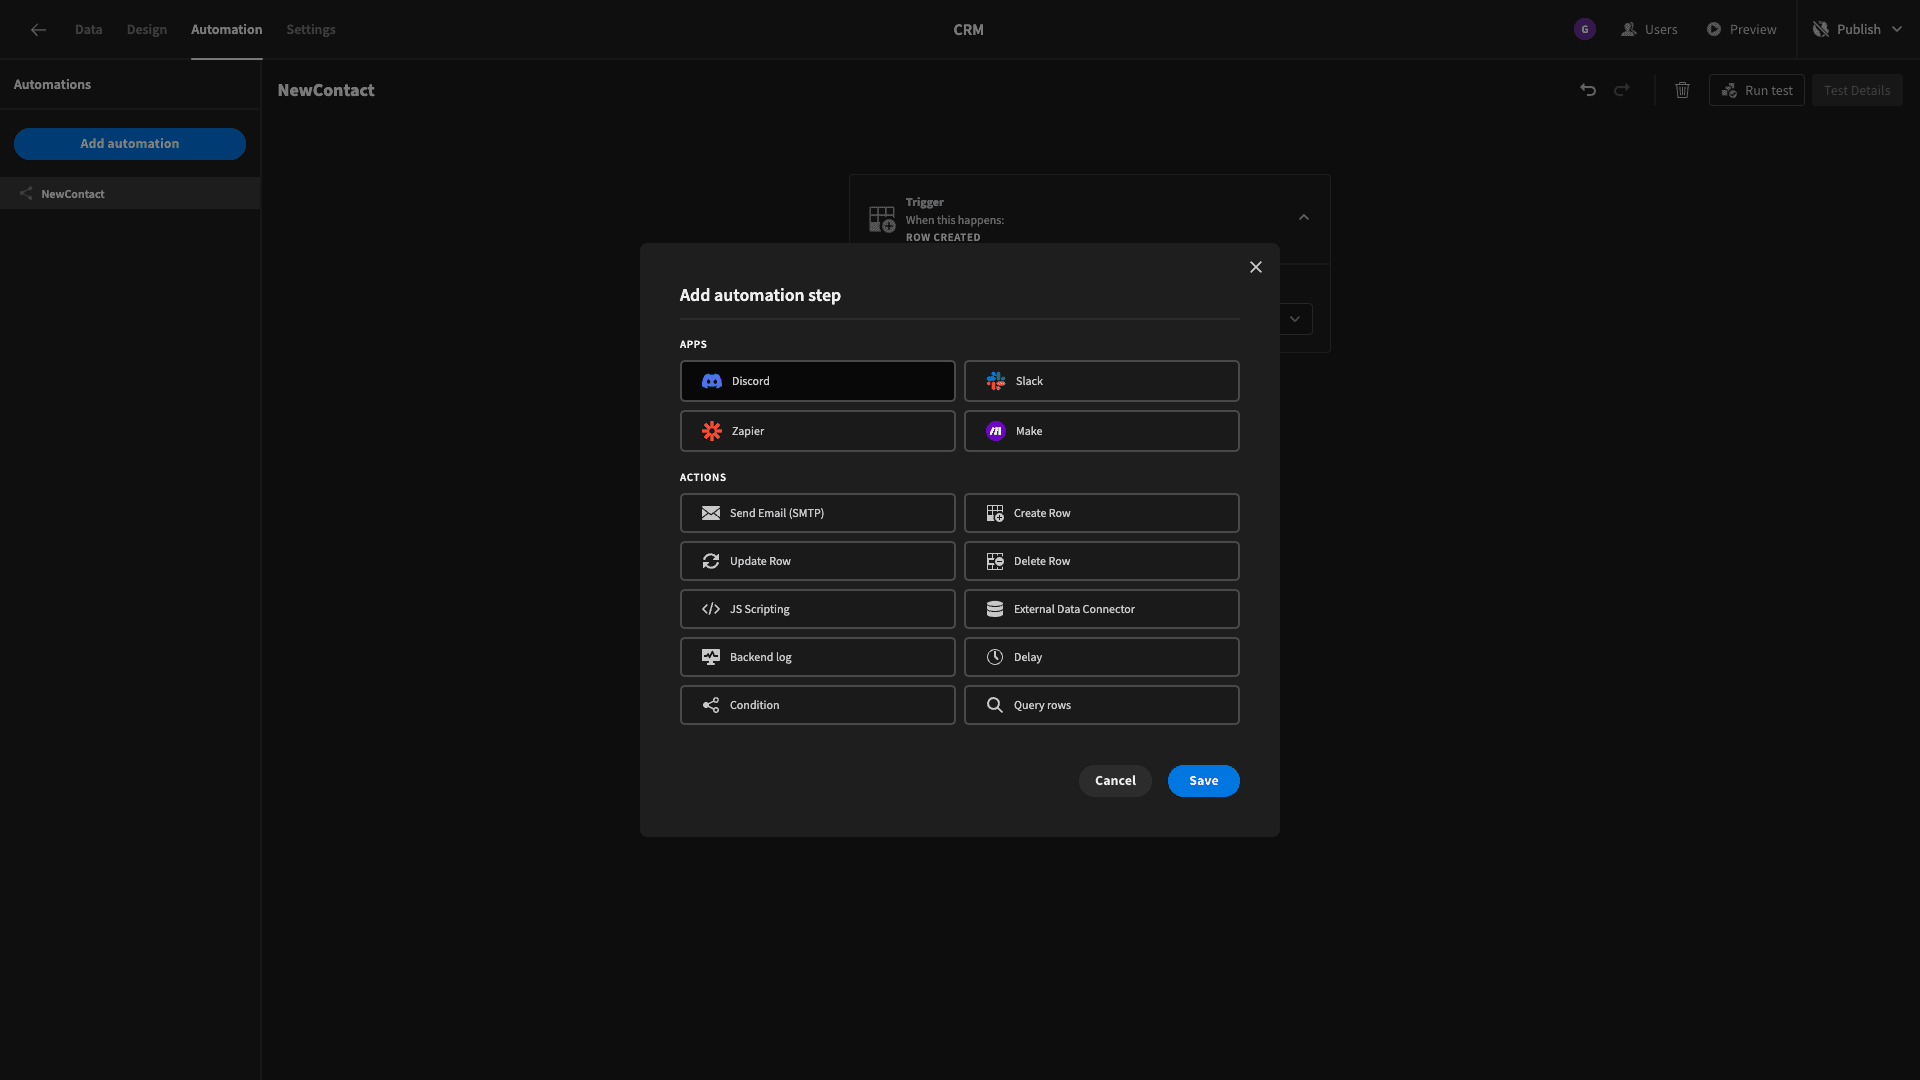
At this point, we need to head over to a Discord server where we have admin permission and create a WebHook to post inside whichever channel we want our message to go.
For the sake of demonstration here, we’ll use the following URL as a dummy webhook:
1http://our-example-webhookWe can paste this into the Discord URL field of our automation action, as well as giving our new bot a name:
Then, we can open up the bindings drawer of the message field and input whatever message we want to be sent when a user submits their details:
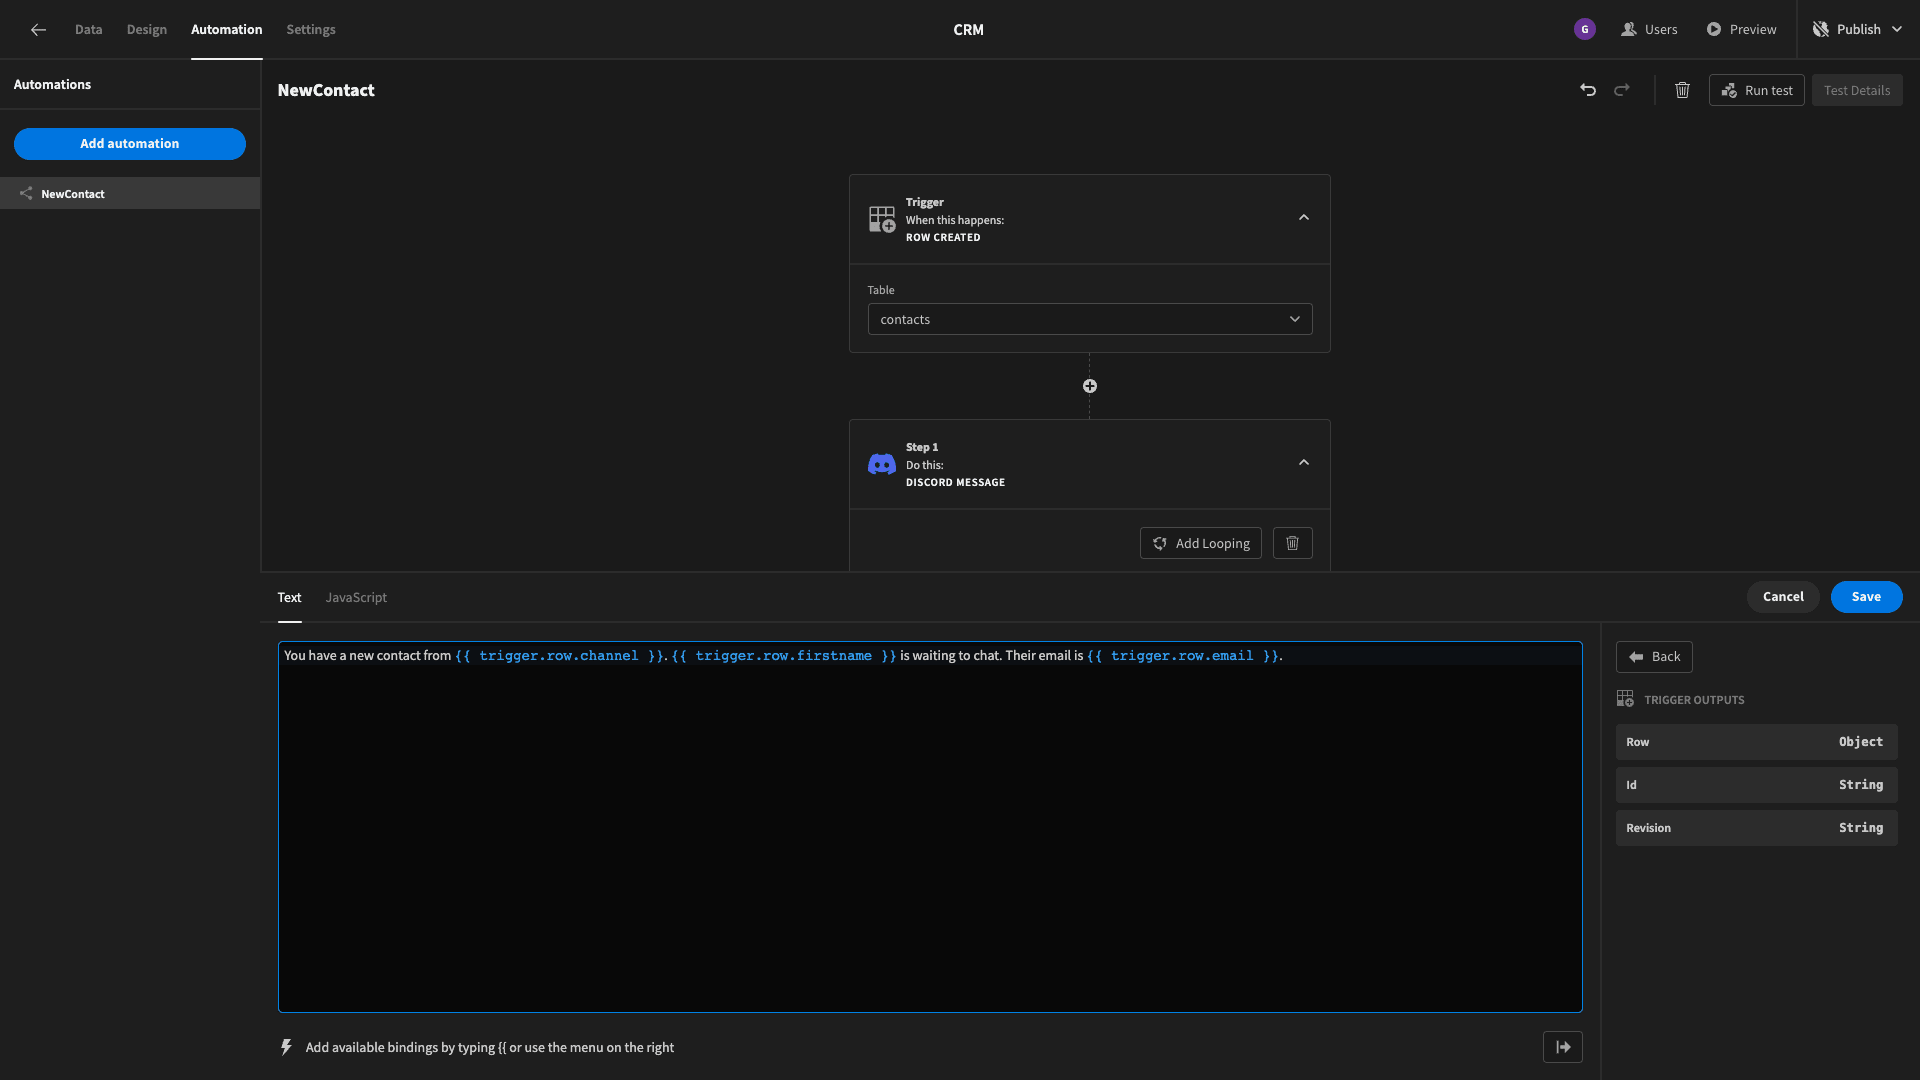
We’ve used three bindable values from the trigger row to populate the lead’s channel, first name, and email address. So, the full message is:
1You have a new contact from {{ trigger.row.channel }}. {{ trigger.row.firstname }} is waiting to chat. Their email is {{ trigger.row.email }}.Once you’ve tested your automation and you’re satisfied that it works, you need to publish your app for it to go live.
And that’s our lead capture form completed.
You might also like to check out our in-depth guide to form UI design for some inspiration for further customization.
4. Create a new contacts screen
Next, we need to add a couple more screen that are pretty similar to our original opportunities UI. We want to replicate the same design, but basically just populate it with slightly different data.
The first of these will be for our new contacts - leads who have submitted their details, but our team hasn’t reached out to them yet.
To save a bit of time, we’ll kick off by duplicating our existing opportunities screen:
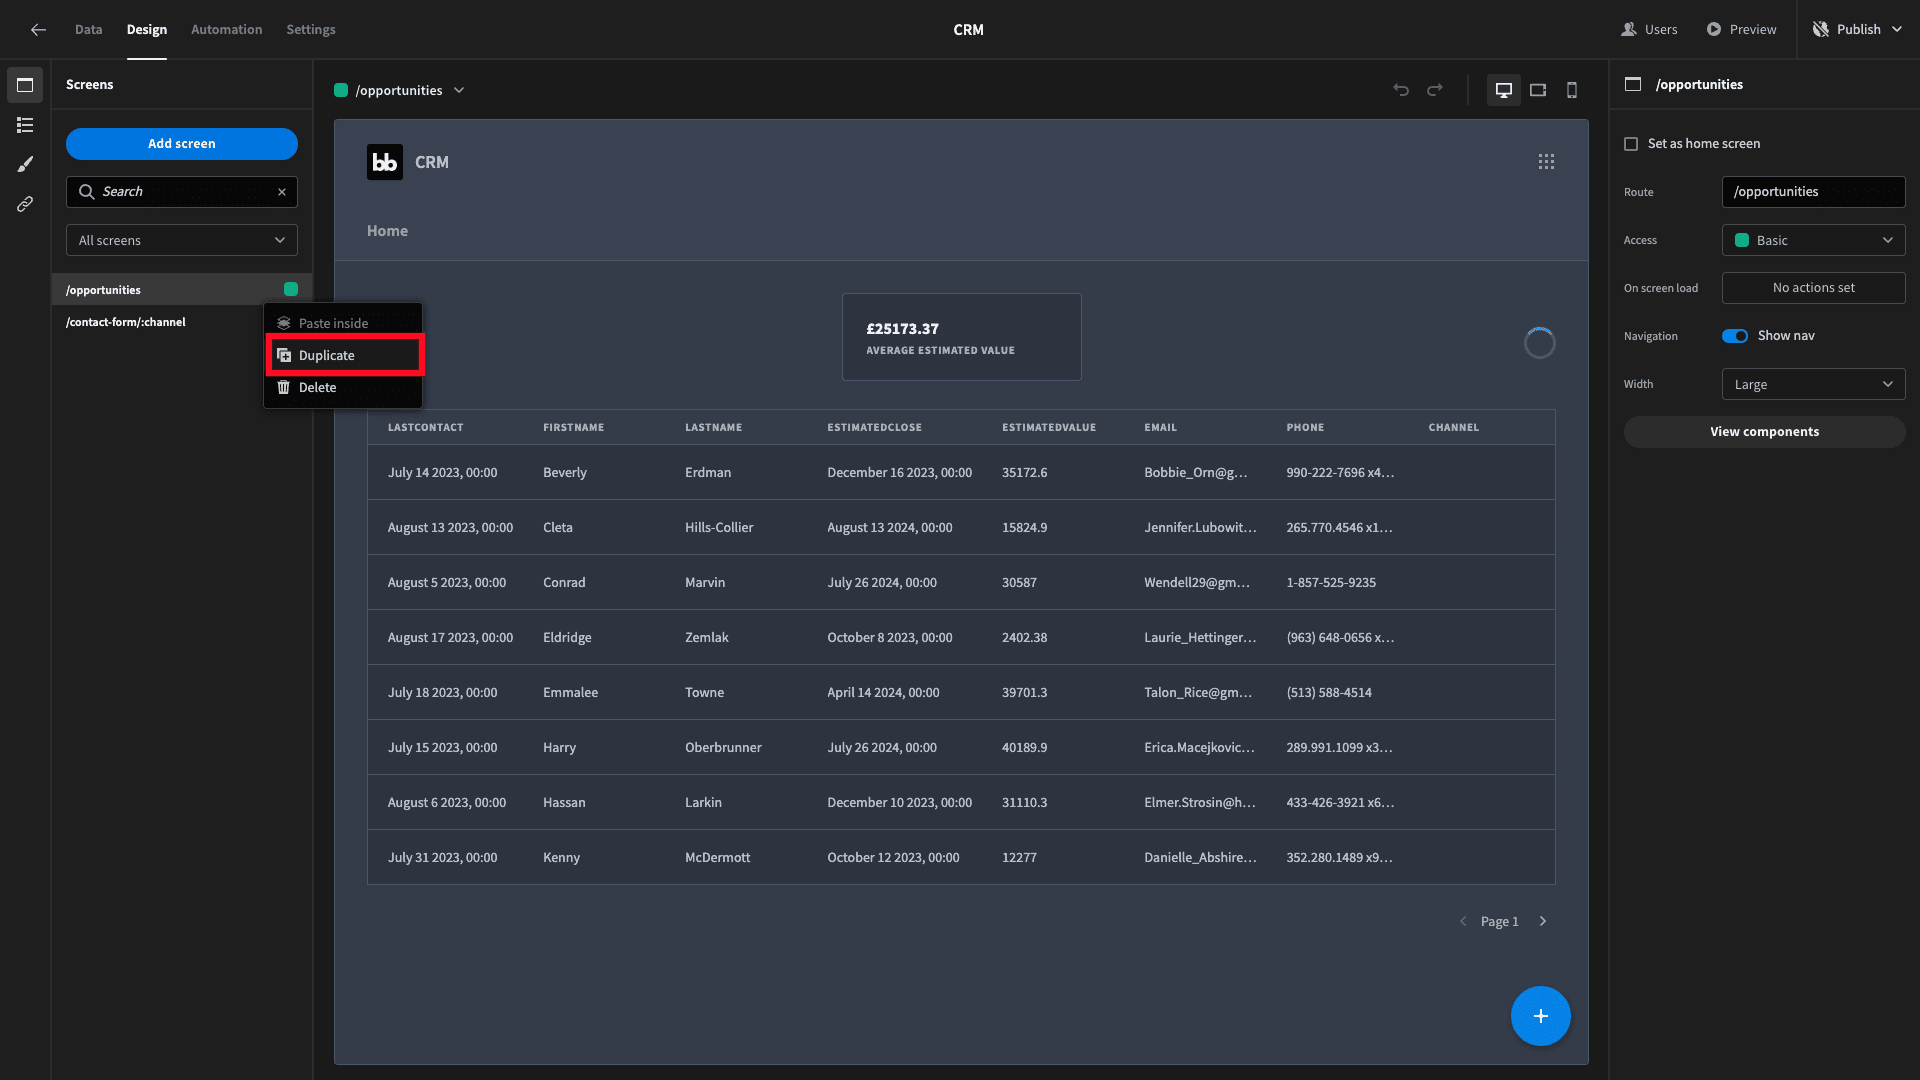
We’ll call this one new leads.
All of the design will be the same, we just need to reconfigure some of the components to populate them with the right data.
The first thing to do is change the filter setting on our table block so that it displays all of the rows with a status attribute that’s equal to New:
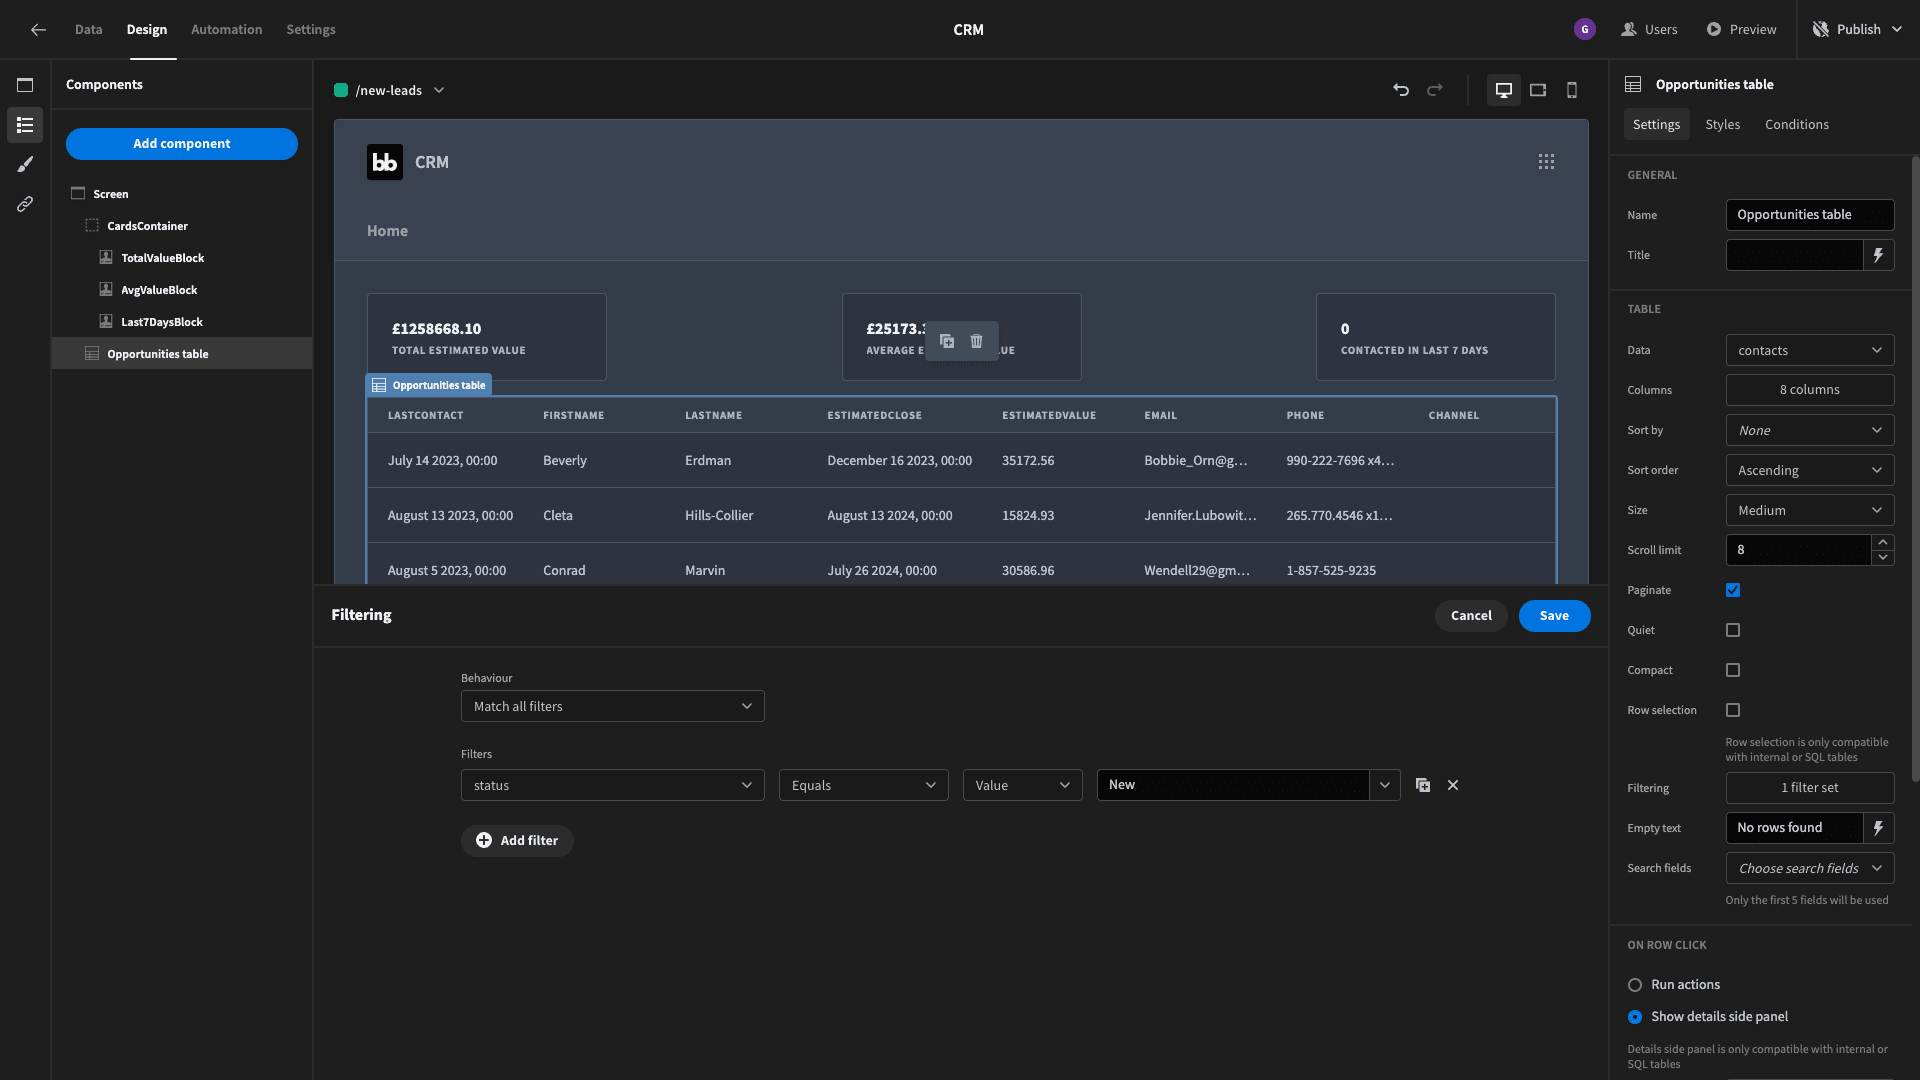
That’s the easy part.
To populate the cards with relevant data, we’ll need a couple more custom queries that filter for status=New.
Let’s head back to the Data section and duplicate our AvgandTotalValue query. We’ll call the new query AvgAndTotalValueOfNewLeads.
And, we’ll simply edit the existing WHERE clause to filter for status=’New’:
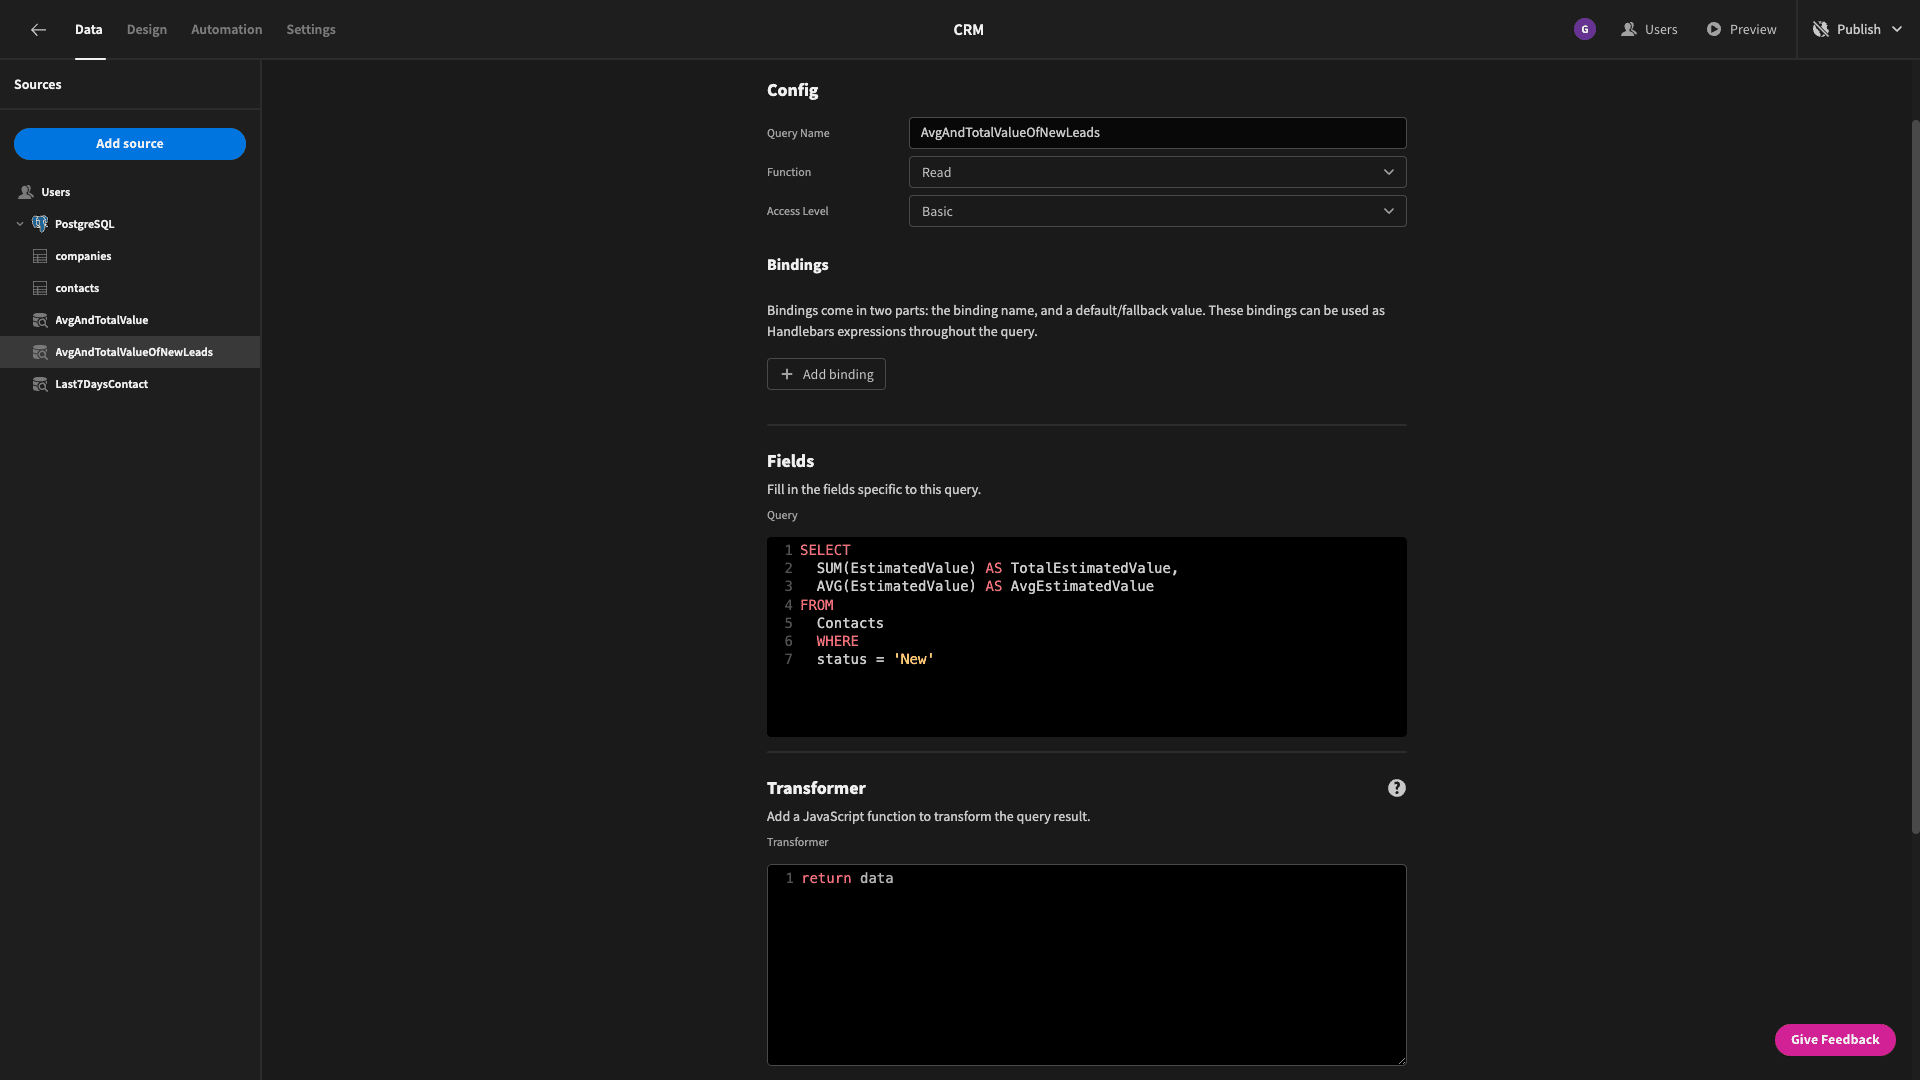
The full query is now:
1SELECT
2
3 SUM(EstimatedValue) AS TotalEstimatedValue,
4
5 AVG(EstimatedValue) AS AvgEstimatedValue
6
7FROM
8
9 Contacts
10
11 WHERE
12
13 status = 'New'Then we’ll do the same thing on our Last7DaysContact query - creating a new version called Last7DaysContactNewLeads.
Again, we’ll simply change the WHERE clause, so that the new query is:
1SELECT COUNT(*) AS RecentContactCount
2
3FROM Contacts
4
5WHERE LastContact >= CURRENT_DATE - INTERVAL '7 days'
6
7AND LastContact < CURRENT_DATE + INTERVAL '1 day'
8
9AND Status = 'New';
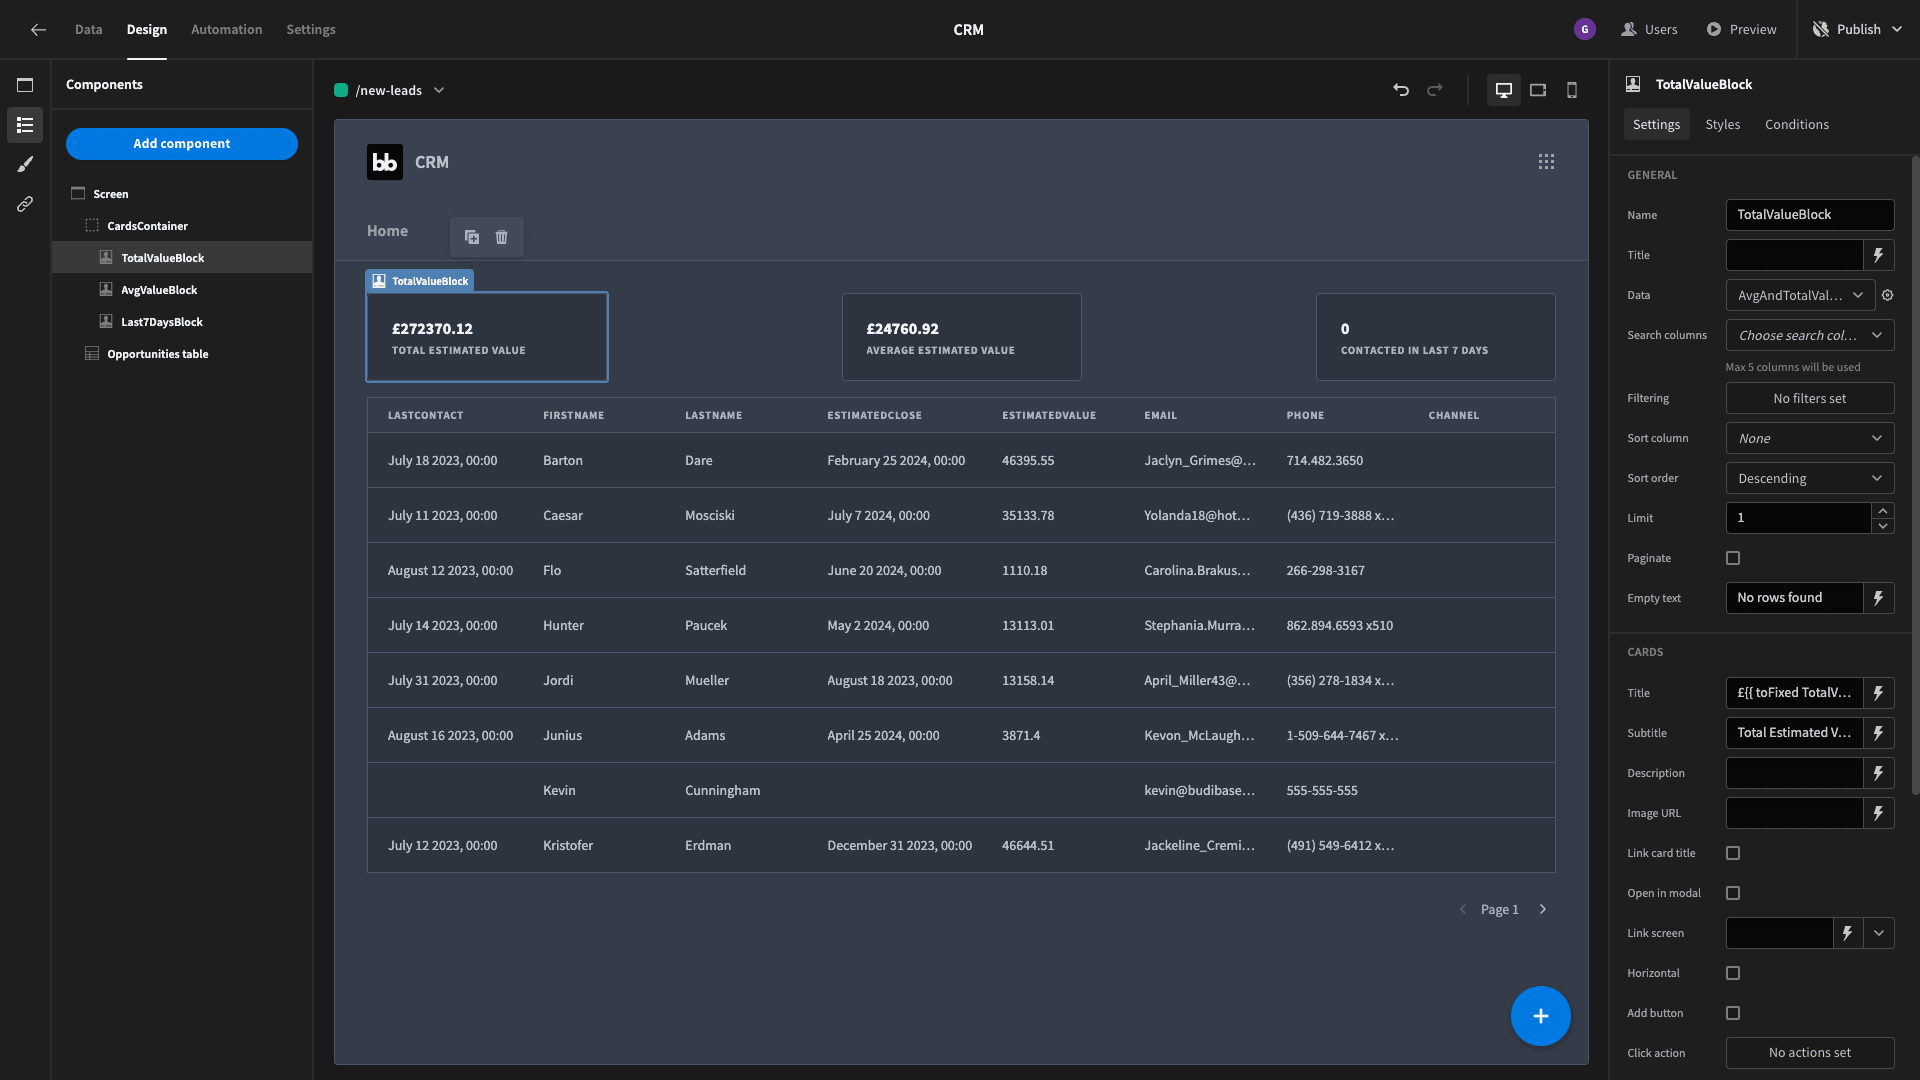
Once both of those new queries are saved, we’ll head back to the Design section. Then, we need to swap out the Data field for each of the card block components to the relevant new queries - giving us:
Adding menu configuration
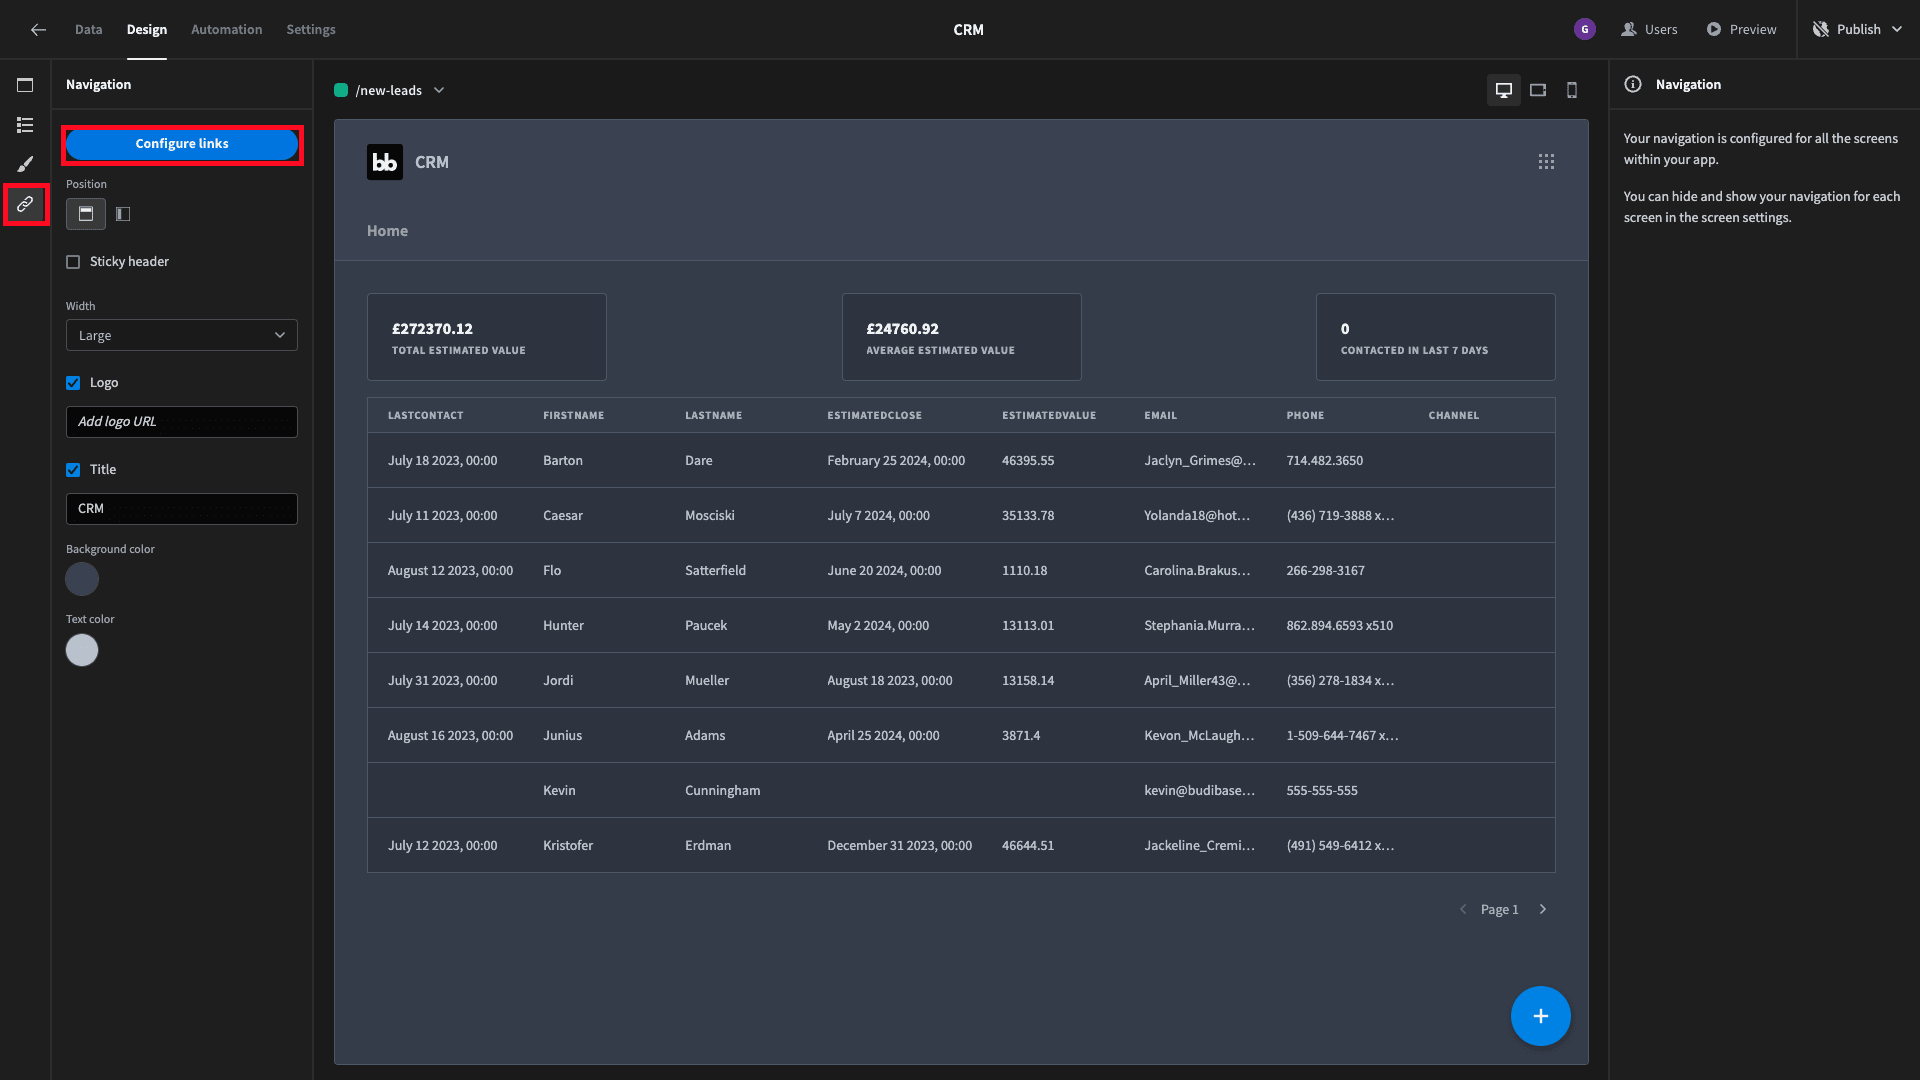
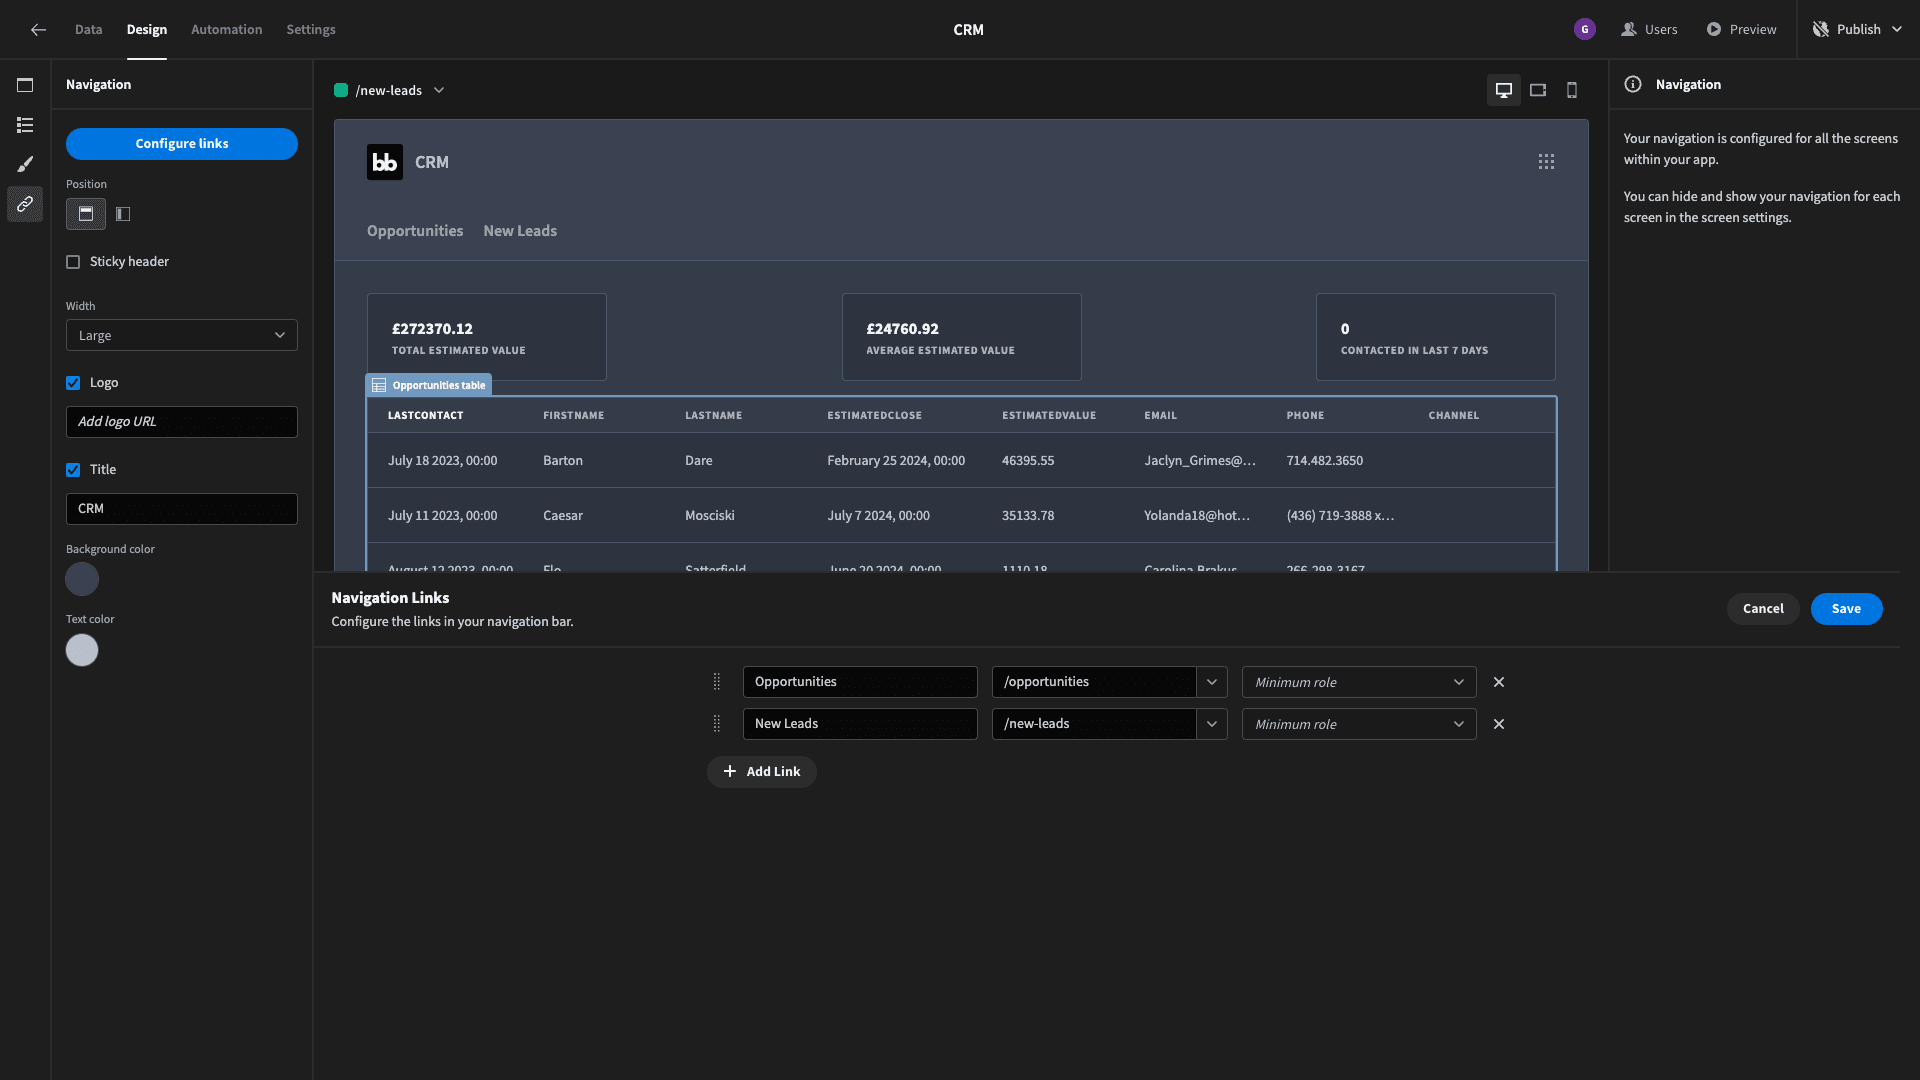
At this point, our internal users can access two distinct screens - so, we need some solution to enable them to navigate the app. To do this, hit the Links icon on the left-hand side and choose Configure Links.
This gives us a bindings drawer where we can choose which pages will appear in our nav menu and how they’ll be displayed:
5. Create a customers screen
Next, we want to repeat this exact same process for existing customers. These are entries on our contacts table where the status is equal to Won. Rather than repeating ourselves, we’ll just quickly list out the steps and then provide you with the specific queries.
So, we need to:
- Duplicate our opportunities screen. We’ll call the new version /customers.
- Edit the Table Block’s filter to display rows where status=”won”.
- Duplicate our two custom queries and update their WHERE clauses to status=”won”.
- Reconfigure our card blocks’ Data fields to these new queries.
- Update our navigation to include the new screen.
We have two new queries to achieve this. The first is called AvgAndTotalValueOfCustomers:
1SELECT
2
3 SUM(EstimatedValue) AS TotalEstimatedValue,
4
5 AVG(EstimatedValue) AS AvgEstimatedValue
6
7FROM
8
9 Contacts
10
11 WHERE
12
13 status = 'Won'And the other is called Last7DaysCustomers:
1SELECT COUNT(*) AS RecentContactCount
2
3FROM Contacts
4
5WHERE LastContact >= CURRENT_DATE - INTERVAL '7 days'
6
7AND LastContact < CURRENT_DATE + INTERVAL '1 day'
8
9AND Status = 'New';
6. Add a dashboard for our home screen
Lastly, we want to create a home screen that will be based around a dashboard for displaying some top-level metrics about our customer data - giving us some helpful analytical CRM features.
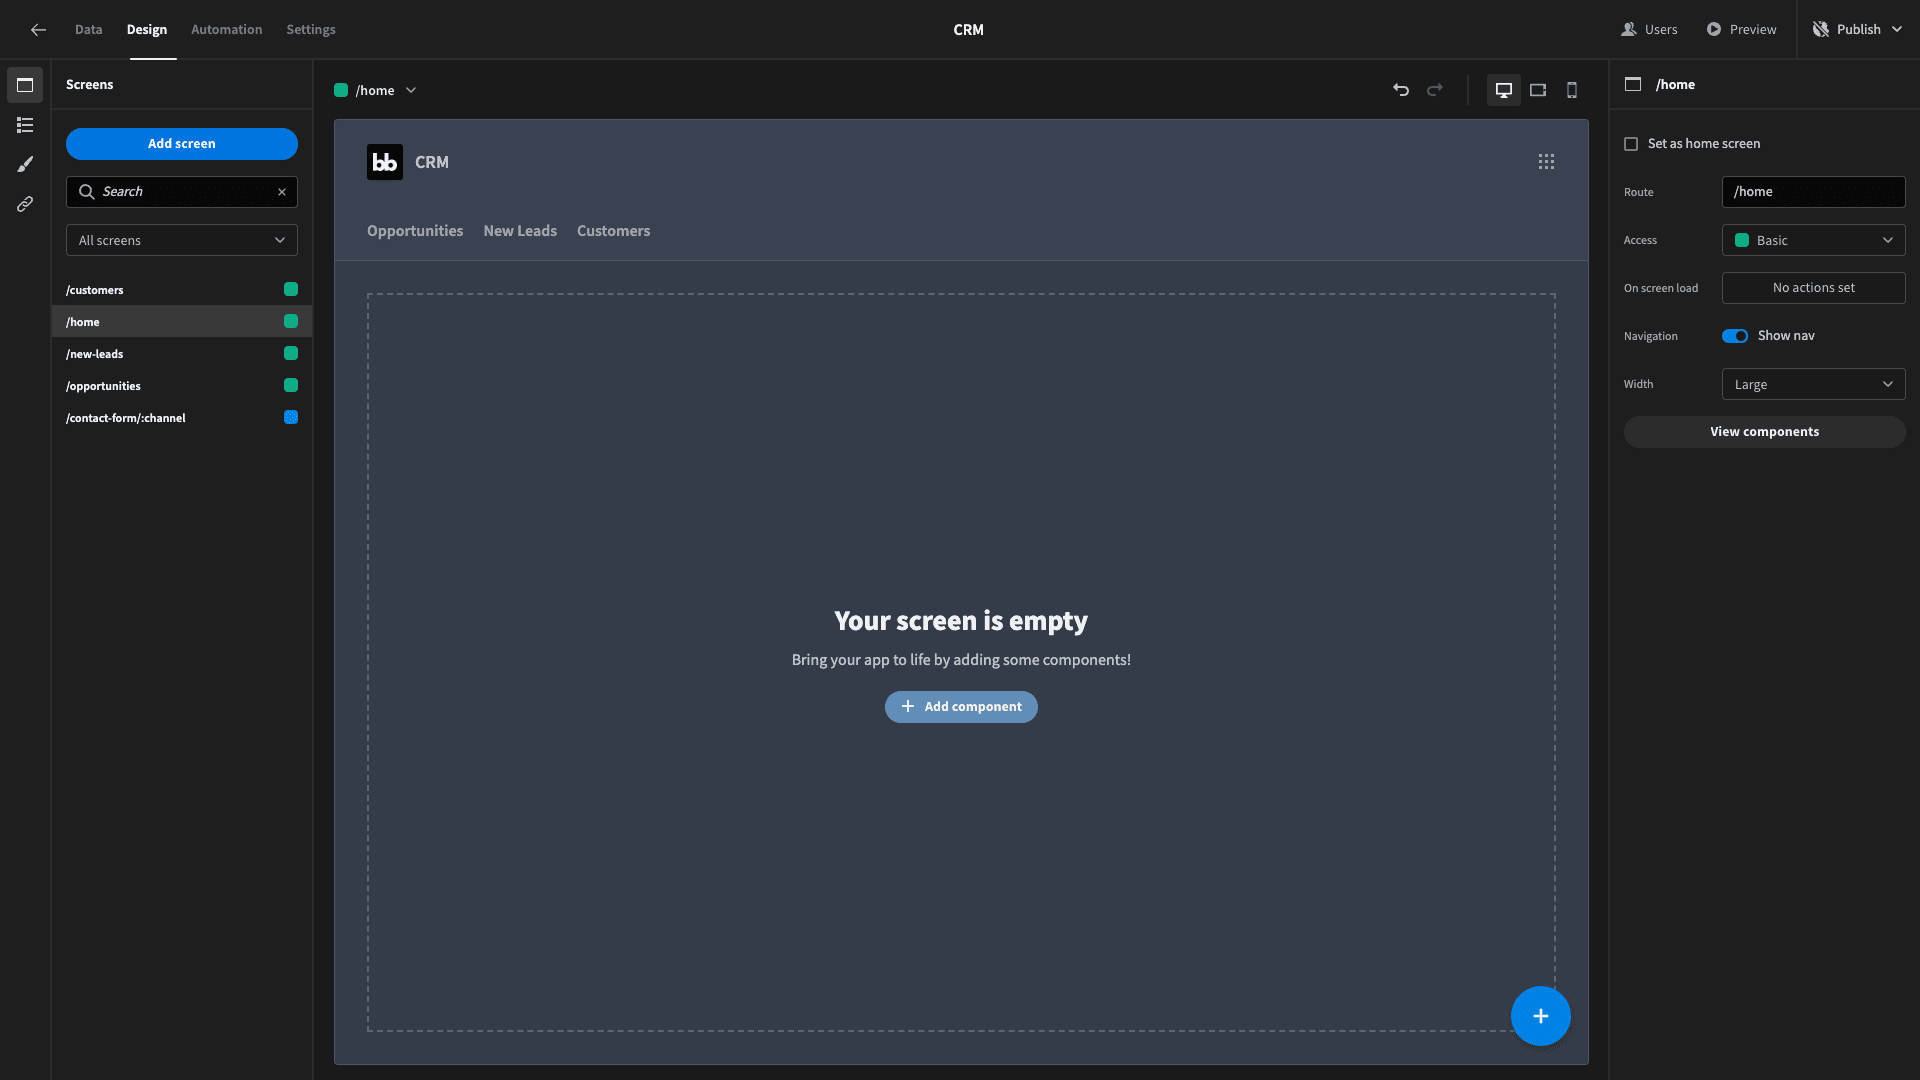
We’ll start by creating one last blank screen and naming it /home:
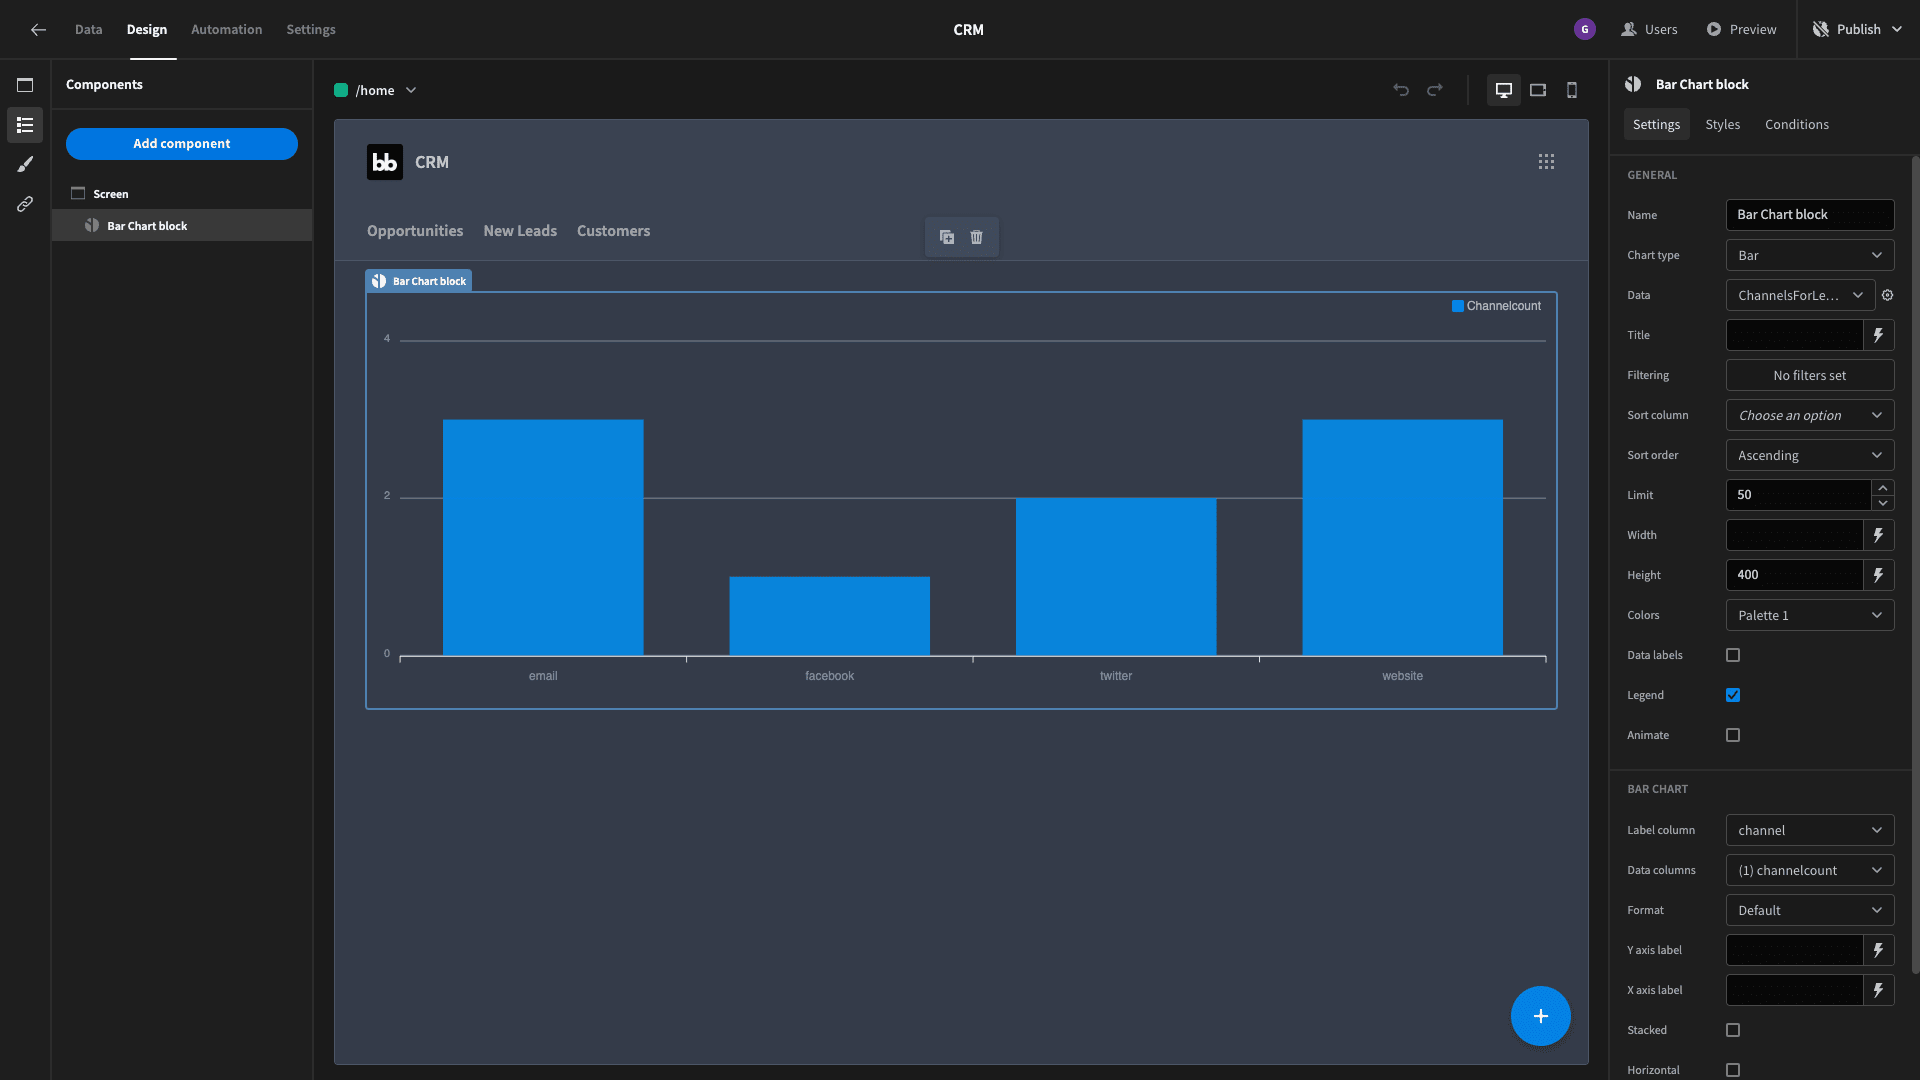
The first part of our dashboard will be a bar graph displaying the different channels that our leads are coming through.
We’ll create another custom query called ChannelsForLeads. The SQL command we’ll use is:
 1SELECT
 2
 3  channel,
 4
 5  COUNT(*) AS ChannelCount
 6
 7FROM
 8
 9  contacts
10
11WHERE
12
13  channel is not null
14
15GROUP BY
16
17  channel
18
19ORDER BY
20
21  ChannelCount DESC;
This returns all of the channels that are assigned to different rows, alongside the number of rows that have each one.
Now, back on our home screen we’ll add a Chart Block, choose the bar type, and set its Data to this new query. We’ll set the label column to channel and the data column to channelcount. This gives us the following chart:
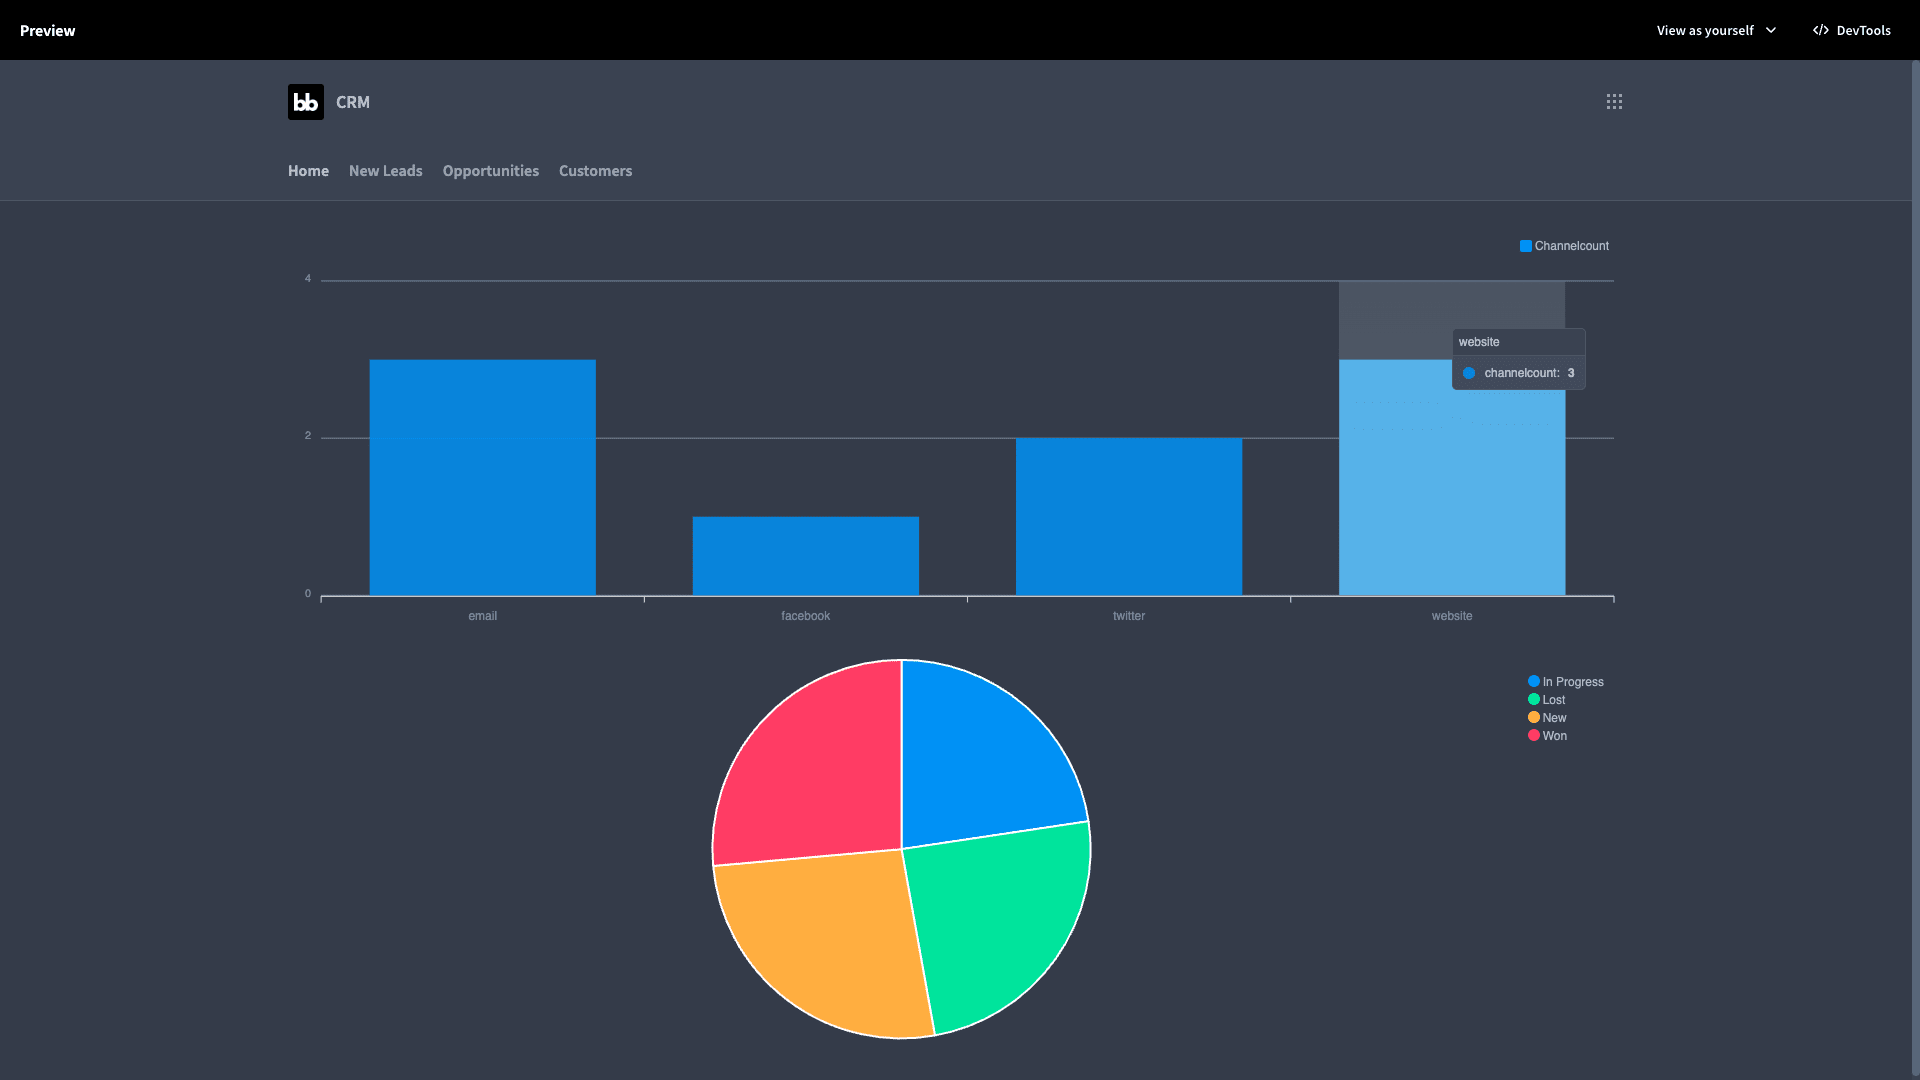
Below this, we want a pie chart that will display a breakdown of all of our current leads by their status.
Again, we’re going to need a custom query. We’ll call this one StatusOfAll. The query is:
 1SELECT
 2
 3  status,
 4
 5  COUNT(*) AS StatusCount
 6
 7FROM
 8
 9  contacts
10
11WHERE
12
13  status IS NOT NULL
14
15GROUP BY
16
17  status
18
19ORDER BY
20
21  StatusCount DESC;
Basically, we’re doing the same thing as before, but this time with the status attribute, rather than channel.
We’ll add another Chart Block using our new query - this time choosing the Pie type. Our label column will be status and the data column is statuscount.
We also our new home screen to the menu and tick the set as home screen box so that authenticated users will land on this page when they open our app.
Here’s what the finished home screen looks like:
How to build a CRM
It’s worth restating that a huge part of the motivation for building a CRM will always be the need the replicate your own unique sales processes.
What we’ve presented today is an illustration of what this could look like.
Using Budibase, you have the power to adapt this however you need - adding your own data, automation rules, interfaces, integrations, plug-ins, and more. You can also choose to host your custom CRM on our cloud platform or your own infrastructure.
To learn more, take a look at our features overview .